“Making of Paragalis – part 1 ” by Marcus Dublin
6. When that’s done I click on the model to start adding new topology lines, creating and connecting vertices along the way.
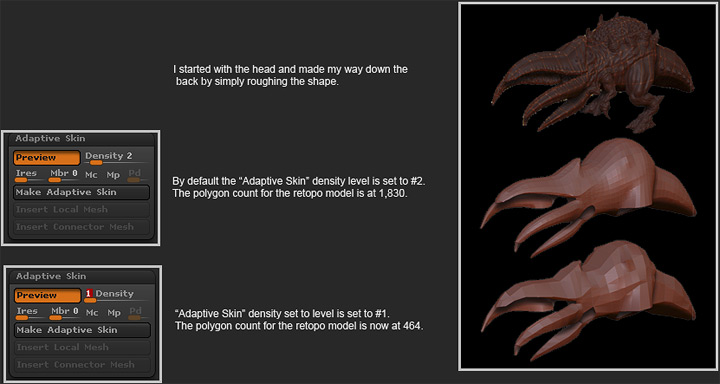
At this point I start creating the vertices that connects the topology lines. You can see from the image below how this works. I started with the head and made my way down the back by simply roughing out the shape. I try not to worry about edge flow and tight detail in the early going; I simply concentrate on all of the big forms. Once I have the new topology conformed to the mesh, I then begin to tweak the vertices and edges for better edge flow. You should always keep in mind that the new topology would be used for a low poly model, so try not to concern yourself with a perfect shrink-wrap! All you need is enough new geometry that you can modify in your 3d application. Another cool thing about Zbrush is Adaptive Skin, you can pretty much cycle through higher and lower subdivision levels by adjusting the slider. What this means is that you can comfortably build your new mesh at a higher subdivision level and reduce it on the fly when you’re ready. When the mesh is completed I simply hit the “A” button to look over my mesh, then I go to the tool palette and export the new geometry.
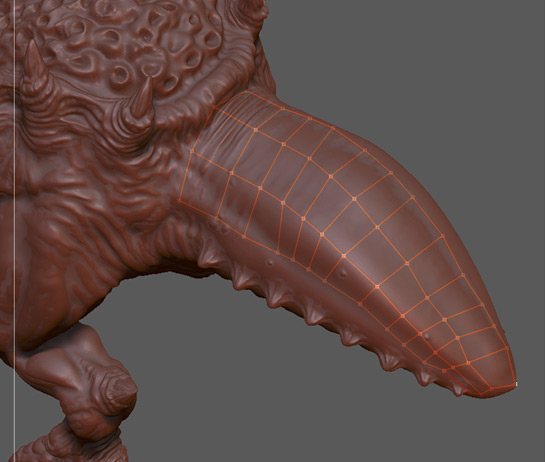
At this point I start creating the vertices that connects the topology lines. You can see from the image below how this works. I started with the head and made my way down the back by simply roughing out the shape. I try not to worry about edge flow and tight detail in the early going; I simply concentrate on all of the big forms. Once I have the new topology conformed to the mesh, I then begin to tweak the vertices and edges for better edge flow. You should always keep in mind that the new topology would be used for a low poly model, so try not to concern yourself with a perfect shrink-wrap! All you need is enough new geometry that you can modify in your 3d application. Another cool thing about Zbrush is Adaptive Skin, you can pretty much cycle through higher and lower subdivision levels by adjusting the slider. What this means is that you can comfortably build your new mesh at a higher subdivision level and reduce it on the fly when you’re ready. When the mesh is completed I simply hit the “A” button to look over my mesh, then I go to the tool palette and export the new geometry.
Well that’s it from the Zbrush aspect of things; I could have continued building out the new mesh by repeating most of the steps mentioned above. Instead I’m going to move into the 3ds max / Polyboost workflow and demonstrate a few of the tools features.
3ds Max / Polyboost retopology Workflow
Before going over this method I wanted to talk a bit about Polyboost. Polyboost is a max script that features a number of handy tools for modeling, texturing, UV mapping, transforming, selecting, etc. Unfortunately it’s not a free max script but I will tell you that I find it extremely valuable and have incorporated it into daily my workflow. That being said I highly recommend this to artists who want to get a little more mileage out of 3ds max! By the way you can view some of the additional Polyboost features on www.polyboost.com
This is a brief overview on how I get started rebuilding topology in 3dsmax, which in turn will feel a bit like the Zbrush 3.1 workflow. Only now I’ll be working with a much lower triangle count source mesh. Once I was happy with the high poly mesh I proceeded to go down a few sub division levels and export it at a level 3ds max can handle, the midlevel mesh that was exported came in at 66,048 triangles. The cool thing is that the midlevel source mesh carries all of the silhouette detail needed for me to start building around. That being said you can see from the image below how the selected tools in Polyboost work. The main tool that I’ll be using is “PolyDraw”. Under PolyDraw are a number of sub tools that I’ll be using as well, mainly the “PolyTopo” brush and the “Build” tool. I selected the tale and hide the rest of the mesh so that you can see how the tools work.. Here are the steps involved:
1. I make sure to set my “Drawn on” to surface mode. The “Surface” mode allows me to select an object with the “Pick” button so that I can draw on the surface of that object.

Making of Paragalis – part 1
Popular Tutorials
-
 Free set of photo references for our members
Posted on Nov 15, 2010
Free set of photo references for our members
Posted on Nov 15, 2010
-
 Photo References
Posted on Oct 6, 2010
Photo References
Posted on Oct 6, 2010
-
 Modeling Competition
Posted on Dec 10, 2010
Modeling Competition
Posted on Dec 10, 2010
-
 Modeling a High Definition Building – part 1
Posted on Dec 9, 2010
Modeling a High Definition Building – part 1
Posted on Dec 9, 2010
-
 FREE photo reference sets for you – only for registered members
Posted on Oct 2, 2011
FREE photo reference sets for you – only for registered members
Posted on Oct 2, 2011
Try something new

Latest Comments