“Making of Paragalis – part 1 ” by Marcus Dublin
Step Three: Subdivide smooth Test
Once I’ve completed the base mesh I then run a few tests, mainly 3ds max “turbo smooth modifier”. As a rule of thumb I always make sure that my quad based models can withstand a turbo smooth. This is important since this’ll give me a heads up on how it’s going to smooth in either Mudbox or Zbrush, not only that but I can also look out for any weird pinching in obvious areas.

Step Four: Preparing for Export
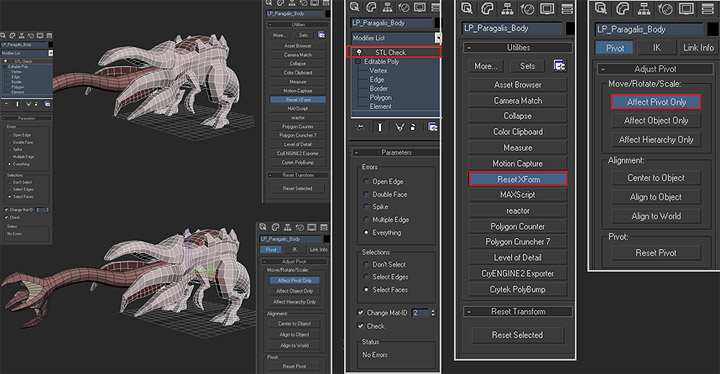
After I finished checking the base mesh for any smoothing oddities it’s time to get it ready for export. I’m pretty paranoid about errors like double faces, multiple edges, holes, etc. Due to this I make sure to run 3dsmax “STL check modifier”, this will instantly highlight any errors my base mesh contains. Once the modifier has been run it’s time to “Reset Xform” which basically resets all transforms made to my base mesh. Last but not the least is setting up my pivots, I tend to center my pivots to the object and then adjust it to a comfortable position. The reason for this is so that both the pivots in my modeling app and sculpting app match up. I find this to be helpful when working with multiple elements, for example a space marine with lots of separate gear.
Step Five: Model Export
This step is pretty easy as you can see the settings that I used from the screen shot below.

Step Six: Model Import
This is pretty self-explanatory much like the export step but I did want to highlight the fact that I name my separate elements! I think it’s a good habit to get into when dealing with multiple objects. Once both objects are in my sculpting app I then subd the mesh to a workable density level.

Step Seven: Creating the Reference sheet and Paint Over
I find that it’s important to gather your reference materials even at this early stage and create what’s called a “Material callout sheet”. Generally this sheet is created before the texturing stage but comes in handy when you have to sculpt as well. I can’t stress this enough but it’s always good to be prepared and have some sort of reference handy! I see way to many artists pulling out detail from thin air without any real appreciation for the surface their trying to simulate. With that said, the sheet should have a healthy mix of photos and illustrations. While the reference sheet isn’t written in stone it’ll serve as an initial guide for you and or client, art director, etc. The last thing I wanted to address was the teeth; I kept them separate since they would just get in the way of my sculpting. Imagine trying to work up to nice level of detail in your sculpt while avoiding rows of little teeth along the way, it’s pretty annoying and it’s always best to leave small details like that off until the sculpt is near completion.

Making of Paragalis – part 1
Popular Tutorials
-
 Free set of photo references for our members
Posted on Nov 15, 2010
Free set of photo references for our members
Posted on Nov 15, 2010
-
 Photo References
Posted on Oct 6, 2010
Photo References
Posted on Oct 6, 2010
-
 Modeling Competition
Posted on Dec 10, 2010
Modeling Competition
Posted on Dec 10, 2010
-
 Modeling a High Definition Building – part 1
Posted on Dec 9, 2010
Modeling a High Definition Building – part 1
Posted on Dec 9, 2010
-
 FREE photo reference sets for you – only for registered members
Posted on Oct 2, 2011
FREE photo reference sets for you – only for registered members
Posted on Oct 2, 2011
Try something new

Latest Comments