“Making of Paragalis – part 1 ” by Marcus Dublin
8. Now that all of my settings are in place I went ahead and hit the “Pick” button . The “Add” targets dialog box appeared and I selected the high poly target mesh, this applied a projection to my modifier stack. As you can see from the image below the cage for the projection is unadjusted and all over the place.
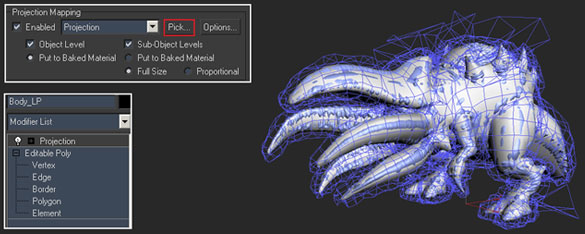
9. My next step was to go into the “Cage Rollout” and hit the reset button to get the things back in order. Now my cage was reset, I went ahead and pushed the amount to around 0.75

10. Now everything was in order, I hit the “Render” button on the Render to texture dialog box.

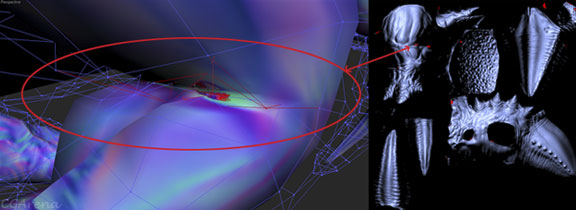
At this point I’m now going to go over my normal bake and investigate what needs adjusting. The reason is no matter how perfect your mesh and cage is, you will most likely have to make some small adjustments to the cage and in some cases the model after the first bake! So you can see from the image below what needed fixing to get rid of the obvious red spots. Now when I say “obvious red spots” I mean parts of the mesh where the cage is intersecting with the low poly mesh geometry. Keep in mind that there are other instances where you’ll have red spots no matter what you do, this is caused by overlapping or intersecting geo, missing faces, missing UV chunks, etc. In Paragalis’s case most of the red spots were due to the cage not being out far enough in certain areas. The only exceptions were the armpit and inner thigh seem. That being the case and I went in and adjusted those areas, you can see an example of one of the trouble spots in the image below.
“Special note”, you can hide the high poly mesh when making adjustments to the low poly mesh. The changes you make will still apply once your finished and you’ve unhidden the high poly mesh!” Now that I’ve fixed my trouble spots I did another render. You can see from the image that I was able to get a cleaner normal map from the second bake, yay! Now that the bake has turned out successful I went ahead and repeated the process for the tongue in a separate 3dsmax file. That being the case you should always try “if you can help it” to create your models in separate elements. This way you can bake out the elements separately from higher resolution source meshes!
Making of Paragalis – part 1
Popular Tutorials
-
 Free set of photo references for our members
Posted on Nov 15, 2010
Free set of photo references for our members
Posted on Nov 15, 2010
-
 Photo References
Posted on Oct 6, 2010
Photo References
Posted on Oct 6, 2010
-
 Modeling Competition
Posted on Dec 10, 2010
Modeling Competition
Posted on Dec 10, 2010
-
 Modeling a High Definition Building – part 1
Posted on Dec 9, 2010
Modeling a High Definition Building – part 1
Posted on Dec 9, 2010
-
 FREE photo reference sets for you – only for registered members
Posted on Oct 2, 2011
FREE photo reference sets for you – only for registered members
Posted on Oct 2, 2011
Try something new

Latest Comments