“Making of Paragalis – part 1 ” by Marcus Dublin
Modeling Application / Retopology workflow
So let’s say you don’t have access to Zbrush 3.1 or cool tools like Polyboost, what do you do? Well in this case you’ll have to shift your workflow to sheer brute force optimizations. This was a workflow that I often used before I got a hold of Zbrush and Polyboost, and to be honest I still use it every now and then. You simply have to export a subdivision level that conforms to the high poly silhouette and begin stripping away edges and faces. I know a number of artists who actually prefer this method and have become very proficient at it. This method takes quite a bit of patience and a mastery of your modeling tools!
There are a number of different tools like “Topogun, Blender, Nex, etc. that also do a good job of building new topology over your source mesh. I guess you’ll have to find out what works best for you and run with it!
Paragalis / Retopology / Optimizing the model:
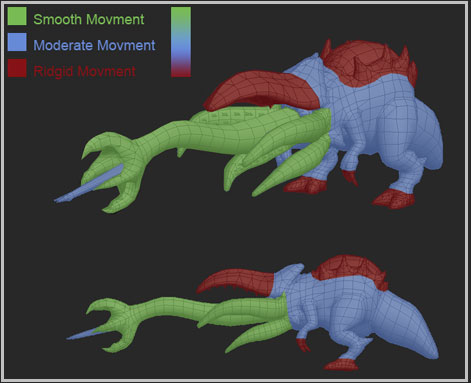
Defining edge loops:
So now that my mesh is almost done I want to highlight areas within the model that require most of the edge loops for posing and animation purposes. Now “I am not an animator” but I’ve worked with enough of them to know what they like and what they don’t. Looking at the image below you can see the areas that required the most edge loops for smoother movement. The tongue, lower tentacles, shoulders, knees, and ankles get an additional loop, or in the tongues case a bunch of them! Since this is a personal project I’m pretty much guessing on what areas require what based on past creature work experience. Had this model actually been created for a production I would have consulted with the animator to see what I could “get away” with in the modeling stage. With that said I’m pretty happy with the mesh as it is and will now move on to matching up the mid level poly and low poly meshes.
Paragalis / Retopology / Optimizing the model:
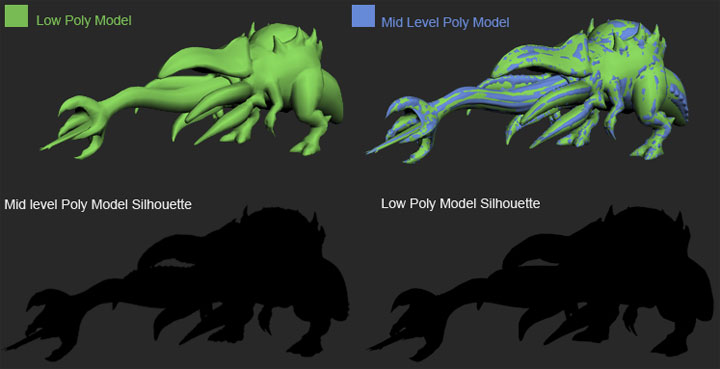
The Final Results:
At this point I go over the mesh one more time, tweaking it here and there making any and all necessary adjustments. You can see from the images below how the low poly mesh matches up with the mid level poly mesh. Once I’m done with my tweaks I then weld all of the vertices and move onto the next step, which would be the UV’s.
Step Ten: Creating the UV’s
Now that my models completed and I can move onto creating the UV’s. Of course before I start cutting the mesh up, it’s important for me to identify what’s going to be mirrored and what’s going to be unique. This is an important step since the final texture is going to be 1024×1024 in size and every pixel counts! You can see from the image below how I broke down the parts of the mesh that have unique space and the parts that don’t. For the most part this creature is mostly symmetrical and I treated the UV’s as such with the exception of the top part of its head, hump back, inside tongue and poisonous barb. The reason I left those areas unique is so that I can add some interesting details within the texture work to break up the symmetry. When it comes to symmetrical creatures I try to have the areas you can’t view at the same time mirrored, and the areas you can view at the same time unique!
Making of Paragalis – part 1
Popular Tutorials
-
 Free set of photo references for our members
Posted on Nov 15, 2010
Free set of photo references for our members
Posted on Nov 15, 2010
-
 Photo References
Posted on Oct 6, 2010
Photo References
Posted on Oct 6, 2010
-
 Modeling Competition
Posted on Dec 10, 2010
Modeling Competition
Posted on Dec 10, 2010
-
 Modeling a High Definition Building – part 1
Posted on Dec 9, 2010
Modeling a High Definition Building – part 1
Posted on Dec 9, 2010
-
 FREE photo reference sets for you – only for registered members
Posted on Oct 2, 2011
FREE photo reference sets for you – only for registered members
Posted on Oct 2, 2011
Try something new

Latest Comments