“The secrets of Swimsuit babe ” by CGriders
2.3 Techniques
Throughout the modeling process, there’re some points to be aware of:
?? Avoid straight lines
?? Avoid regular structures
?? Use enough vertices to describe contours
?? Make lively contours
?? Keep refering to references
Straight lines should be avoided for obvious reason. But what are regular structures? What I mean here are cylinder, sphere or other primitive like structures. Some people make the neck and limbs like cylinders. The edge flow in cylinders does not match the muscle flow at all so they should be avoided. If you use ZBrush to model with its ZSphere technique, it will generate these regular structures. That’s why people have to retopologize the model outside ZBrush. But there is a structure in the body which can be made directly out from primitive. They’re the breasts.
In order to break up the regular structures, one technique you can employ is “spin edge”. It is depicted as follows.

Fig. 2.3.1 Spin edge technique
This is a way to change edge flow so that it’ll match the underlying structure. To quickly execute this action, you can use the script called OMT_to_spinEdge in Open Maya Toolbox (refer to section 6.3 for download URL).
Beware of the contours or outlines you’re making. Keep rotating the model in 3D space to observe the contours. They also govern the density or the polygon count of the model. Contour is composed of vertices. The number of vertices necessary to construct the contour affects their density and thus polygon count. Lively contours are those appear in living things. Try to understand the reason why they appear the way they are. Observe their curvatures and how they change directions. Try to apply the result of your observation in your modeling. There’s no rule for it as contour construction is the major contributing factor for the style of artists. Some drawing books do emphasize the significance of contours and show demonstrations. Refer to those listed in section 6.2.
Always refer to references and instructions in drawing books as much as you can. References can be photos, your body or someone’s body. But they must be of high quality. Use photos of beautiful ladies exclusively. If your body is not beautiful, it cannot be used as reference. Otherwise, the model will likely be distorted from being attractive. An example is the gastrocnemius (back of the lower leg). It is large and prominent in most people’s legs. If you follow those legs, your model will look terrible. A beautiful gastrocnemius should appear slim and is not prominent from side view.
2.4 Head
Model size
I’m going to make an eight-head body (the total length of the body is eight times that of the head). The body to head ratio for a typical woman is seven or seven and a half. If I make it eight, the legs will look a bit longer which is what I want. The body height is about 6 feet which is about 180 centimeters . The height of the head would be 22.5 centimeters . I determine the model size early at this stage because I know that the shader sss fast skin is sensitive to scale. Also take a look at the working unit in preference settings to make sure it’s centimeter.
Image planes
To model known characters, image planes are very important. It’s important to spend enough time on it before moving forward. For a fictitious character, image planes don’t really matter. But I still put up something to get me started. The usage of image plane here is to make sure that the facial features are in proper proportions. The following figure (Photoshop screen shot) shows what I have used.
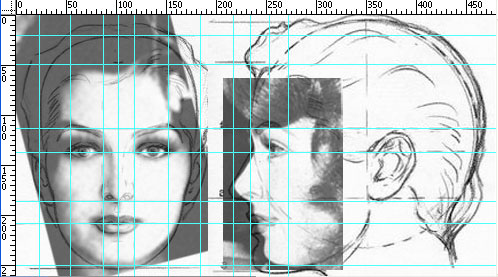
Fig. 2.4.1 Head image plane
The front photo should be chosen with care such that there is no or very little head tilt relative to the film plane, otherwise you’ll be in trouble. Note that the head side photo in Fig. 2.4.1 is not showing the head at its default pose (expressionless pose). It’s a half smile in which the lips are slightly raised and a bit deeper than default. Front and side planes are in the same image so that their scales can be adjusted easier with the help of guides. It is particularly important to adjust the tilt of the head side image according to the slang of the head in the front photo. Guides and rulers are used to measure the relative proportions. The followings are some of the rules:
?? Head width is slightly less than 5 times of eye width
?? Gap between eyes is 1 eye width
?? Nose width is 1 eye width
?? Eye is at half of overall height of head
?? If head is 3.5 units high, brows and underneath of nose are 1.5 and 2.5 units from top of head (ie. nose is half way between brows and bottom of chin)
?? Mouth is at one third the distance from underneath of nose to bottom of chin
?? Width of mouth is equal to distance between pupils for man, shorter for woman
?? Upper lip is slightly in front of the brow’s apex from side view
?? Ear base is half way between forehead and back of head from side view
?? Underneath of nose and tip of lower ear are at the same horizontal level
?? Brows and tip of upper ear are at the same horizontal level
?? Upper side of ear base is at the same horizontal level of eyes
?? Pupil is at the same depth level of corner of mouth from side view
?? Depth of eye is equal to the distance from brow apex to pupil from side view
There’re still a lot more rules in drawing books. Refer to those in section 6.2.


Latest Comments