“Making of Glimpse ” by Toni Bratincevic
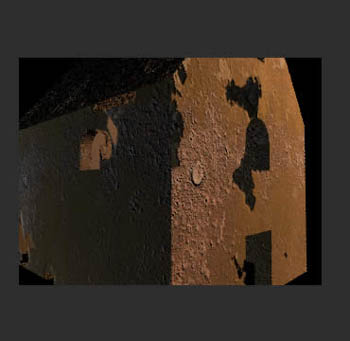
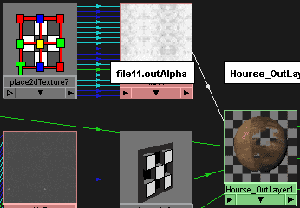
This is the time when the mix picture made in photoshop will be integrated in network. Since this lambert shader will be used as the top texture layer of the house material, I will map the transparency channel with the image from photoshop. One, very important thing that I did in this stage is that I connected the outAlpha of the mix image to the alphaOffset of the image file that I used as the bump map. What this did was that it increased the bump level at the sections where there is white color in mix image, and where there is black, the bump value stays the same. As you can see from the rendered image, the parts that are black in the mix image are transparent, and the edges of that areas are little bumped up. 😉
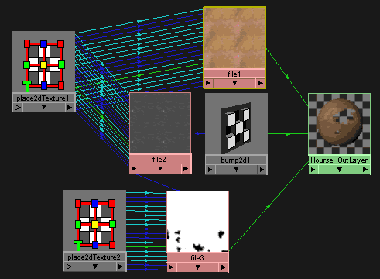
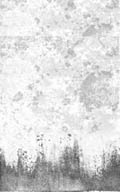
The image I’ve created in Photoshop was mapped to the transparency channel of the lambert shader.
Used tools:Map transparency channel with mix image map…
The result: where there is black in the mix image, the texture will be transparent and where it is white, the texture is visible.
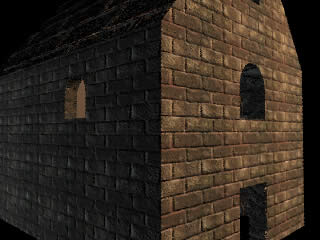
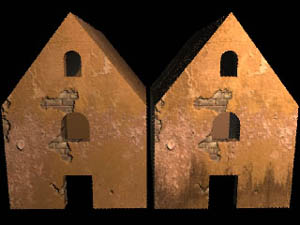
At this stage I wanted to set the material for the surface bellow the main texture. To make things more intuitive I assigned the newly created lambert shader to the whole building model. When I did that the shader that I created before was disconnected from the geometry but it is still there. As you can see in the first picture below, I’ve made the same shading network as the one above, but without transparency. I don’t need transparency since this texture doesn’t have nothing below it. I have also changed the repeat values for this brick texture. After the rendering second picture appeared.
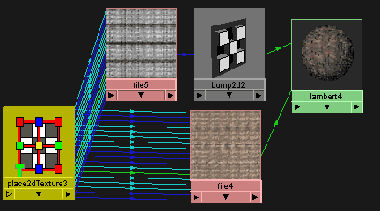
The similar shader was created for the texture that will be below the original texture.
Used tools:Created Lamber shader + image file on color channel + bump map on the bump channel
And the rendering of the bottom layer of the texture…
The last step was to made the mix of the two materials that I’ve created above. The simplest way to do this is to create LayeredShader and to drag the materials from above to the layered shader node. I did just that, created the LayeredShader, assigned it to the house model, then I opened the attribute editor of layered shader and dragged the two materials from above to the layered shader. The material that is transparent must be the first one in the layeredshader, since the transparency of the first shader is used to reveal the material (bricks) that is below.
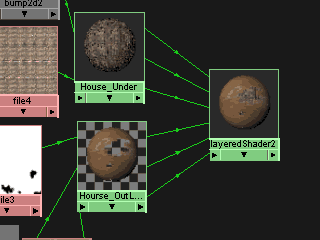
To mix the two textures I’ve created the LayeredShader, assigned it to the building and connected two materials that I created above to it.
Used tools:Create LayeredShader, assign it to the object, drag the two material to the layeredshader. The first material with transparency must be the first one.
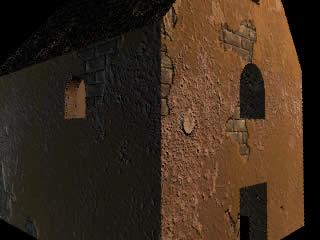
The result of the rendering with both layers.
So, this was the first step in texturing main building part. The same technique was also used for other parts of building. As for the roofs, I’ve done the planar mapping from above and then mapped a simple lambert shader with bump mapping. The UVs for the roof of the tower are made using cylindrical map, and it uses the same texture as for the main roof. Fence was textured in similar way to the house … planar mapping and lambert shader but without mix image. I’ve manipulated the UVs for the planks to get different parts of image texture mapped to it.
One more important thing … if you want to get the realistic textures, then you need to map something on channels like diffuse, specular roll off, specular color and others… Sometimes when the objects are small in picture and it doesn’t take too much attention then the simple fractal mapped on the diffuse channel can do very well. But, in situations where you have the big object that takes a lot of attention, it would be best to paint the diffuse image to get more detailed surface. The effect of using diffuse image is shown in pictures below. The first picture shows the simple shader network with diffuse image mapped to it. The middle image is the diffuse map that I’ve used in this example. I’ve created the image by mixing few textures from 3DTotal textures. Since the diffuse is one dimensional value don’t forget that you need to paint grayscale map. 😉 The difference between the shader that uses single diffuse value and the shader that uses image mapped diffuse channel is showed in third picture. As you can see, the surface material looks more real and not so flat as it was before. If you are creating the metal surfaces then you will probably want to do the mapping on other channels, like specular color, specural roll off, eccentricity and reflection.
The example of image file mapped to the diffuse channel of lambert shader.
The image file used as the diffuse map.
Difference of the shader that doesn’t have diffuse mapped channel and the shader with diffuse image.


Latest Comments