“Making of Glimpse ” by Toni Bratincevic
4. LIGHTING
The last step but not the least is the process of defining the lighting of the scene. I’ve done this with great help of Final Gather from mental ray. If you do not know how to use final gather then refer to my first tutorial on global illumination. 😉 After you read it you will see that the light setup is the same as in the scene from the temple model. That means, only one light was used, and the big sphere was added to the scene which will be used as the indirect illumination source.
So first thing I did is that I’ve set the main light. I had a choice of few light types … the point, spot or directional light, all three will fit as the sun light in this situation but I have used the spot light because it is very easy to position it … I can look through the spot light and approximately know where my shadows will be. 😉 After few tests with global illumination I decided to not go for it, because in this particular situation the final gather will do it’s job pretty good. If this would be the scene where you need the light to be bounced and bounced to get the indirect illumination in the shadowed areas, the global illumination will be something you want. But this is a different story…

The direction of the spotlight when looking through it.
Attributes that I’ve used for the spotlight.
The color of the main light was set to something between yellow – orange color, and I’ve used the Quadratic Decay Rate. After I switched to Quadric Decay Rate I boosted up the Intensity value to 5000. The intensity value is dependent on the overall scale of the scene, but for my situation the 5000 intensity value was the right one. I also played a little bit with Pneumbra Angle and Cone Angle to get the non uniform distribution of the light as you move out of center in spotlight shape.
Now the sky light… no, it’s not emitted from the sky from the final picture. It is emitted from the one big sphere that surrounds the scene (pic1), and it is hidden for anybody except final gather. 😉 This was easy to do, I have just created one sphere, scale it like in the image below so that the scene is inside the sphere. Then in attribute editor of the sphere in the Render Stats section I have turned off the Cast Shadow, Receive Shadow and Primary Visibility. After this, if the light will be placed out of the sphere, it will not block the light since it is not casting shadows, and it will not be visible in final render, but it will be visible to renderer when it calculates final gather. The last step I did was that I assigned the shader to the sphere. As the shader I tend to use the surface shader. I have set the Out Color attribute of surface shader to some dark color, like dark brown (pic2). This will produce the indirect illumination that comes from the sphere and the lighting will look pretty real. 😉
Spherical object used as the indirect illumination source.
Shader used for the indirect illumination source.
Yes, one tip. After you set the color and intensity for the light and the color of the sphere, many times you won’t get the right balance of these two factors, the picture can be to bright or to dark in shadowed areas, so you would probably want to decrease the one value and increase the other value. For example in this image after the first test render I decided to decrease the intensity of the light and increase a color of the sphere. Well, that’s it for lighting. Now the last step.
5. POSTPROCESSING
There are times when I skip the postprocessing part … but since this time I wanted to create the image in sepia tone, and I wanted to put the transparent frame around the picture, the postprocessing step was the next logical move. 😉 There was also the background image that was done in terragen modeler and needed to be integrated in the background of the original rendered image. I use terragen very often when I do a still image with realistic hills and sky.
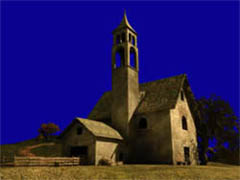
This last step was created in photoshop. I’ve used few layers as you can see from the picture below. The background layer was created in terragen … the camera in terragen was placed so that it aprox. fits the camera direction in the rendered image. Yes, the color of the background has different colors, but since the picture will be in one tone, this wasn’t the problem. The second layer is the image layer, rendered image from maya. The areas, where the blue color is, are transparent, they were only colored because I wanted to show you where transparent area is. If I hadn’t turned off primary visibility value of the sphere that was used as indirect light source, then this blue area would not be transparent…. now you know why I did that at the lighting stage. The third layer is the layer made with noise generator and it’s blend type was set to multiply. This layer was used to make the picture a little grainy. I’ve adjusted the transparency of this layer so that the grain is not visible too much. The fourth layer has a frame, signature and name of the picture … nothing special about it. The fifth layer has constant color over it so that it colorize’s the layers below it. The blending mode of this layer, as you already know ;), is set to Color. For the first and second layer I’ve made a little curve corrections to get a better contrast of the pic.
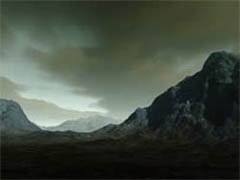

LAYER 01 : background
Background hills and sky was made in terragen (terrain generator). Since this needs to be in back it was placed in first layer.
LAYER 02 : rendered image (normal)
Second layer is the rendered image. I’ve painted the blue color where the image is transparent and the background (layer 1) will be visible.
LAYER 03 : noise (multiply)
Now to add a little noise to the image I’ve created this layer and set the multiply as the blending mode. If there is too much noise, modify the Opacity value.


LAYER 04 : frame (normal)
I’ve tested the image with this frame over in and I liked it so it was used in original image.
LAYER 05 : color (color)
The last layer was used to colorize the image. It is a simple layer with constant color over it with blending mode set to color.
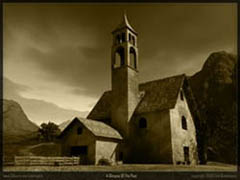
FINAL IMAGE
And this is it. Yes, the original image was flipped horizontally. 😉
And this is the end my friends.. I hope this will be of any use to you. I didn’t have much time so I’ve explained only a few techniques used to create image. These are not complex techniques, but it is something to start with.
Well, good bye till next time…
(c) Toni Bratincevic, http://www.interstation3d.com


Latest Comments