“Making of Glimpse ” by Toni Bratincevic
1. INTRODUCTION

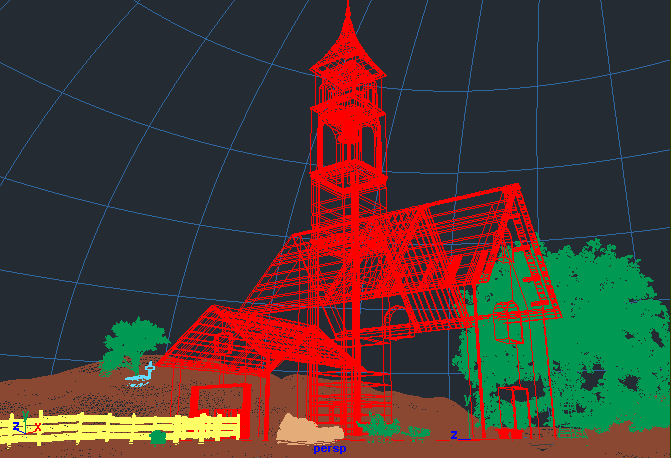
Hi. This is my first tutorial that will cover the process of creating 3D images from my perspective. As an example I will show few techniques that I used in my last work “A Glimpse Of The Past”. As you can see, picture looks quite good and interesting (my opinion, of course 🙂 ) and it’s not so complicated to do, I’ve done it in aprox. 12 hours. The geometry is fairly simple, textures are mostly seamless images from 3DTotal CD Textures and lighting is simple global illumination setup that I’ve described in my Global Illumination tutorial, but I will describe this process again in short words. As for the software, I have used Maya 5.0 for modeling, lighting etc…, MentalRay for rendering (because Maya’s renderer doesn’t support global illumination), a simple terrain generation program that produces great skies named the Terragen was used for the background, and at the end Photoshop for texture painting and postprocessing the final image.
So where to find an inspiration for your projects? Well there is no recipe for that, if you want to start from somewhere I recommend the sites that have a lot of photographs, like PhotoSig or DPChallenge or Environment Textures. My idea came from one picture that I’ve found on one of those sites. It was a photography of one old church in mountains. The image made a special emotional touch to me, and there it was. After an hour of thinking I decided to go for something different than original picture. My decision was to made the image older, with sepia tone, to add some trees in it and to make a small grave in the back to invoke a feeling of sadness in viewers. So that’s it, I started to work on it…
But just one thing before you start… you need to be familiar with maya to easily pass through this tutorial. I recommend, if you haven’t done that yet, that you read maya manuals. You will need the knowledge of how to use polygonal tools, the UV tools and how to build simple shading networks. Since I don’t want to write complete book on this topic, I will cover only few things in process of modelling-texturing-rendering that I think it would be useful.
2. MODELLING
As you can see in the picture below the models in this scene are fairly simple. Don’t worry about the trees, they can be easily created using paint effects. 😉 As for the building and fence, I’ve used the polygonal modeling from start to end. Why did I used polygons …. well they are easy to manipulate, with only few steps you can cut, extrude or do some bollean operations on them and you can create the nice UV map for texture painting.
For start, I’ve created three polygon cubes, one for each part of the building (pic 1 below). At this time it was crucial to scale and place them properly to get the right proportions. After that I’ve selected the bottom polygon for the main part of the building and used the extrude tool two times to get the hole in the building (pic 2). I have also done that for other two parts of this building. The next step was to cut the small and large building through the middle, and the tower will be splited in horizontal way four times (pic3). After the split, I have manipulated some points to get the right shape for these three parts (pic 4). So for these few steps I’ve used Create Polygon Cube, Cut Faces Tool and Extrude Face + point manipulation after the extruding and cutting.
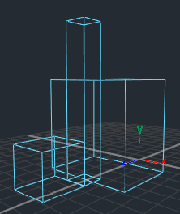


Created polygon cubes, transformed to fit the proportion of the building parts.
Used tools:Create > Polygon Primitives > Cube+ Move and Scale tools
Extruding bottom parts of the cubes to get the hole (walls?) in these three cubes.
Used tools:Edit Polygons > Extrude Face
Cutting the polygon models to create the roof and the scaled part in the middle tower.
Used tools:Edit Polygons > Cut Faces Tool
Now the roofs. They are pretty simple to do … I’ve done it by creating one polygonal cube (pic1), which I scaled and translated to the position where the roofs ends will be. After that I’ve used the cut faces tool to cut the cube at the center. Now all I did is that I transformed the points to its positions … moved the middle points along Y axis. Then I’ve selected the points on the both side of the roof and transformed them so that the roof has a constant thickness along them.
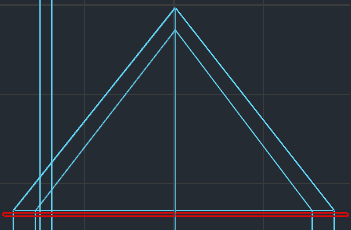

Polygon cube was created. Then moved and scaled.Used tools:Move Tool and Scale Tool
Cutting in the middle of the cube and editing points to get the right shape.
Used tools:Edit Polygons > Cut Faces Tool and Move Tool


Latest Comments