“Making of Glimpse ” by Toni Bratincevic
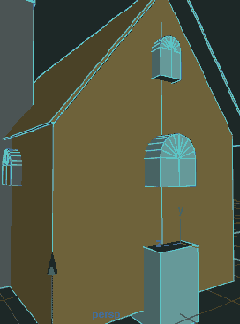
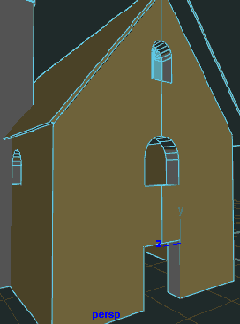
The windows are also simple to do. For this I needed a help of the boolean difference operation. For the door I’ve used simple polygon Cubes which I’ve transformed to the right place (pic2). As for the half-arch windows I’ve created them from Polygon cylinder object. After I created it, I’ve increased the subdivision of the cylinder to get the smoother result when I drill the window in the main model. Next step was to manipulate the points of the cylinder to get the shape that I needed. You can see this process in first picture below. The model on the window was placed on the front of the building model so that it intersected with it (pic2). It was also duplicated, scaled and placed to the positions where I needed two other halfarch-windows. The last step was to do the difference boolean operation… so I just selected the main body model and window and done the Boolean Difference. I did this for all windows and door, and there it was. 😉
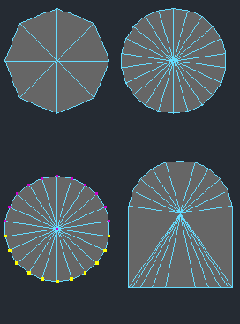
Creating cylinder to cut window. Increasing subdivisions. Then scale and move selected points in y axis until they become flat.
Used tools:Create > Polygon Primitives > CylinderMove and scale tool
After the windows cut objects are created and positioned they are ready to do the bolean difference operation.
Used tools:Move, Scale and point editing.
Doing boolean operation to get the windows and door. First select the main structure then window cut object and do the difference.
Used tools:Polygons > Booleans > Difference
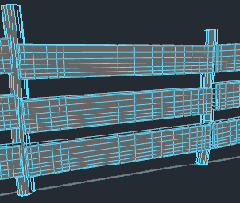
Fence was also made by using polygonal cubes. At the start, I’ve created one cube and scaled it. Then I have cut it like in the first picture (middle object) and transformed the edge points so that I got more natural edges (pic1 – last object). Now, I needed sticks that would hold the fence. So I just draw a few non straight curves (pic2 – left), created one circle and extruded it along these curves (pic2 – right). After I have done this I went to the side view and duplicated – transformed (translate, rotate and then scale) wooden plank that I have created. One more thing that I did before duplicating the plank is that I cuted it horizontally and vertically few time. Then after the duplication, I’ve transformed the points of the planks so that at the edges they look more natural – not so linear, And there it is, a fence.. 😉
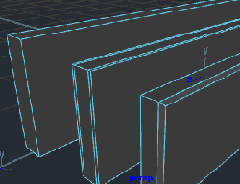
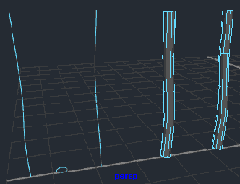
Created polygon cube, scaled it, then cuted it and moved the points to get the smoother transition at the edges.
Used tools:Create > Polygon Primitives > CubeEdit Polygons > Cut Faces Tool
Created few curves on which I have extruded the circle. These objects have been created with NURBS.
Used tools:Create > CP Curve ToolCreate > Nurbs Primitives > CircleSurfaces > Extrude
At this stage I’ve made a few copies of planks, cuted them in horizontal and vertical direction and placed them on the stick.
Used tools:Edit Polygons > Cut Faces ToolEdit > Duplicate + Move and Scale tools
First hill in the back (with grave) was made using displacement on polygonal object. But before I did the displacement on polys, I have used the height field object (created it in hypershade), on which I mapped the texture that I will later use as a displacement (picture 1). When you do this with height field, after you modify some of the parameters in displacement texture, you will have real time show of how displacement will look on polygonal object, that’s why heighfield objects is so good at this situations. After I was satisfied with the result, I’ve created the lambert shader and connected the texture from heighfield object to the lambertshadergroup. Then, I’ve assigned the shader to newly created poly which was scaled to fit the x and y boundaries of the heighfield plane and then I’ve increased subdivisions to 100 in both directions. In this situation it is recommended to turn off Feature Displacement option in the Displacement Map section of the Attribute Editor of the polygonal plane object. This will reduce the usage of polygons … it will only displace the polygons that are already in the plane.
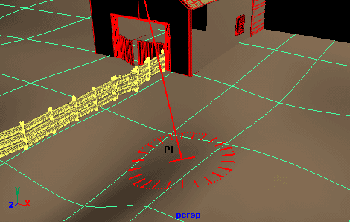
As for the ground (in front of camera) on which the building was placed, it was made by creating one nurbs plane which I scaled and moved where I wanted it to be. After that, I’ve used the Sculpt Surface Tool to displace it (picture2). It is recommended to set the right tessellation values for this hill in attribute editor… so that It looks smooth when rendered, so that was my last step for the hills. 😉
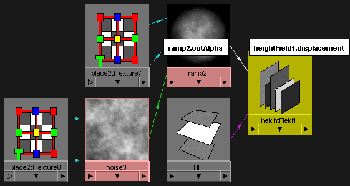
After the height field object was created in hypershade I’ve made a texture that will be used for the displacement mapping of the polygon hills in the background of the image. As you can see for the falloff of the hill as it reaches the edge, I’ve used the circular ramp on which I mapped the noise texture…
Used tools:Hypershade window > HeighField object + Ramp texture and Noise texture…
For the ground that is in front of the camera I’ve created simple NURBS plane and using the sculpt tool I have modified it like in the picture.
Used tools:Create > Nurbs Primitives > PlaneEdit Nurbs > Sculpt Surfaces Tool


Latest Comments