“Making of Paragalis – part 2 ” by Marcus Dublin
Creating the Bump Map / Normal Map
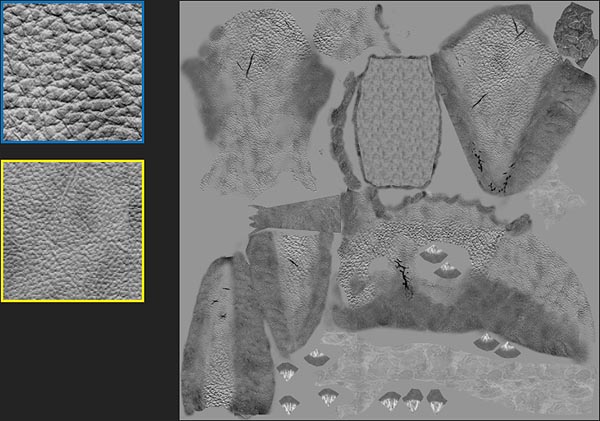
Well now that the spec maps are created its time to move onto creating a grey scale bump map. A bump map pretty much uses the black areas to indicate depth, white areas indicating height and grey staying neutral to the surface. Once the bump map / height map is created it’ll be converted to a normal map overlay. This step is super important since the bump map will serve as a base to accentuate subtle details within the skin surface, meaning a bad bump can and will destroy the hard work done in the previous steps! That said I’m going to explain how I created my bump map. The first thing I did was merge all of the layers in my diffuse map, with the exception of the mouth skin, scars, teeth, underbelly skin, and tongue distortion. I then created another layer and filled that layer with 50% grey, once I did that I moved all of the un-merged layers on top of the grey fill layer. I then took those separate layers and de saturated them, along with adjusting the contrast.Now at this point I have to ask myself, do I want to use the skin that I made for the diffuse map and bump that? Or do I want to use another skin source that’s a little more uniformed? Well I choose the latter and I did so due to the erratic nature of the diffuse skin. If you think back to when I was applying all of skin materials in the diffuse map you’ll see that it was made up of numerous “clone/stamp” elements. While those elements were fine for selling the diffuse, they simply wouldn’t hold up in the bump map. Bumping out the diffuse skin would have resulted in a noisy output, which would break the illusion and believability I’m going for. That said I used two different tillable materials as an alternative. The cool thing about these materials elements is that they play off of the original skin quite well! So I created two new layers and filled one with the big skin pattern and one with the small skin pattern. Then I took my eraser brush and gradually blended the two patterns, the reason for this was simple. Most creatures’ skin in real life is almost never uniformed and contains slight variations throughout.
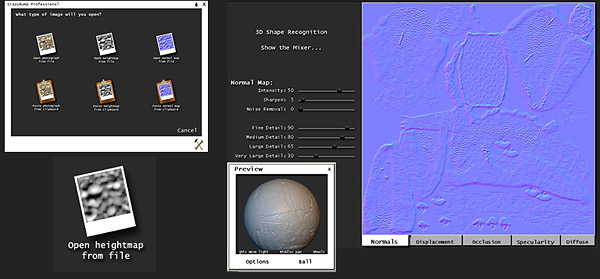
With my bump map completed, I moved on to generating the normal map, for this I used “Crazy Bump”. Crazy bump is an awesome program that does exactly what it say’s, it bumps stuff really well! All kidding aside Crazy Bump can produce other maps as well such as occlusion maps, displacement maps, specular maps, etc. That said the normal map could also be generated using the Nvidia normal mapping plugin. You can see the settings that I used from the image below.
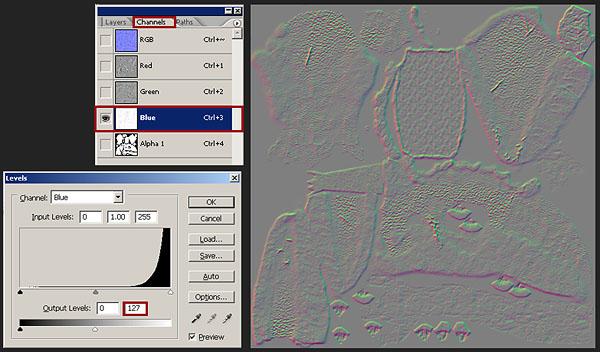
Now that I generated my normal map, it’s time to overlay it onto my baked normal map. Of course before doing so I needed to make a few tweaks, first being the adjustment of the blue channel. This is really important since having the blue channel unadjusted would create a few odd results, most notably it wouldn’t behave well with my baked map. So in order to get things straight, I to adjust the levels in the channel itself. The first thing that I did was go into my channels and dialed the number down from 255 to 127. By the way the way there are a few cool Photoshop actions that handle this.
Making of Paragalis – part 2
Popular Tutorials
-
 Free set of photo references for our members
Posted on Nov 15, 2010
Free set of photo references for our members
Posted on Nov 15, 2010
-
 Photo References
Posted on Oct 6, 2010
Photo References
Posted on Oct 6, 2010
-
 Modeling Competition
Posted on Dec 10, 2010
Modeling Competition
Posted on Dec 10, 2010
-
 Modeling a High Definition Building – part 1
Posted on Dec 9, 2010
Modeling a High Definition Building – part 1
Posted on Dec 9, 2010
-
 FREE photo reference sets for you – only for registered members
Posted on Oct 2, 2011
FREE photo reference sets for you – only for registered members
Posted on Oct 2, 2011
Try something new

Latest Comments