“Making of Paragalis – part 2 ” by Marcus Dublin
Now I have a rough idea on what the skin looks like, it’s time for me to step back and determine what areas are going to receive what color, material and surface values. I do this by making a very quick and simple paint over. This is especially helpful since I’m not working with any fleshed out color concepts and or illustrations.

With my color guide in place it’s time for me to assemble my references and materials. My vision for the creature is something that would have fit right at home in prehistoric times. The skin would be a cross between that of an elephant, rhino, pig, and perhaps a dinosaur. That being the case I went ahead picked a few surface materials from my reference library, as you can see the surface materials pretty much correspond to the creature skin in question. “I also wanted to note that I have an extensive library of material references and fabricated skins that I use to help aid with this process!”
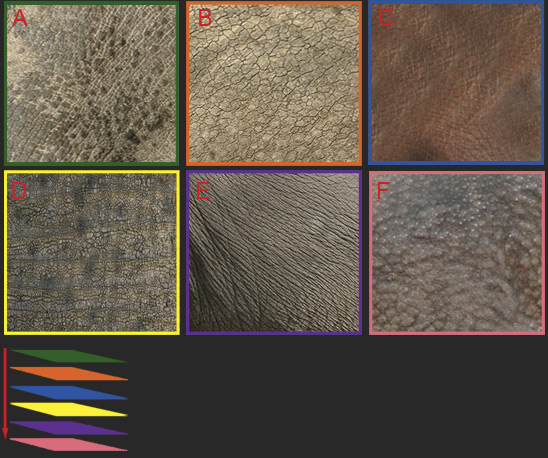
With everything in place it’s time for me to start combining and layering the various materials. Phase one is where I’m blending the materials A, B, and D. At this point I want to give a good once over to the surface area adding in some nice sporadic splotches of skin. I try to keep the skin interesting by varying the opacity, contrast, and color. Speaking of color, I tend to match the color values by adjusting the “variations” as I go along. The Image/Adjust/Variations works much better than Hue/Saturation because it shifts all of the color values, unlike Hue/Saturation which move the image towards monochromatic values. It’s really important to keep this is mind since the source materials carry a nice sense of natural color embedded in the photo’s. This works wonders when it comes to selling the photographic nature of a skin!

Continuing work on the base skin, I move into phase two where I’m refining the various skin elements. I started to add in materials E and F, which provide even more interesting results. This is especially true of material F, which is used primarily around the back of the thigh and tail, having the big small detail keeps things interesting. Speaking of which it’s always good to vary the scale of each skin element as well, since an animal’s skin is rarely if ever uniform in size throughout!

Continuing work on the base skin, I start to add materials F and C. Material C in this third phase is extremely important since it’s what I like to consider a transitional element. This material element will serve to bridge the outer skin with the mouth skin, underbelly, and exposed skin. I also want to note that so far all I’ve been doing is adding and blending material elements. I blend the elements by using the “clone stamp tool” with my brush set to soft round.

Making of Paragalis – part 2
Popular Tutorials
-
 Free set of photo references for our members
Posted on Nov 15, 2010
Free set of photo references for our members
Posted on Nov 15, 2010
-
 Photo References
Posted on Oct 6, 2010
Photo References
Posted on Oct 6, 2010
-
 Modeling Competition
Posted on Dec 10, 2010
Modeling Competition
Posted on Dec 10, 2010
-
 Modeling a High Definition Building – part 1
Posted on Dec 9, 2010
Modeling a High Definition Building – part 1
Posted on Dec 9, 2010
-
 FREE photo reference sets for you – only for registered members
Posted on Oct 2, 2011
FREE photo reference sets for you – only for registered members
Posted on Oct 2, 2011
Try something new

Latest Comments