"Making Of L.Van Beethoven’s Bust" by Pablo Fernandez Gomez
In this case I ve used 3DSMax.
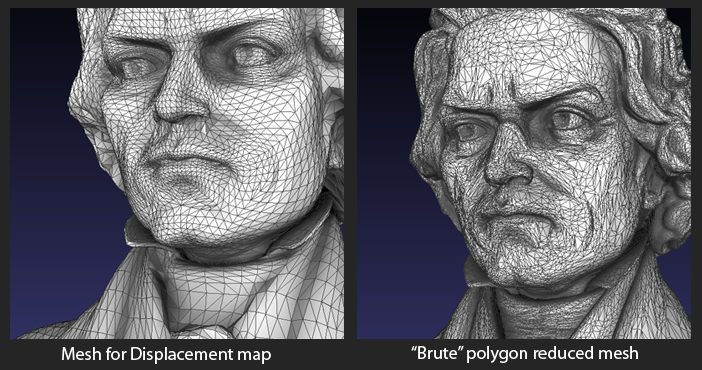
-Displaced Mesh:
You can imagine this one. Export level one or two of your model to OBJ, along with a Displacement Map out of Multidisplacement Plugin.
“32 Bit floating point, 3 channels, A.D Factor” displacement map, is the way to go, because you don’t have to be guessing displacement distances.. but if your Render engine doesn’t support this, “16 Bit Grey 1 channel Auto” displacement map will do good, after you adjusted distances on your render software.
Its good to have a medium-res reference mesh loaded on your application for this purpose when setting distances.. often is the most reliable way to do it if you can’ t use 32 bits.
That’s it. You have your model into your application, ready for render.
Step7: Materials and Shader.
First of all, a good comprehension of the surface you want to simulate will make your task easier.
In this case, I ve noted the figure have some dirt on its cavities.. the surface presents a slightly translucence and there’s micrometrical pores pouring the polished surface. The base will look good on a semi polished painted wood finish and some minor wear on corners will give impression of handling and improve credibility of the final result. Some very subtle scratches and grease details on specular will also payback when light hit the surface.
With this concepts and some color matching I can already set up a working material for the bust.
For the cavity dirt, I ve used a Dirt Shader, very similar to an Ambient Occlusion, that tries to simulate dirt depositing on areas where naturally would accumulate. You can find shaders like this on V-Ray, Final Render, Fry Render and even there s a custom one for MentalRay. Anyway, if you don’t wanna mess with new stuff, yo can get mostly the same results with an Ambient Occlusion shader along with some tweaking on your Image editing Application, or even Zbrush, have a cavity renderer on the Zmapper Plugin which is very effective and quick to use and render.
I baked Dirt result from the Highres version of the model and stored the maps for using it on the building of the Diffuse and Spec maps on Photoshop.
For the subtle translucency, the choice is obvious. A Sub-Surface Scattering shader. This is a fairly common effect used mostly to simulate Skin or Wax, and its available on all advanced render engines.
Its very useful and looks nice, though is costly and you might want to avoid it if working on short times. In this case I’m using MentalRay, so Fast SSS shader will be the thing.
For the pores and the aging, some work and painting on any image editing application like Photoshop or Gimp, will do. Its a matter of observing… and so the same with the aging and the specular details.
Taking this into account and having the cavity map rendered, its time to build the maps I will use on the figure shader.
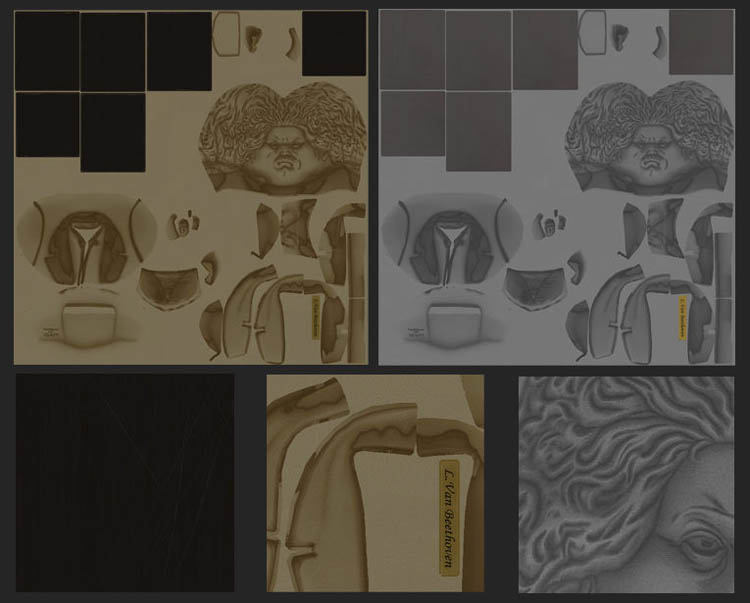
Nothing really difficult to figure here.. just notice that the diffuse is darkened.. that’s because the SSS shader on the figure works in a some sort of additive way and the normal color version will oversaturate on the final render.
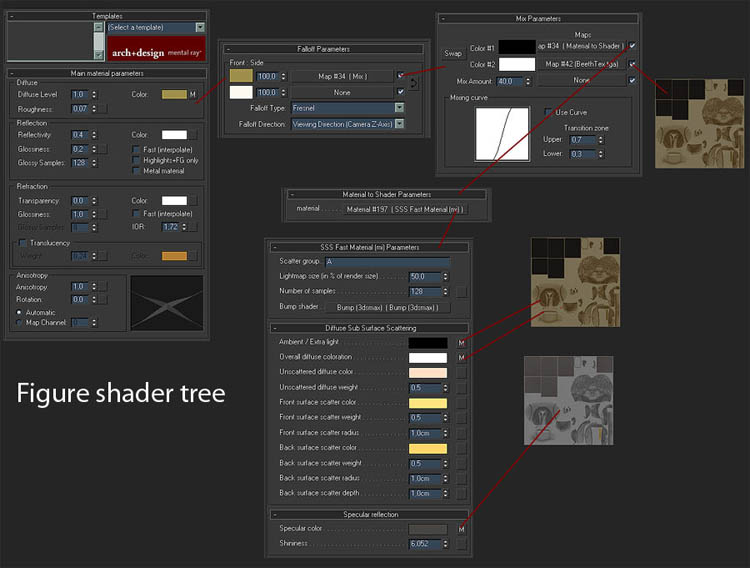
The shader might seem complicated to make, but is not.
A base of mr Arch and Design material, simulates semi polished plastic and provides reflection based specular, which I find satisfactory on renders like this.
On the diffuse I added a fresnel based mix, having a bright color for the contour (looks nice) and a Mix map for the surface, between the diffuse texture and a Material to Shader map.


This is very funny, but it does not at all look like Beethoven