"Making Of L.Van Beethoven’s Bust" by Pablo Fernandez Gomez
Typical Do’s and Dont’s on this stage.
Dont’s:
-Get stuck in a part of the object adding more and more detail. Keep working on a homogeneous manner, trying to keep level of detail equal on the whole model. You will probably waste work otherwise or you might get unequal detail levels on the general look.
-Work directly on High level subdivision. The good way is to go from low to high, working at a different scale at each level.
-Forget to save. Zbrush can be crashy sometimes if you work on High res stuff or you do much masking.
Do’s:
-Bring your model to a "normal" 3d package or engine to check your proportions. Zbrush "fakey" perspective can be tricky.
-Save often, progressive way. Life saving custom.
-If you work on Masks, don’t forget save them to reuse later..
-Check that modifications for adding high detail do not transform your main proportions when working on hi subdivs.
For the body, lets say the suit, I ve decided to use classic polygon subdivision surface, being this method more reliable when comes to model non-organic shapes. When having the model ready and tested for non holes or n-gons (multiple side polygons), time to bring it to Zbrush and use sculpting tools to add a more “clay” look, along with some wrinkles and some details that would have been difficult to do on polygon subdivision modeling.
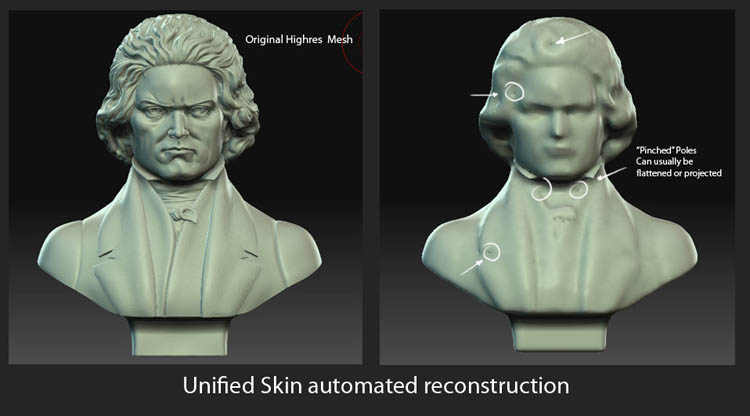
Step4: Unifying Meshes/Retopoligizing.
So you have your model made.. But there is heavy stretching on the mapping and quads and the overall distribution of resolution is not satisfactory. Also, if you are working with an old PC you will have your model divided in several subtools.
The main idea then, to have a better result and make the model more efficient for output, would be reproject your information into a new better divided and organized mesh model.
For that.. depending on your model, your PC and your time, you can use two methods. I ve used both on this model for the unitizing parts first and the Displacement map version then.
–The quick and rough:
Unified Skin feature of Zbrush.
It will build a quad based approximation for your mesh volumes given a number of iterations you give it. Depending on the complexity of your mesh It can give good/fast results. The resulting mesh would be good for reprojecting both manually or automatically. This could be UV mapped automatically by Zbrush or you can take away the 1 level and remap it before projecting, in your favorite 3d package or mapping tool. Keep in mind this tool probably won’t work very good if the base mesh have holes, deep carves or its divided on several different elements.
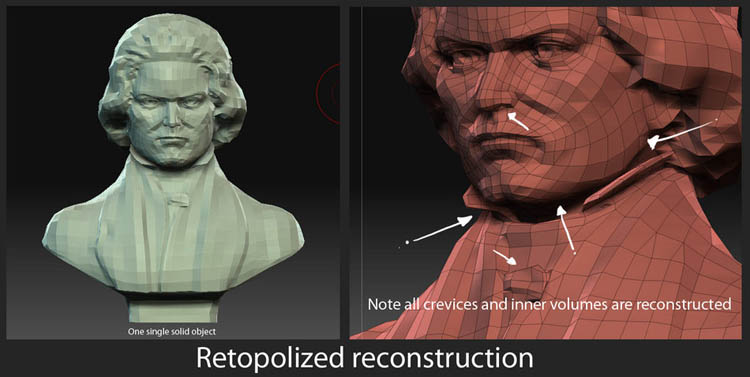
By Hand:
Export all parts at a decently high resolution and process them with polygon reducing software like MeshLab or Polycruncher. Import your meshes into your favorite 3DApp like 3Dsmax, Blender o Maya or even hopefully Meshlab in the next version 🙂 and then reconstruct them over the surface, making a quad-as-possible mesh trying to get all volume detail into the reconstruction. This is, add detail everywhere the angle is bigger than 90 degrees. If you leave that areas too flat, the projection will probably miss volumes and you ll get stretched areas/weird stuff. You can map it. It would be really useful and like now you have a pretty similar in volume mesh to your original, you will have minimum stretching on your final results.
You could also use the retopology feature on Zbrush, but I never tried it, so I can’t tell.
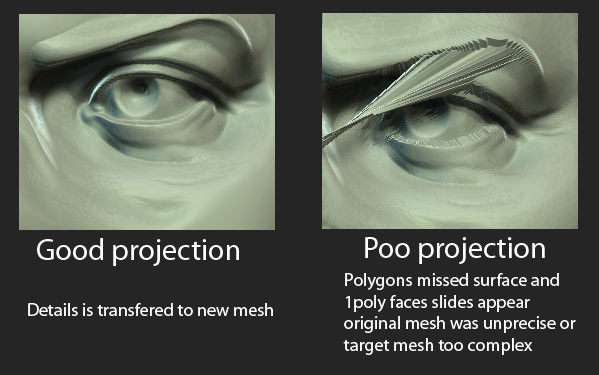
Step5: Reprojection
This is tricky stuff. If you reconstructed the mesh or Unified Skin did its job nicely, automatic projecting will work decently good, providing some minor corrections. If the projecting fails and you get "escaped" vertex or weird surfaces , you ll have to isolate that area, soften broken parts and reproject by hand using Project brush. Its not difficult, but its time consuming task, boring, so better try to get the better base mesh that you can when reconstructing in the last step. Keep in mind very complex/divided target surfaces will lead to a higher chance of projection errors, so take that on account if you have a tight schedule. When everything is fixed or you have been lucky, you have then your model ready, all in one piece but much more efficient, with better polygon quality and a non stretched mapping.
Step6: Take the Model out of Zbrush.
This is an easy part.. You can, depending on your needs and objective for the model, use two methods.
-"Brute" mesh:
Export the high level mesh, all in one piece if you have a powerful PC, sliced if you don’t, to OBJs and reduce the amount of polygon to an usable limit ( I ve found 150000-500000 can be handled by render software on average PCs and you get decent results) using polygon reducing software like Meshlab or Polycruncher, of course, keeping your UVs. Save it to OBJ again, and then import it onto your Favorite 3D Application.


This is very funny, but it does not at all look like Beethoven