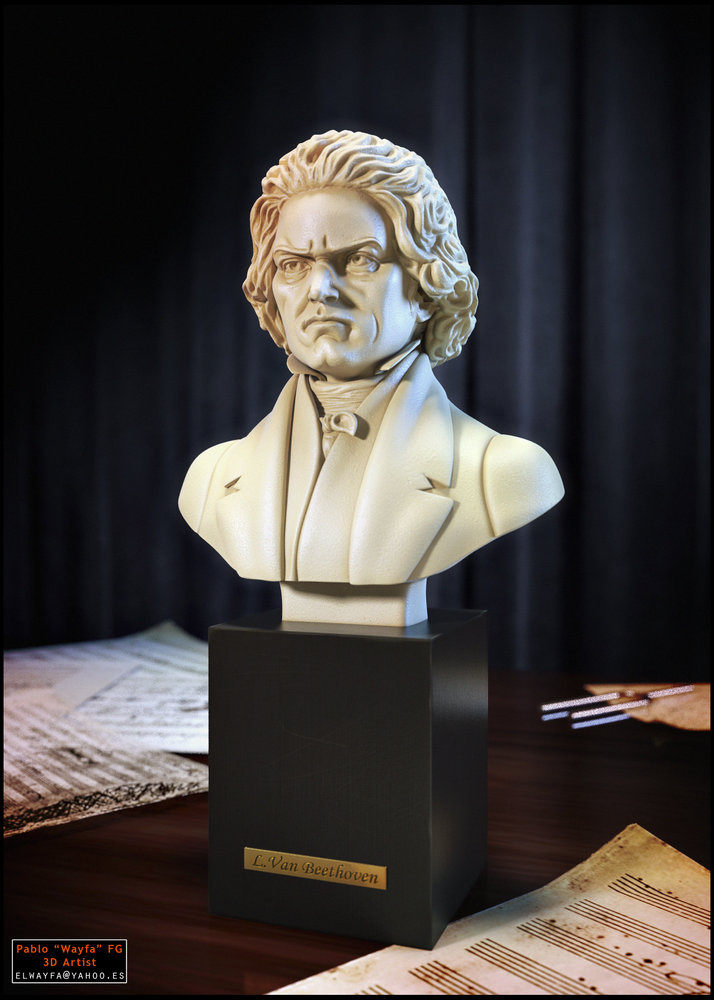
"Making Of L.Van Beethoven’s Bust" by Pablo Fernandez Gomez
3Dtutorials.sk recommendation:
To maximise the realism of your 3D models we recommend using high quality human photo references from the #1 texture website www.3D.sk
Hello and Welcome
My name is Pablo F.G. And this is my first tutorial. Here I will explain the procedures and techniques I used to create this Image, the L.Van Beethoven Bust, focused most on the model itself. I made this as a general practice and for fun, and is based, though not pretending to be exactly the same, on a small resin bust that was lying on the Piano at my house.
–For good understanding of this tutorial you need to have average knowledge about 3d techniques, 3d rendering and Zbrush modeling. There is some basic steps that will be omitted.–
Step1: The refs.
Usually, you don’t start modeling anything more or less complicated without using some references.. unless you want to waste your time or you are just a big huge Pro. Always provide yourself with all the angles you can get, so you don’t end “inventing” too much. Here are some of the example photos that I made thinking of reference for this figure.

Step2: The Base Mesh
When start to model on Zbrush, I usually don’t bother anymore on having a detailed base mesh coming from 3dsmax, Blender, Maya or whatever software I’m using. Instead of that, I bring meshes with a right amount of quads for subdivision and a basic non-overlapping mapping to make use of the Save Mask to Alpha function on Zbrush.
Note that I made different solid meshes for Hair body and face.. this is actually not a requirement, but a way to solve a limitation. I modeled this figure using a basic laptop computer, and I had available only 1.5 Gbs of ram, So I decided to fraction parts for more definition. If you have a powerful PC, lets say a 64 bit with 4Gbs of Ram or more, you wouldn’t need to do this.
Step3: Sculpting
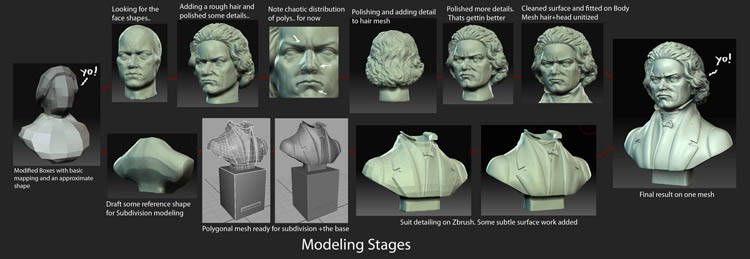
What I’m going to with this shape, is to "find the shape and proportions" from my model, like playing with clay. This is the most fun part of the modeling and also the most difficult, because here you have to set the base for your work, find proportions and planes. Needles to say, mistaking proportions at this stage will complicate procedures afterwards.
Once you have you satisfied with proportions and structure, its a good idea to save a reference copy of it, or even export an .obj to have as a guide so you don’t stray too far from your original set shapes. Then you add details and polish surfaces progressive way, level by level. I personally use move, clay and flatten a lot, but that is up to everyone’s tastes… good eye for proportions Is often more important than using a type of brush or not. Its good, every certain amount of time, to check if main volumes are still okay o you just messed up some volume during your work. You will note that density and direction of faces are indeed very unorganized and uneven. Thats OK for now, It will be fixed with reprojection in the next steps.


This is very funny, but it does not at all look like Beethoven