“Apophysis for Beginners – Part 1” by Stacy Reed
Options Settings:
Click Options in the toolbar, and choose Options from the drop down menu. Most of my settings have remained the same for a very long time because I am used to them and they work for me. You can certainly use the same settings if you like, but I encourage you to find the settings that work best for you. There’s more information about these options in the help files.
In this tutorial, the tabs of particular interest are the following:
General
Editor
Display
Random
Variations
Paths
For the purposes of this tutorial, we will not need to change the settings under the other tabs, so leave them as they are by default for now.
General:
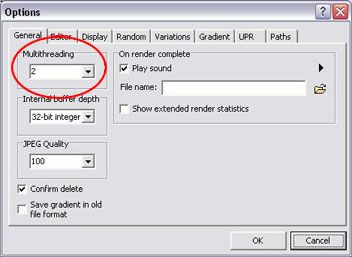
My settings here are mostly default but I changed Multithreading to 2 and I suggest you do too. Regardless of whether or not your computer has a dual processor, you should see an improvement in render time. I’ve heard it can be between 8-10% faster.
You might like to hear a notification beep when you’re render has completed. If so, tick the Play Sound box and choose your sound file (or keep the default).
Editor:

These settings pertain to the 2D plane of the Transform Editor, which is just a matter of personal taste. You may want to apply settings and open the editor to see how it looks. Some people find it easier to work on a light surface, some prefer to work on a black surface. I prefer seeing a grid, though earlier versions of the software did not have this feature. Play around with these settings until the editor feels right to you.
Under Double-click on variation, tick the radio button next to “Reset value to zero, if zero set to “ 1”
Display:

This is how your fractal is displayed while you are working. This is also personal preference. I like to have a nice view of my fractal without having to wait forever for it to finish processing each time I make a change. It’s really up to you to find the right balance between your computer’s capabilities and your patience. I keep most of the default settings, but change the Rendering Quality to 10, Brightness to 6, Oversample is set to 2 and Filter Radius is 0.2
I suggest keeping Show Transparency unticked while you work and only turn it on in instances when you want to see what the flame looks like on a checkerboard without a background. You just can’t get a full appreciation for the colors and shapes without some form of solid background color behind the flame. Black works for me.
Random:
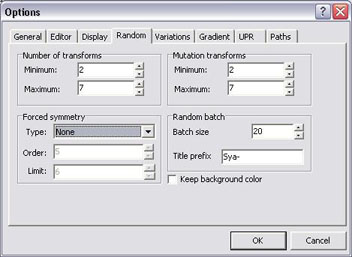
These settings pertain to creating random batches (I’ll go into more detail in a bit). Apophysis allows you to choose certain presets so you have a better chance of getting what you want in the midst of all that random chaos.
Number of Transforms pertains to the number of transform triangles the program will randomly create when you make new batches. I like to have a minimum of 2 and a maximum of 5, though I sometimes go as high as 7 depending on the variation.
Mutation transforms pertains to the number of transforms used in Mutation when the “Same no. of transforms” option is turned off. I usually make this the same as the other, with a minimum of 2 and max of 7. I will cover the Mutation window in more detail in Part 2.
I encourage you to change all of the settings under this tab while exploring, but the option I change the most is the Forced symmetry settings. Change this often and enjoy the different results!
I usually use my nickname as the flame prefix but you can change it to anything you like.
I prefer dealing with smaller batch sizes, so I change this setting from 100 to 20. Again, it’s completely up to you.


Latest Comments