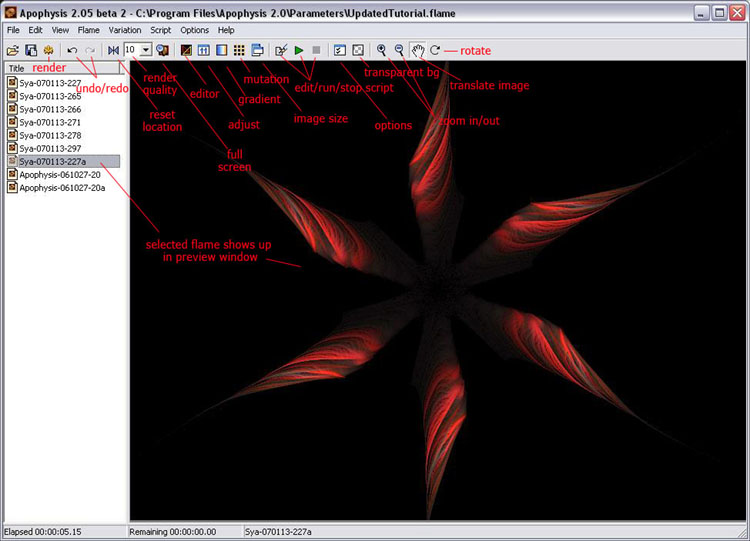
“Apophysis for Beginners – Part 1” by Stacy Reed
This tutorial will walk you through some of the basics of the Open Source fractal software, http://www.apophysis.org/ . This is designed especially for beginners. A lot of new Apophysis users ask me to help them configure their settings and options within the program and in the past I have helped walk them through things like applying scripts and creating batch renders. I will write many more tutorials explaining some of the program’s ins-and-outs, my favorite variations and how to get particular results.
This is Part 1, in which we’ll discuss basic commands, shortcuts and the Translation Editor tool found in Apophysis. It might help for you to have the program open while you read this tutorial for reference sake, but I should warn you now that you will not be able to achieve the same exact results. Don’t think of it as a 1, 2, 3 step process to making a fractal flame, but use this more as a guide to help you learn about the programs many features.
When creating fractal imagery, I usually start out with a plan in mind, but I rarely end up with exactly what I envisioned, if ever. That’s why the whole process is called “fractal exploration”. We can give the computer some basic instructions, which help to determine the structure of a fractal flame, but I believe Patrick Gosch, (aka Hallucinaut) said it best by saying, “I don’t think anyone knows the full potential of Apophysis.” It is, indeed, a powerful program with many avenues to explore. It’s important to understand that even thought we would like to be complete control of the outcome, mistakes and accidents are often a welcome surprise. Always endeavor to try new ideas! When it comes to fractal exploration, there aren’t any rules! Pull triangles, change variables, add scripts, heck, add multiple scripts! The point is to find something unique, something beautiful. The possibilities are endless. Keep in mind that you can always undo what you’ve done if you don’t like it.
Ready? Let’s begin by learning some keyboard shortcuts.
Basic Commands:
Ctrl+Z = Undo
Ctrl+Y = Redo
Ctrl+B = Create new batch
Ctrl+S = Save parameters
Shift+Ctrl+S = Save all parameters
Ctrl + P = Options window
Ctrl+O = Open Flame
Ctrl+C = Copy
Ctrl+A = Opens the Adjustment window
Ctrl+C = Copy
Ctrl+U = Copy as UPR
Ctrl+R = Opens Apo’s Internal Render window
Ctrl+X = Export Flame
Ctrl+E = Open script
Ctrl+D = Edit script
Ctrl+H = Stops the script from running
Ctrl+N = Randomize color values
F3 = Full Screen
F4 = Opens Transform Editor
F5 = Adjust
F6 = Opens Gradient window
F7 = Opens the Mutation window
F9 = Run script
F11 = Applies random variation
F12 = Reset location (to show entire flame)
F1 = HELP FILES (read them. Seriously.)
Alt+F4 = Exit

3Dtutorials.sk recommendation:
To maximise the realism of your 3D rendering we recommend to use high quality photo textures from the #1 texture website www.environment-textures.com


Latest Comments