“King Kong – part 2. ” by Dan LuVisi
As we start to advance onto his finger, we need to shape it some more, placing more darks on the sides, and rounding off to blues in the middle. Putting some yellows onto the bridge of the finger and so forth, basically just laying down colors but also forming it instead of it being a regular, ordinary blue finger.

As we move forward there will be the as usual tips for this, just smudge or blend the colors together, connect them and mold them into the finger. His fingers are very wrinkly and old; he is at the age of 40. To the left of the picture, you can see that his finger has some real tight wrinkles on it, and the lighting will cause different shades of the skin folds. So I used the brush on low opacity, not too low this time but around 80% to just dab at colors around it. Try to blend with the advantage of lower opacity. Use a size 3 brush to get tiny details in there, which you wouldn’t even have to smudge if the colors match correctly to it. You can also do the same for as the tip of the finger, you can see the same type of wrinkles.
As we progress
I again took advantage of the grunge brushes and started to apply much textures with them to the top of Kong’s finger. I first started with an applying of green grunge brushes on the fingers, then went over it with a low flow and opacity yellow color, then smudged just a teeny bit. After that, I used the sharpen tool to add some more grainy texture to the wrinkled-messy skin. After I have sharpened, I went over it with a size 3 brush, and went over it with squiggly lines to get just that dirty worn look that…an ape would have. I used a charcoal brush again to add more little bumps and notches on his finger (more near Ann’s armpit).

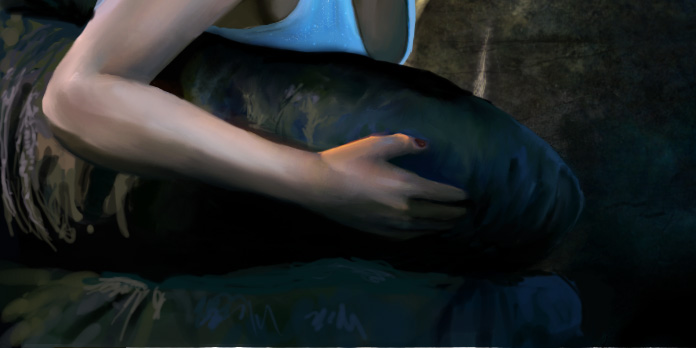
In our final image to this part of the tutorial, I am nearly complete with the finger. I have molded my colors together, added hair on the finger for some more personality, and have used the same texture technique with the brushes on the tips of his finger. You also will notice that I cropped the other finger out, because I got lazy! Don’t be lazy! And with a few strokes with the dodge tool, causing some wrinkle highlights and you are done with it. The rest is creatively up to you and how much more realistic you want to take it. I’ve given you all my tips on this one, now it’s your turn to experiment!

(c) Dan Luvisi, dmxdmlz@aol.com
King Kong – part 2
Popular Tutorials
-
 Free set of photo references for our members
Posted on Nov 15, 2010
Free set of photo references for our members
Posted on Nov 15, 2010
-
 Photo References
Posted on Oct 6, 2010
Photo References
Posted on Oct 6, 2010
-
 Modeling Competition
Posted on Dec 10, 2010
Modeling Competition
Posted on Dec 10, 2010
-
 Modeling a High Definition Building – part 1
Posted on Dec 9, 2010
Modeling a High Definition Building – part 1
Posted on Dec 9, 2010
-
 FREE photo reference sets for you – only for registered members
Posted on Oct 2, 2011
FREE photo reference sets for you – only for registered members
Posted on Oct 2, 2011
Try something new

Latest Comments