“King Kong – part 2. ” by Dan LuVisi
Starting Kong’s chest
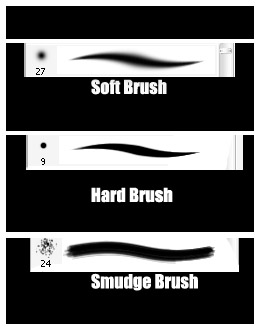
At first his chest looks complicated, but surprisingly it was one of the most fun parts and easiest to do out of the entire painting. Right now in the sloppy image for this we just have our colors laid out. I used a charcoal brush to just get that rough overall feel. Don’t pay attention to the white slash through it, it’s just from Ann’s arm. Anyways, just put down your basic choice of Kong’s usual lighting colors onto his chest.

Start to overlap your basic colors with stronger bolder strokes from your pen. Where his two breasts collide, there is a wide black gap. Fill that in, but then start to work your way up to a lighter skin color. The scars are just painted on with a size 9 brush. I then use a size 15 brush, with 10% flow and 45% opacity and start to Eye Drop

colors and randomly paint over; creating more of a textured feel for his skin.
Refining Kong’s chest, Details and texture
With this being done, your basic colors laid out in front of you, you can start to work on the yellow patch on his chest. First I smudge it with my typical smudge brush, and get those colors blended in there. After that, I use my charcoal brush and go over his chest with different blues (all dark) and yellows, just getting that grungy feel out of the way for his ape like skin. Once that is through, I can start to draw the stretch marks coming from the inner breast up with a size 5 brush on Pen Pressure. Once those lines are up to my standards, ill start to work the tiny bumps on his breast with a size 15 brush, on 10% flow, 10% opacity and basically I will just dab at it softly, nothing too forceful or long strokes. After that, I use the Dodge tool, set on Highlight, 10% Strength and with the scattered leaf brush I let the textures take over and make new ridges and bumps. You can also use a size 3 brush and draw some thin lines of blue down the chest, little scratches and what not.
King Kong – part 2
Popular Tutorials
-
 Free set of photo references for our members
Posted on Nov 15, 2010
Free set of photo references for our members
Posted on Nov 15, 2010
-
 Photo References
Posted on Oct 6, 2010
Photo References
Posted on Oct 6, 2010
-
 Modeling Competition
Posted on Dec 10, 2010
Modeling Competition
Posted on Dec 10, 2010
-
 Modeling a High Definition Building – part 1
Posted on Dec 9, 2010
Modeling a High Definition Building – part 1
Posted on Dec 9, 2010
-
 FREE photo reference sets for you – only for registered members
Posted on Oct 2, 2011
FREE photo reference sets for you – only for registered members
Posted on Oct 2, 2011
Try something new

Latest Comments