CLONING THE PIECES
To clone the pieces we need to do the same process 50 times!.
Fortunately, there is a method to do it very quickly, an iterative macro operation. As i said in the first page, it means to make a lot of repetitive tasks in a few lines of code.
Go to Maxscript Menu -> New Script. In the Text Field paste these lines of code:
for i=1 to 49 do
(
newPiece=copy $Caterpillar_Piece_01
newPiece.position.controller[2].percent.controller[2].value=(i/50 as float)*100
newPiece.position.controller[2].percent.controller[1].controller=
$Caterpillar_Piece_01.position.controller[2].percent.controller[1].controller
)
How it works:
for i=1 to 49 do
First, we need to define the iteration range using the sentence “for”, using the variable “i” we start defining the first number of the iteration, in this case we start from 1, and then defining the last number of the iteration, in this case 49, we’ll be executing the same process 49 times. Inside the Iteration the current loop number is stored in the variable “i”, we can use this number to set a percent offset in the current piece copy.
Between parenthesys we describe the process that we need to repeat 49 times.
newPiece=copy $Caterpillar_Piece_01
In this line of code we’re creating the copy of the piece and storing it in the “newPiece” variable, we need to use the “$” character before the object’s name to be able to use this object inside maxscript. If the object’s name has any space on it, in maxscript we need to replace this space by the “_” character.
newPiece.position.controller[2].percent.controller[2].value=(i/50 as float)*100
In this line we’re defining the percent offset. With the dot character (.) i’m accessing into a property, first accessing the newPiece’s position property , then the second controller of the position, then its percent, then the second controller of this percent, and finally the value of this controller. I use the variable “i” (current loop) to find the right offset, if we divide this number by the total number of copies we get a value ranged from 0 to 1, multiplying it by 100 we get the percent respective to the current copy. i use “as float” to make sure the division will bring me a decimal number.
newPiece.position.controller[2].percent.controller[1].controller=
$Caterpillar_Piece_01.position.controller[2].percent.controller[1].controller
this is only one line actually, it was too long. Here, we’re copying-instance the first percent controller, the script controller. If we’ll need to make any configuration to this controller in the future, we’ll need to make it only once. And also there’s only one script controller executing only one time giving a value shared for all the pieces.
After you place the code in the Text Field of the maxscript editor go to File->Evaluate All. Now we got 50 pieces!.
This is just a very very tiny explanation of iterative macro operations, you could check the Maxscript reference for a lot of information about this. Also, you could use the Macro recorder to find the maxscript code for an operation in max, You can activate it in the Maxscript menu -> Macro recorder. It enables a pink Text Field in the Maxscript Listener (Maxscript Menu->Maxscript Listener). If you made an operation in max the script will appear in this text Field, unfortunatelly not all the max’s operations appears there.
FRAME POSITION AND ORIENTATION
Before create the frame position and orientation system, we need to copy the wheels and caterpillar for the left side of the tank. But, there’s a problem that we need to deal with. After clone the caterpillar, the original caterpillarSpline will have the skin with the cloned helpers as bones and not the original ones. Fortunately there’s a trick to avoid this, just turn off the caterpillarSpline skin modifier.
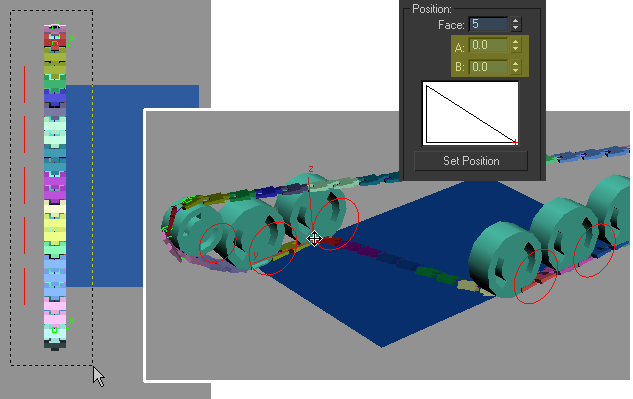
Hide the Frame, the turret and cannon objects. Select all the wheels, helpers, pieces, and control objects of the right side. You can do it in the top view drawing a selection rectangle over all the objects (see picture below), unselect the ProjectedPlane after this. Press ctrl+v, and check copy in both options.
Now select by name the caterpillarSpline and turn On its skin modifier, do it also with the caterpillarSpline01.
Select by name the Helper_Attached_14, in the motion panel change its A and B values to set its new position (probably you only need to set A=0), do the same process with the 13, 12, 11, and 10 Helper_Attached objects. The front wheel will be different, change its Face number too (Face=2), set A=1 and B=0, and rotate it 180 degrees over its local z-axis.
To mirror the position of the Helper_Attached_09 and Helper_Attached_08 (the new Wheel_Small helpers) change their x-position value from negative to positive value.

Now, select all the Control_Wheel objects and change its object position with the “Affect Object Only” button activated in the hierarchy panel, put them in the oposite side of the wheels.


Thank you ever so for you blog post.Thanks Again. Really Great!!!
Can anyone download the file “video_tank.mov” ? I can’t download it.
what a rubbish is this…….
where is its start………….
hi, please try again. i just tried to download the file and it worked.
would you re-upload the file: tank_rig_start.rar.
It seems as its not longer online.