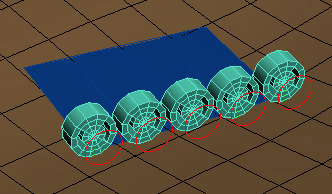
Basically we’re gonna instance the transform controllers. Like instanced Objects, a change to the instance for any one controller will change all the others.
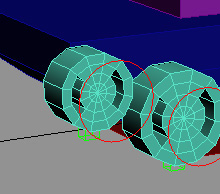
To do that, First unhide by name the “Control_Wheel_ 01”, align it to the wheel (position and orientation) and make an offset in its position and orientation with the “Affect Object only” button pressed in the Hierarchy panel (take a look at the picture, both pivots must be in the same place).
Link the Control_Wheel to the “Helper_Attached_ 01”. Since the transform controllers are respect to the Parent’s transformation, we need to make sure that both objects have the same parent.
Next, Select the Wheel_01 and open the Track view (you can also open the Mini Curve Editor clicking the button![]() in the Left-Bottom of the Screen). Navigate until you find the Wheel’s transform controller, click it and then with the right button, select “Copy”. Then, navigate until you find the Control_Wheel’s transform controller, click it and right click it, this time select “Paste” and check “Instance” in the Paste DialogBox.
in the Left-Bottom of the Screen). Navigate until you find the Wheel’s transform controller, click it and then with the right button, select “Copy”. Then, navigate until you find the Control_Wheel’s transform controller, click it and right click it, this time select “Paste” and check “Instance” in the Paste DialogBox.
Now both objects, Wheel and Control_Wheel are transform-controller Instanced, you can check it out by moving the Control_Wheel.
CLONING THE WHEELS

Double-click the Helper_Attached_01(it’s easier if you do it in wireframe mode), it will select all the objects under its hierarchy, including itself. Clone them by pressing ctrl+v, select copy in both options (object and controller). If your cloned wheel has an orientation offset, you can fix it selecting by name the Helper_Attached_02 and rotating it.
Then, select by name the Helper_Attached_02 if you haven’t, go to the motion panel in the Attachment Parameters rollout and decrease the Face number until you get the right position for the second wheel, this number could be 2 units less than the first wheel (if this rollout doesn’t appear you need activate the position button in the PRS Parameters rollout). Do the same process three more times for the remaining wheels. For the last wheel you need to change the A and B values to fix its position (A=0, B=1) and set the face value to 1.
CREATING THE CATERPILLAR
As mentioned in the first page, the caterpillar is based in several pieces slidding around a spline. So now, we’ll create the spline.
Select the projectedPlane, in the Modify panel turn off its conform binding modifier by clicking the bulb and set its world position and rotation values to zero. This is temporal, it’s to do the next steps more easily having the tank aligned to the viewport.

To create the small wheels, double click the Helper_Attached_01 to select it with the wheel and the control object, clone them pressing ctrl+v, select copy in both options. We need to clone the wheel with the helper because we need a parent with the same orientation (the controllers are in respect to the parent’s transform), select the Helper_Attached_06, in the motion panel select its Position list controller and replace it by a Position XYZ controller, doing this we’re deleting the attachment constraint.
Fix its orientation by rotating it -90 degrees over its z-axis, and place it in the back-top side of the tank (see picture), Unhide the Frame and link the helper to it. Then select the wheel and decrease its radius value, like 0.373, you have to decrease it in the script controller too.
To create the front small wheel, double clik the Helper_Attached_06, clone the objects, select by name the Helper_Attached_07 and place it at the front of the tank.
From the left view start creating the spline adding vertices at the bottom of the wheels, one vertex per each wheel, continuing above the small wheels (see picture below). Finally make sure that all vertices are bezier type with tangents as large as shown in the picture (select vertices -> right click -> left-top quad -> bezier), these tangents will generate a smooth interpolation in the spline while being deformed over the ground’s surface. From the top view move the line to the middle of the wheels. Name this spline as “CaterpillarSpline”.
Next, we need to create one point helper for each spline’s vertex. Use the Vertex snap tool for this operation and set a size of 0.2 for them. We’re gonna use these helpers to deform the spline’s vertices. Name them Helper_CaterpillarPoint_1, Helper_CaterpillarPoint_2 …. starting by the Helper in the first wheel. You could use the rename Objects tool in the tools menu.


Thank you ever so for you blog post.Thanks Again. Really Great!!!
Can anyone download the file “video_tank.mov” ? I can’t download it.
what a rubbish is this…….
where is its start………….
hi, please try again. i just tried to download the file and it worked.
would you re-upload the file: tank_rig_start.rar.
It seems as its not longer online.