Rotate the wheel’s pivot (with Affect Pivot Only, Hierarchy Panel) 90 degrees over its local y-axis. This is to make sure that our wheel’s rotation will work fine setting its spinning over the x-axis which is the first one in the Axis order.
Then, Link the Wheel to the Helper_Attached_01 (Helper_Attached_01 as parent).

Select the Helper_Attached_01 and Add a Attachment constraint to it, select the plane as target. The point now is in other position, we have to configure its attachment constraint. In the motion pannel under the Attachment Properties Rollout set the next parameters: Face=7, A=1, B=0. the face is where the point we’ll be attached and A and B are the barycentric coordinates, useful to place the point just over its respective vertex. Make sure the “Align To Surface” property is checked.
If the wheel has a wrong orientation you have to rotate the helper to fix it, just make sure the wheel has the orientation that it had before.
If the Face, A and B values doesn’t work for you, you could change them until you get the right point’s position.
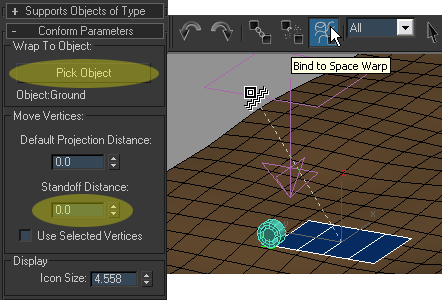
Finally we’re going to create the conform space warp and project the plane. Create panel -> Space warps -> Geometric/Deformable -> Conform. Draw it from the top view with any size you like, it must be pointing downward. Unhide by name the Ground. In the modify panel choose the Ground as Warp to Object and set zero the Standoff Distance (This parameter defines an offset position from the Mesh)
Bind the projected plane to this space warp with the Bind to Space warp tool. And this is it for now!, our first part of the rig is finished, now we have a modifier over the ProjectedPlane projecting it over the ground’s surface. If we move our projected plane we can see how it adapts itself in real time.
AUTO SPINNING WHEELS
First of all, we need to create our tank’s rout, so we can use the distance along this path to define the wheel’s spinning. We cannot use only the tank’s current position, because the wheel’s spinning depends on the distance traveled by the tank. For example, if our tank goes from the point A to the point C its wheel’s rotation in the point C will be diffirent if it goes from A to B and then to C, not matter that it’s finally in the same place, that’s because the distance is different. So, if we create a spline as its path, we may know exactly the distance traveled by the tank along this path.

Unhide by name the “Path” and the “Control_Main” objects, we’re gonna use this last one as the point that is going to travel along the path. Select the Helper_Attached_01 and link it to the ProjectedPlane, then link the ProjectedPlane to the Control_Main, the hierarchy now goes as shown in the picture.
Align the ProjectedPlane to the Control_Main, make sure to check all position and orientation axis and that both objects are in pivot point align. The plane now looks weird, but we’ll fix that in the next step.
With this hierarchy we make sure the wheel and the projectedPlane will follow the Control_Main’s rout and its orientation.

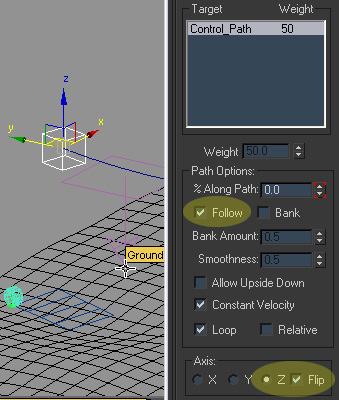
Select the Control_Main and add it a Path_constraint, select the Path spline as target. we need to configure some settings in the motion panel. The point needs to “Follow” the path and its axis must to be “z” and flipped. with this settings the projectedPlane has a right shape, because it is now parallel to the ground.


Thank you ever so for you blog post.Thanks Again. Really Great!!!
Can anyone download the file “video_tank.mov” ? I can’t download it.
what a rubbish is this…….
where is its start………….
hi, please try again. i just tried to download the file and it worked.
would you re-upload the file: tank_rig_start.rar.
It seems as its not longer online.