“Creating fire in a Particles Editor ” by Evgeni Bulatov
Now go to the Color tab and check Intense box (it’s a special blend mode for luminous particles, corresponding the Photoshop screen blend mode). Now click the gray rectangle at the bottom, you’ll put a marker there. This way you’ll specify the particles color during their lifespan.
Adjust the color as following:

The final marker must be black, so that the particles faded in the end (this way we are using the Intense blend features). This is the color of the flame.
Now each particle’s texture is changing in consecutive order. But we didn’t make animation, so we do not need this. Go to the Texture tab and enter zero in the Change frame texture speed . Also check the Random texture starting frame . Now each particle has a random texture not changing during its lifespan.
Now all we have to do is to adjust the particles motion and you’ll get a real fire! But first change the Visibility range (at the bottom panel) 9% start and 95% end range visibility. This way the program doesn’t show the start and the end of the effect if you don’t need them.
Fire always goes up with a constant speed, emitting the tongues of flames of different length. As it goes up it gets thinner and finally fades. Now step by step we’ll set the particles motion according to this model.
Let’s starts with the emitter. Click on the emitter in the Emitter tree (on the left) and in the top diagram change the point emitter type to the line type.
The particles will emit from this line. It has two parameters, the blue graph – the incline degree, the green one is the line length. The default parameters are 0 degrees and 100 length suit the fire nicely.
Now let’s change the angle of emitting the particles. Next diagram is the Emission direction, degrees . Set the values 36º and 144º so that the particles go up.
Now it doesn’t resemble fire very much. Switch to the Particles and hit the Diagram Settings button.

Here are various parameters of particles and as all the parameters are in one place it is very convenient to adjust them in this window. Such parameters as Life, Number, Size, Velocity are interdependent. For instance the high value of Velocity will increase the motion speed of particles and at the same time will make flame longer. But decreasing the Life parameter you could shorten the fire size.
Adjust the parameters as you like or take mine:
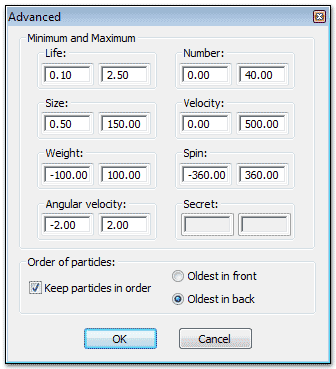
Looks like a good flame thrower, not too bad, but we’d like a small nice campfire. Actually, as I was tuning the particles I adjusted both the graphs and the Minimums and Maximums in this window, until I got the result I needed.
Let’s adjust the diagrams. Now the fire looks too dense, the flame is too bright. Find the diagram Visibility over life (factor) and decrease it to 35.
Now we are going to set the particles motion. The flame must go up but now it’s thrown sideways. It happens because of the wide angle of emitter direction. When making fire I wanted the flames first to go sideways and then go upward. Like this:
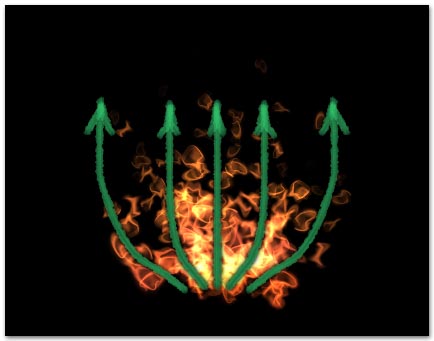
Now the flame goes sideways and we want to direct it upward. We can do this using the Weight parameter, setting its value to a negative number. The particles will “float” upward.
In Magic Particles there are two types of graphs. The ordinary (gray icons) and the Factors (red ones). The usual graphs adjust the particles properties during the effect’s lifespan (X axis is the effect’s lifespan). But factors change the particles during the lifespan of the particle (X axis is the particle’s lifespan).
Creating fire in a Particles Editor
One comment
Leave a Reply
You must be logged in to post a comment.
Popular Tutorials
-
 Free set of photo references for our members
Posted on Nov 15, 2010
Free set of photo references for our members
Posted on Nov 15, 2010
-
 Photo References
Posted on Oct 6, 2010
Photo References
Posted on Oct 6, 2010
-
 Modeling Competition
Posted on Dec 10, 2010
Modeling Competition
Posted on Dec 10, 2010
-
 Modeling a High Definition Building – part 1
Posted on Dec 9, 2010
Modeling a High Definition Building – part 1
Posted on Dec 9, 2010
-
 FREE photo reference sets for you – only for registered members
Posted on Oct 2, 2011
FREE photo reference sets for you – only for registered members
Posted on Oct 2, 2011
Try something new

wow cool