“Studio lighting in Vray ” by Géza Kadás
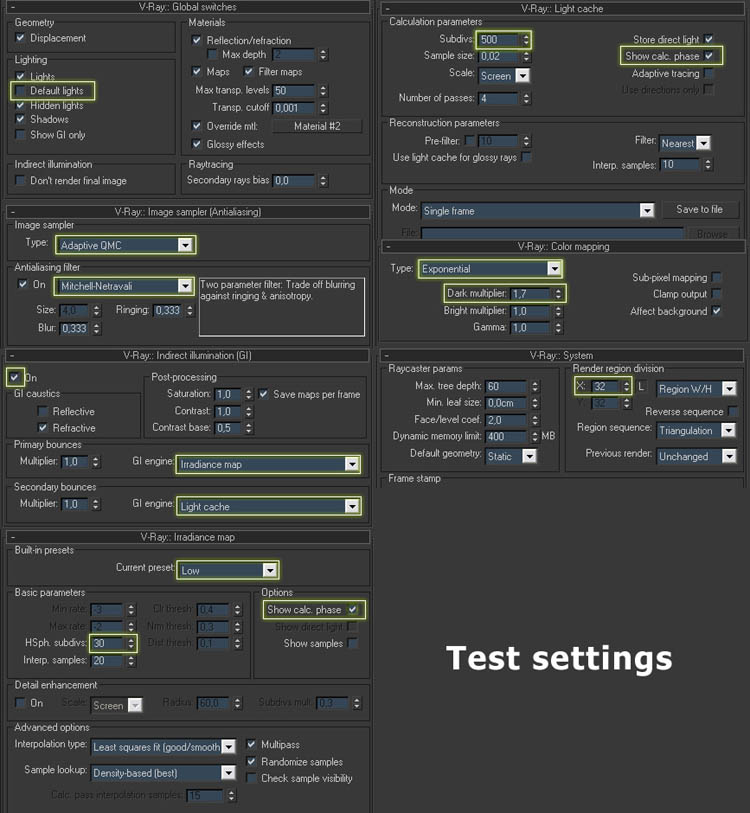
Here is a short explanation of the settings above:
Default lights: turn it off ,we do not want any light, except the vray ones.
Adaptive QMC: A faster image sampling method than Adaptive subdivision.
Mitchell-Netravali: With this antialiasing filter edges will be sharp but not crisp.
Irradiance map + Light cache: the mostly used GI combination.
HSph subdiv: (GI samples) lower it to speed up the rendering process.
Show calc phase: The rendering process will be visualized, so if are not happy with the effect you don’t have to wait until the effective rendering.
Subdivision: The subdiv. of lightcache controls the number of traced paths… The actual number of the traced paths is the square of the adjusted number.So with 500subdiv. 250.000 paths will be traced.
Exponential: With this type of colormapping ,colors will be saturated so you can avoid burnouts on the surfaces.
Dark multiplier: This controls the “Sternth” or the multiplier of dark colors.
Render region division: set it to 32×32 ,smaller bucket size less ram will needed with smaller bucket size a faster feedback can be achieved. All right, lets see the render with the mentioned settings.
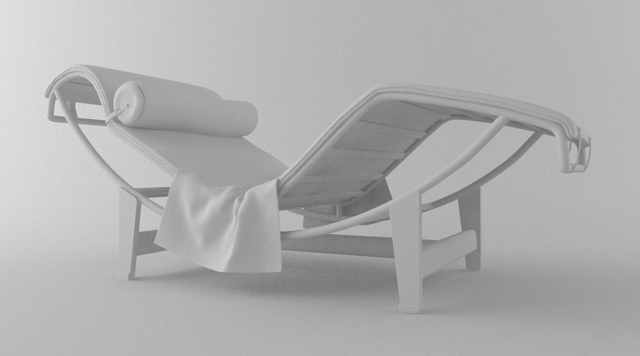
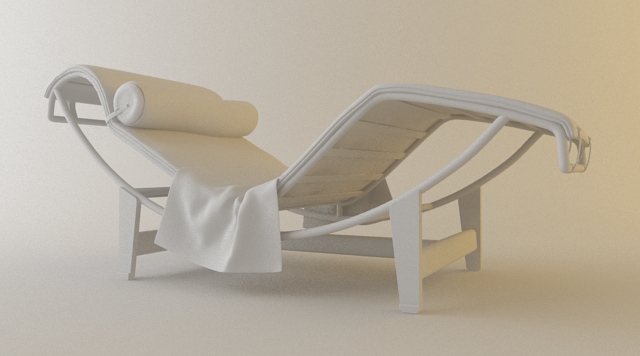
It is much better than the first one. The scene is much more brighter, light is smoother and there are no burnouts. Because of the low quality settings there are GI artifacts ,noise and blurry lines. However ,these settings provide us a very efficent way of testing. Lets play with the colors to break the dull feeling of the render. Change the color of the vray light on the right to R:255/G:180/B:80. This warm orange color will take care of the monotonic lighting.
At this point if you are satisfied with the result you can go to the next step. Creating and understanding shaders is the following topic.
Studio lighting in Vray tutorial
One comment
Leave a Reply
You must be logged in to post a comment.
Popular Tutorials
-
 Free set of photo references for our members
Posted on Nov 15, 2010
Free set of photo references for our members
Posted on Nov 15, 2010
-
 Photo References
Posted on Oct 6, 2010
Photo References
Posted on Oct 6, 2010
-
 Modeling Competition
Posted on Dec 10, 2010
Modeling Competition
Posted on Dec 10, 2010
-
 Modeling a High Definition Building – part 1
Posted on Dec 9, 2010
Modeling a High Definition Building – part 1
Posted on Dec 9, 2010
-
 FREE photo reference sets for you – only for registered members
Posted on Oct 2, 2011
FREE photo reference sets for you – only for registered members
Posted on Oct 2, 2011
Try something new

un gran tutirial, gracias por las molestias.