“Realistic lighting with LDRI images” by Toni Bratincevic
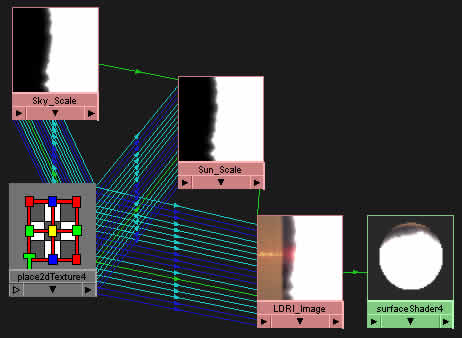
As you probably know, we must connect the place2DTexture node to the Sky_Scale node to get the correct mapping. So, with CTRL pressed, drag with middle mouse button the place2dTexture node and drop it to Sky_Scale node.

Now our shader has been build up correctly. How does this shading network works? Well, as you see the Sky_Scale image node is connected to the SunScale Color Offset attribute and the Sun_Scale is connected to the LDRI_Image Color Offset attribute. This means that where the Sky_Scale image is white it does the offset to the Sun_Scale image, and where the Sky_Scale image is black it doesn’t. After the Sun_Scale image has been offseted, the Sun_Scale node does the same thing to the LDRI_Image image. So with this kind of setup, where the Sky Scale and Sun_Scale is black it doesn’t scale the LDRI_Image. Where the Sky_Scale is white and Sun_Scale is black it does the offset to original image of 1. This means that if the pixel color of the original image has the color of RGB 0.7 0.3 0.1, with the offset it will have 1.7 1.3 1.1. And, where the Sky_Scale and Sun_scale is white it does the offset of 2 to the original image. With this trick we’re simulating the effect that HDRI image has … and that means that we are increasing the brightness of the image to values higher than 255 levels. 😉 Enough of this, let’s see what will we get if we do a test render:

Very nice, but in my opinion the sky is too bright. We can easily control the brightness of the sun, sky and the other parts of the image. How? Well, let’s try this for the sky. Double click on the Sky_Scale image node to open the attribute editor. In the Color Balance section, move the Color Gain slider to the middle (GrayColor). This will decrease the sky brightness level. Ok, now remember the first part of tutorial where we calculated the sun scale value? 😉 Yes, we will use it here … double click on the Sun_Scale node to open attribute editor. Then in the Color Balance section click on the color Box on the left side of the Color Gain slider. The color chooser will pop up. In the Sliders section where it says V set the value to somewhere around 5. This will scale up the part of the original image where the sun is. That means, that areas where the white color in sunscale.tga image is, that part in the original image will be scaled by 5 (+ the scaling value of the skyscale). Let’s do one test render.

There it is… but, it is not over yet. 😉 You can also decrease the brightness of the original image by going in to the attribute editor of the LDRI_Image node and in the Color Balance section move the Color Gain slider to the middle of the line. And here it is, the final image:

I hope you have understand what I was talking about in this tutorial. The technique I showed you goes one step ahead compared to HDRI images, because you can have brightness control of every part in the LDR image. Remember that in the HDR images you can only change the exposition value. Ok, maybe my technique is not as real as the illumination with HDRI images, but it is not too far away from that. I just want to point out that this was a simple example, so be free to experiment with scale maps. For example you can try to use the scale map with gradient for the sky … that will for sure give the interesting effect.
Well, happy rendering and faking. 😉 I hope this tutorial helped a little bit…
Bye bye till next time… 😉
(c) Toni Bratincevic – toni@interstation3d.com – http://www.interstation3d.com


Latest Comments