“Realistic lighting with LDRI images” by Toni Bratincevic
Mmmm… very nice. Now, this is what you get when you try to illuminate the scene with ldri image. If you would have done it with HDRI image the sun and sky would probably be much more brighter than they are now. This is where our scale maps come in place. With them we will increase the brightness of these areas and try to get more realistic results. Let’s go back to hypershade…
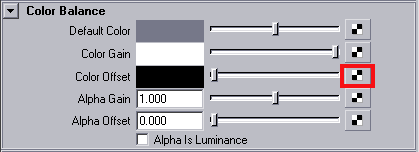
First, we will attach the SunScale image to the LDRI_Image node. To do this double click on to the LDRI image node to open the Attribute Editor. In the Attrib. editor at the Color Balance section click on to the small box on the right side of the Color Offset attribute:
After the click, new window will pop up, named Create Render Node. In that window, open the Texture section. Then, turn off the “With New Texture Placement” Option and in 2D Textures click on to the File. At this moment, the new file node is created and it is connected to the Color Offset option of the LDRI_Image node. To see the whole shading network in the work area of the hypershade select the surface Shader node and click Graph > Input Connections. The shading network should look like this:
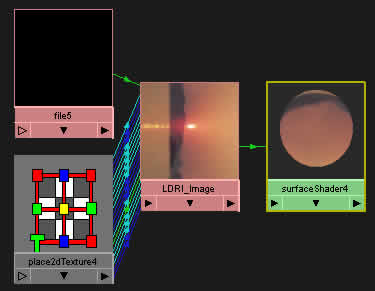
Since new file node doesn’t have any place2Dtexture node connected to it, it would be mapped with the default parameters of placement, and we don’t want this to happen since it will not be correctly rotated, just like the LDRI_Image node was before. And, since we have the correct place2Dtexture node with the right rotation values, we will connect it to the fresh created file node. Remember that place2DTexture node can be attached to as many nodes as you want, but they must be from the 2D Texture section. Press and hold CTRL and with your middle mouse button drag from place2DTexture and drop to the File node. This will create the connection to the file, like in picture:
The file node is empty, and that means that we must point it to the image file. Double click on the file node to open attribute editor. First, rename this node to something like Sun_Scale, then click on the small folder icon on the right side of the Image Name attribute and select the sunscale.tga image. We did it, the first scale map is attached to image. 😉 If you do a test render at this moment the rendered image should be similar to the one without scale map, but there is one little difference, the sun looks much brighter than in original picture. 😉


Let’s explain things a little bit more. The Color Offset can be used to increase the color values of the original image. This means that if the pixel x in the original image has the color of RGB 0.2 0.2 0.2, and if we increase the Color Offset value to 0.5 0.5 0.5, then the brightness of the pixel x will be offset to the color value of 0.7 0.7 0.7. So, if we connect the image (sunscale) to the Color Offset of the original image, where the sunscale image is black it will not offset the color in original image, but in the areas where the sunscale image is white it will offset the color of the original image by 1. I hope you understand what I’m talking about? 🙂
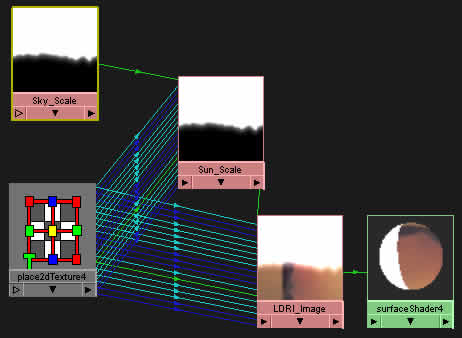
At the end, we will also connect the last scale map, named skyscale.tga, to our shading network. To do this, in work area of hypershade view double click on the SunScale node. When attribute editor opens, in the Color Balance section click on the little Box on the right side of Color Offset slider. In Create Render Node window at the Texture > 2D Textures section click on File. This will create the new file node … and the attribute editor for the node will be automatically opened when you do this. Rename this node to Sky_Scale and in the File Attributes section > Image Name click on the folder icon on the right side of this attribute. Select the skyscale.tga image and click ok. The shading network should look like this:


Latest Comments