“Realistic lighting with LDRI images” by Toni Bratincevic
Now go to the Edit > Fill. In the Contens > Use select White and click OK. This will create the circle filled with white color. Now we must fill the remaining section with black color. To do this go to the Select > Inverse and then again to the Edit > Fill, but now select the Black color. At the moment the image should look like this:

This can be our scale map for the sun, but we will make one more step to make things more realistic. What we want to do is to add a little glow around the bright sun spot. To do this duplicate the SunScale layer. The photoshop will name it SunScale copy and it will probably be placed above the SunScale layer. Now select this copy and go to the Filter > Blur > Gaussian Blur. Set Radius to 10 and click OK. This will blur up the image very strong. Our original layer (SunScale) is not visible at this moment, and it should be mixed with its blurred copy to get the right effect, so select the SunScale copy layer and change the Blending mode from Normal to Lighten. As you would see, the glow appears around sun. Since we would like to make it a little bit more brighter, we will go to the Image > Adjustments > Levels. When menu pops up, set the middle input box of Input Levels option to 1.3 and click OK. The image should look like this:

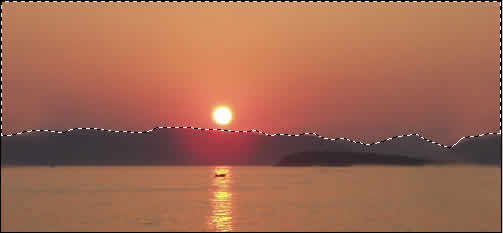
Next scale map image would be the sky. So turn of the SunScale layer for the sun, and from the toolbox select the Lasso Tool. Select the sky area, like I did in picture below:
Now create new layer and name it SkyScale. Fill it with white color as you did it before … go to the Edit > Fill, in the Contens > Use select White and click OK. This will fill up the sky with white color. To fill the rest of the area with black color you have to go to the Select > Inverse to make inverse selection, and the again go to the Edit > Fill menu, select the Black color and click OK. The image should look like this:

To make image a little bit smoother we will apply a little blur filter. Go to the Filter > Blur > Blur More. This will smooth up image a little bit. Now we will do the same glow trick as we did for the sun. Duplicate the layer, then on this duplicated layer apply the Gaussian Blur filter with Radius of 10, and change it’s blending mode to Lighten. The image should look like this:
We don’t need the last scale map for the mountains and sea since it is of constant color, which means that we can do it easily in Maya.
Last thing we have to do here is to save these maps. First, turn off the SkyScale layers and turn on SunScale layers. When you do this go to the File > Save As and save the scale map for the sun. Then turn on the SkyScale layers and save this map also.
So let’s go to maya and see what we can do with these scale maps … double click on my, and probably yours favorite software 😉
CREATING SHADING NETWORK IN MAYA
Welcome to the beautifull empty (at the start) world of Maya. 😉 What we must do is to fill up the scene with something like object. Since we want to make things as simple as we can, we will use some primitive nurbs objects from maya, and lately you can try to build and shade more complex scenes. Just download the scene that I created, the link is below. In the ZIP file are two images sunscale, and skyscale that we created in the section above, so if you don’t have it you can use this ones.
DOWNLOAD THE SCENE (for maya 4.5)
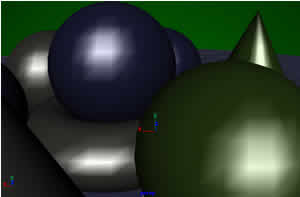
Open the scene with maya. You will probably see few primitive objects in the scene. There is also half of the sphere around the scene that will be used to light up the objects. This sphere doesn’t have any material applied to it, but this is the step we have to do. If you examine the scene a little bit more, you’ll see that there are few blinn shaders that are attached to the objects (spheres, cones, torus ) in the scene. These materials have some reflectivity so that it can reflect the scene around it. I have also set the mentalray final gather options … you can see it in Render View> Options > RenderGlobals (MentalRay) > mentalrayOptions1 > Final Gather. If you have passed through my first tutorial, you’ll probably know what these parameters are used for, if you didn’t it would be wise to go and read it. 😉 Ok now that I have explained a few things about this scene setup, let’s go to work…
I hope you know a little bit about hypershade and how to use it. I’ll go step by step and explain the process of building this type of shading network but you need some experience, so if you don’t have an idea of what hypershade is read the manuals that comes with maya and come back to my tuto. 😉
Realistic lighting with LDRI images
Popular Tutorials
-
 Free set of photo references for our members
Posted on Nov 15, 2010
Free set of photo references for our members
Posted on Nov 15, 2010
-
 Photo References
Posted on Oct 6, 2010
Photo References
Posted on Oct 6, 2010
-
 Modeling Competition
Posted on Dec 10, 2010
Modeling Competition
Posted on Dec 10, 2010
-
 Modeling a High Definition Building – part 1
Posted on Dec 9, 2010
Modeling a High Definition Building – part 1
Posted on Dec 9, 2010
-
 FREE photo reference sets for you – only for registered members
Posted on Oct 2, 2011
FREE photo reference sets for you – only for registered members
Posted on Oct 2, 2011
Try something new

Latest Comments