“Realistic lighting with LDRI images” by Toni Bratincevic
One of the biggest inventions in the last few years in realistic lighting solutions is the appearance of HDRI images and lighting the scenes with them. In my first tutorial on mentalray thematic, I have described the way how to use hdri images to light up the scene. As you already learned in that tutorial, the scene setup for the hdri lighting is not the problem. You just need to put the sphere and map the hdri image on it. If you have the collection of hdri images in on your comp, and these images are just the ones that you need, then you don’t have anything to worry about. The problem comes in the situations where you need to create your own hdri image. Why is this a problem? Because if you want to create the hdri image, you will need to take bunch of images of the same scene with different exposures. When you do that, the program, like HDRIShop, calculates the final color in the image and creates hdri image. And what if you have made a lot of panorama pictures that you want to use as your light maps, or you don’t want to bother with process of creating HDRI images? Well, there are some tricks when using ldri images, that we will explore in this tutorial, which will help us to get the lighting similar to the lighting with hdri images
To maximise the realism of your 3D rendering and lightning we recommend to use high quality panoramatic photos from the #1 texture website www.environment-textures.com or to visit www.hdrskydome.com and get great HDR skies for better rendering purposes.
As you probably know In HDRI image, some parts of image can be brighter than 255 level used in ldri images. These brighter areas are the main source of light emission from the hdri image. This can not be achieved with ldri images, because ldri can’t emit the light more than 255 level of brightness..
For this tutorial you will need Maya with mentalray for scene setup and rendering, HDRI Shop with few hdri images to measure the light level and Photoshop to create the bitmaps for color scaling.
In our first step we will examine one HDRI images with HDRIShop. This will help us to measure how much is the light (sun) brighter than the rest of the HDRI image. In the second part we will go through process of creating color scale maps, and in the last part of the tuto we will see how to setup the shader for our faked hdri lighting.
MEASURING LIGHT SCALE VALUE IN HDRI SHOP
So, let’s go and measure lighting level of our HDRI image (see the next image). I will use one hdri image from www.cgtechniques.com named salettl.hdr. Start the HDRIShop. Import in HDRIShop your hdri image. As you can see, the big part of the image is white. These are the parts where light brightness goes above the 255 levels. To find out how much brighter these areas are you must go to the View > Exposure > Costum. The exposure menu will pop up, with slider bar in it. Move slowly this slider in the left direction to the point where sun starts to lose it’s white color and becomes gray. In the informations below the slider is the box where the Scale information is shown. This information is important since it shows how much we must multiply the white color in ldri image to get the brightness like in the hdri image. Now with your calculator divide number 1 with that value (mine is 0.15). The result should be somewhere around 6.6. Remember this value since this is the value with which we will multiply the parts of LDRI image where sun is.

CREATING SCALE MAPS IN PHOTOSHOP
Now that the light brightness mesauring is finished we must create the scale maps in photoshop. What are scale maps? They are grayscale image maps that are used to scale the original ldri image. At this moment we will learn how to create them, and later we will create the shading network in maya using these maps, and then you will see how does scale map work. To create the scale maps you need to have the ldri image with which you want to light up your scene. If you have some panorama images, that would be ideal image for that job, but now, to make things a little bit simple, we will use one of the images that my friend has taken at the sea… download it by clicking on the image or the link. Since we don’t use the image of the sun at day, we would have to use different sun scale value from that one which you calculated above.
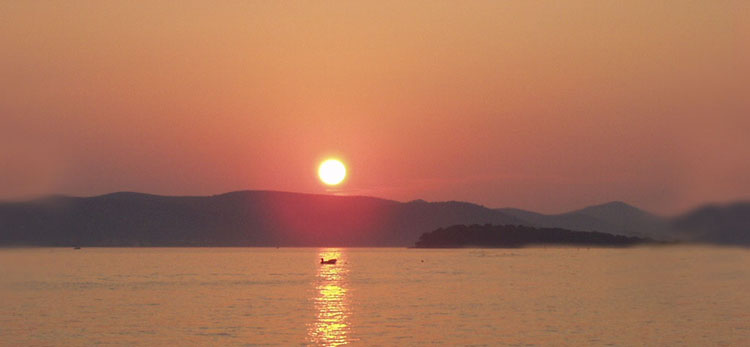
As you can see from this picture, the main source of light energy in the scene comes from the sun. In the picture the sun has the color brightness somewhere around 255 which is the maximum value that LDRI image can store, but in real world it is much much brighter than this. If this would be the hdri image, then the brightness of the sun would have much higher values. If we examine the picture a little bit more and think about the similar situations in real world, we would get to conclusion that next stronger energy emitter in the image is the sky and the last one would be the mountains and the sea. That means that we must create three different scale maps, one for each one of the elements that we mentioned above.
Now that we’ve analyzed the picture, we can get busy and create the scale maps. Of course, this has to be done in Photoshop, so start it and load the picture from above.
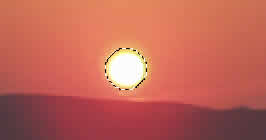
First thing we will do is that we will create the scale map for the sun. Create new layer and name it Sun scale. Now pick the Elliptical Marquee Tool from the toolbar and mark the part of the image where the sun is. Check if the new layer is selected, and if it isn’t select it.


Latest Comments