“Material Tutorial: Chrome” by Mario Malagrino
Florence Design Academy
www.FlorenceDesignAcademy.com

Chrome is one of the most used materials in the Design field. This material needs only a few settings to be rendered in an optimal way. You can see many samples of chrome in the design gallery of the Florence Design Academy http://www.florencedesignacademy.com
Let’s begin:
1 .) You need a dark gray diffuse color (for a perfect mirror it should be black, but often a dark grey
color has a better effect on chrome).
2 .) Now go to add glossiness and specular level (there are no fixed values, the correct effect is
strongly depending by the light that you create. You can begin with the value 40 in both slots).
3 .) Go to maps and assign to the REFLECTION map “RAYTRACE”. This will allow you to
have REAL reflections of other objects in the scene on this material. The value in the reflection slot
should be between 85 and 100 (a mirror must have 100)-( image 1).

Image 1
Very often you need to have a environment which reflects on your object to achieve a good rendering. A good reflection will give a touch of realism to your object and will describe better organic shapes. But what if we don’t have any other object in the scene that can reflect on our model ? We will use a FAKE reflection. This kind of technique simulates to have a environment reflected on surfaces which in reality does not exist in your scene. In fact we will use a simple image to create a Fake reflection. After you have insert RAYTRACE in the reflection map you will see that the material editor is showing new settings. This are the settings of the raytrace panel (on the right side of the material editor you can see written RAYTRACE instead of standard). Like on image 2 go to assign to the NONE button in BACKGROUND a BITMAP (image 2).
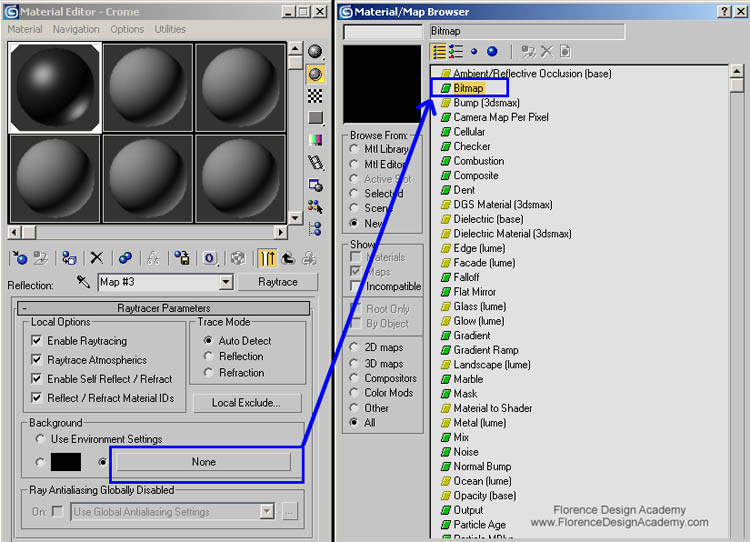
Image 2
Material Tutorial: Chrome
Popular Tutorials
-
 Free set of photo references for our members
Posted on Nov 15, 2010
Free set of photo references for our members
Posted on Nov 15, 2010
-
 Photo References
Posted on Oct 6, 2010
Photo References
Posted on Oct 6, 2010
-
 Modeling Competition
Posted on Dec 10, 2010
Modeling Competition
Posted on Dec 10, 2010
-
 Modeling a High Definition Building – part 1
Posted on Dec 9, 2010
Modeling a High Definition Building – part 1
Posted on Dec 9, 2010
-
 FREE photo reference sets for you – only for registered members
Posted on Oct 2, 2011
FREE photo reference sets for you – only for registered members
Posted on Oct 2, 2011
Try something new

Latest Comments