“Labrador” by Roger Rosa

If you know what you want to model, start searching for Data and images / videos material on the internet. If you have a camera you can, as well, get specific data that will best suit your needs. Front, side and top view of the model are essentials ( better indeed, if taken from the same model ).
I will repeat but great data leads to great detail and natural looking models.
First i took pictures from differents labradors, and from one to another there is huge differences when it come to details. So don’t waste time while modeling and prepare the best you can your work
With precious help from Mathieu ‘s Osmoze Labrador, i could find all i needed to achieve good modeling.
3Dtutorials.sk recommendation:
To maximise the realism of your 3D pets we recommend to use high quality animal photo references from the #1 reference website www.3D.sk

Now we are going to set up the workspace for speed modeling !
1. start editing the current default layout, it will be red highlighted.
2. Layout > new layout > blank to clean the screen .
3. right mouse > set view > view manager to show the viewports.

While this could be sufficient, we need some other tools onscreen. CREATING A MODELING PANEL
1. View > Custom toolbars > new to create a blank toolbar. Give the name you want.
2. Pass again in edit layout mode with the panel open. With right mouse split vertically once. Then split the right pane twice horizontally. Finally split twice the left pane horizontally.
3. Set up the views as shown (’cause i had videos, i put thetimeline 3d and the playback panel )
4. Final refinement, on the image clip viewer view, right mouse and add view switcher. Add the explorer.
5. Leave Edit mode and save the new layout when prompted.

THE FINAL TOUCH
Now we are going to add a browser to avoid searching each reference file with the image clip viewer.
1. views > browser opens the browser. Browse directories to your data. Add to favorite.
2. Set the browser to thumbnail display.
3. Hide the left pane with the center arrow. Now resize it to fit on the right side of the screen.
4. You can resize and place the browser and you modeling toolbar opened or close, they will remember each place and size.
5. to hide or open a toolbar, double click its title bar.

STARTING MODELING
We are going to start from a polymesh cube.
1. You could now choose some reference images and drag them from the browser into the scene.
2. For the overall shape we can pass in rotoscope mode in the right view to model the side of the dog. Don’t forget that clips can be modified in the fx tab without altering the original source. Thus, you can crop or modify hue/brightness… to suit your modeling needs


1. Get a primitive mesh cube. Press V to enter translation mode. Choose the view submode in xyz. this will help you to adjust freely newly created polygons in that plane.
2. Activate Immed in the Edit panel, this will freeze the operator stack after each action, preventing the history to grow. You can still undo with Ctrl + z.
3. Now press Y while dragging over the right side of the cube to choose a polygon. Don’t relax until you completely surround the polygon. This is supra key mode .
4. When you relax, the cube turns yellow and the center has stuck to the middle side of the cube, the polygon has been choosen, you are still in translation and you passed in polygon mode…….THIS IS PURE ERGONOMY “NOM DE DIEU”
5. adjust the form of the cube to fit the nose with pressing T and draging over points. You are now in point mode. You can translate those red points to change the shape.


EXTRUDING
1. Press Y once and relax (this is sticky key mode). You are in polygon mode. Press V, you can now translate.
2. Press Ctrl + D, this will duplicate selected polygons in the same position.
3. Translate to the right, try to follow the rough lines of the side.
4. To adjust the zoom ratio and position between the image and 3d world, the pixel zoom icon can link the image with the mesh and liberate.

EDGES
We are now going to need some triangles.
1. press E while dragging over an edge. You are in edge mode with translation.
2. press right mouse button over an edge, the context menu for tagged edges appear. (Alt + mouse right if you are in extended component ie : Softimage 3D) Choose collapse. The edge disappeared and the 2 endpoints have been merged. Now you can make tris! .
3. If you are in XSI key mode, to add to selection / remove / toggle use the same keys as windows : Shift / Ctrl / Alt or none. This is similar as Max controls. I prefer Softimage 3D extended controls but if you want to play Octopussy with Shift + Y to add…if not you can call extended selection by activating the toggle Select > extended component ( you need to return to xsi default layout )


1. Select the last polygon on the back of the dog. Turn off immed mode ( this way you will be able to update the changes from the property editor ).
2. From the context menu choose extrude polygon along axis. The property editor appear.
3. Choose local component for extruding from the local coordinates of the polygons. Increase the subdivs to 5. In the tab of transformation you can now set values for scaling with the per subdiv toggle, thus refining the tail.
4. You can now easily made the legs by extruding along axis.
5. You can return to the extrude operator by expanding the cube in the explorer and clicking the extrude operator icon. Don’t forget to return to immed mode, when you need no longer operations in the history. But you will collapse all operators.


SUBDIVIDING
You may need to subdivide locally to extract the legs.
1. Press I to pass in Edge Raycast mode and choose some edges near the chest just passing by them. In extended mode with the 3 mouse buttons you can easily select / deselect / toggle ( look at the bottom of the screen to see how the functions are mapped to the 3 buttons).
2. Now from the context menu choose subdivide edges evenly. From the property editor, set the number of subdivisions ( you can experiment all of these tools )and close.
3. Extrude the legs and tweak the points as desired.


If you don’t want to keep the polys with 5 sides, you can add edge easily.
1. Press space bar to pass in object mode. The dog turns white. From the context menu choose add edge tool.
2. you can pass on edges and points, its flashes to give you feedback. When looking at the status bar, you can see the 3 functions mapped on the mouse buttons.
3. Press Ctrl while in add edge mode. Terms change to “bisect”, this mean you will automatically snap to mid edges while cutting. Now you can add edge easily.

You should now have something like that.


INSTATIATION , MIRRORING AND MERGING
To better appreciate your work while modeling in front and user view:
1. Select the dog
2. Press Ctrl+I, this will instatiate the dog
3. From the transform menu in the Scale X text box enter -1, this will flip the mesh.
4. Enter translation mode, turn to global submode and while pressing Shift translate to the left in X. This will ensure perfect alignment with the first mesh. In translation, Shift key will move per increment. (you can modify from the transform option panel)
5. In order to merge, we need to delete the inner side of the first half dog. Select the dog and press U, this will activate Polygon raycast mode. While clicking left button pass on the polygons to select them.
6. Press Del to delete these polygons
7. Return to object mode (space bar). With one half selected Create > Polymesh > merge and pick the other half. Right click to exit. The property editor appear, let the values to the default and close. A new polymesh is created that is linked to the 2 others.
From a schematic view you can clearly see the relashionships between the meshes. You can even select a relashionship and press enter to modify its properties.


SUBDIVIDING
1. Select the merged dog. From the context menu select subdivision. This will create a Subdivided mesh from the merged one. Select your rule of subdivision, you can interactively see the changes. I will choose Doo Sabin ( if you choose Catmull – Clark rule you ‘d better go for Geometry approximation . cf subdivision tutorial ).
2. Open a schematic view. Set Show option to operator links and link to selected nodes only. This way you can understand the relashionship. Double click on the cube and rename it left half.
3. Put the editor right up icon to Focus, now click on the other half. Automatically, the property editor display the name property. You can therefore change all the names.


SETTING WORKSPACE
1. From the schematic, select the cube instance and the merged Polymesh and press H. The black squares are now just transparent to show you they are hided.
2. Select the first cube and from the right click context menu choose explore. Expand the hierarchy to the display properties. Click on the display icon. Choose to duplicate to local properties.
3. From the display properties editor choose wireframe for all the dropdown lists , selected and unselected.
4. From the view display menu toggle off override object properties. This way the view ‘s display properties won’t take precedence over local ones. Now you can view in shade mode the first half in wireframe over the final sudivided merged dog.


ADDING DETAIL
1. We got a pretty good overall shape, we will start refining the dog. The rear leg has 3 main points of detail : the tight, what would be the knee and the paw.
2. Start the main muscle adding an edge through 2 or more sections.
3. Select that edge and choose bevel from the context menu. Adjust the ratio. Collapse one or more edge if necessary.
3. Try to give “the knee part” this look for exterior and inner side. This is a two bones part. First add edge, then bevel and collapse.
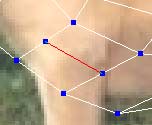
4. This is the goal for the paw. Start by selecting some edges and subdividing them 4 with connection.
Now activate edge mode ( E ) press shift + Ctrl + F to clear the selection with filter and press F9 to pass in freeform selection mode. Drag over the vertical edges.
When selected choose extrude along axis. Change lengh to -1 and close. You’ve got a first paw. Now you can tweak points, add and collapse edges to give it a more pawlike look.
5. The paw after several passes of detail.


CATMULL / DOO SABIN —CONNECTING OR NOT
1. To understand the difference, here it is a rendered Doo sabin rule with the paw’s fingers stoping straight without connection to make tris or quads. Not a terrific Low poly model but a good subdivided one.
2. The same thing but with a Catmull – Clark rule. Awful on all the line and the paw has lost some volume.
3. Now the paw with good connections ( tris or quads ) and Doo Sabin subdivision. The upper part of the paw is now too straight and not as good as the one before. The Low poly is now better but the finished rendered one not.
4. The same thing with Catmull-Clark gives now better results but with the same loss of volume.
5. What you must fully understand is that when it’s time to animate, pleats parts are important. Because only these parts will have a soft enveloppe assignment. In this case the upper paw will never bend so connections are not essentials. This is why while working with Subdivision, Low poly is somewhat like a lattice. Choose your rule depending on your goal, this will change your modeling method.


PAW ‘S CUSHIONS
1. The bottom of the paw is still pretty simpler. We are going to add the cushion.
2. Start connecting the fingers underneath by adding edges.
3. Once you have got the main connections, you are going to extrude the cushions. Subdivide once again to set the basic size of the cushions with add edge. Select the polygons.
4. Press Ctrl + D to duplicate. If you have the “display multiple transformation axes” user preferences toggle activated in the interaction tab, you will be able to see each polygon axe. Toggle COG off in the transform panel since we need local scale in each polygon and not the center of selection. Press Shift while scaling to get uniform scale.
5. In local translation mode, push the cushions out of the paw. Now you have got the paw finished.


REFINING
1. You can add detail where needed depending on what you want to animate.
2. I added the ribs for breath animation.

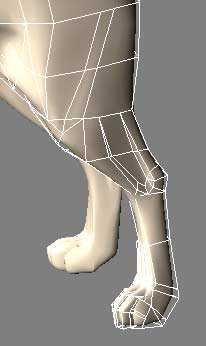
The overall shape of the rear leg. With the knowings you have now, you are going to make the front legs.
Pages: 1 2


Latest Comments