“Model The iPod nano” by Bracer Jack

Welcome to this tutorial on iPod modeling, it is my hope that by modeling this simple model, you will learn the basics of technical modeling & along the way acquire a sense of satisfaction from modeling this culture icon.
3Dtutorials.sk recommendation:
To maximise the realism of your 3D objects we recommend to use high quality photo references from the #1 texture website www.environment-textures.com
The extreme technical look of iPod makes it an excellent candidate for NURBS modeling.
I once model an even older version of the iPod using Rhino and here’s the result, it’s an excellent NURBS modeling product, I am very please with the way Rhino makes NURBS handle boolean operations, very stable.
For this tutorial you may choose to use either NURBS based splines[Maya, softimage, etc] or polygon based spline[3DS max, Lightwave, etc].
The first thing you’ll need to do is to set up the schematic view so that you can make sure everything is being modeled proportionately.
Click to download schematic images. 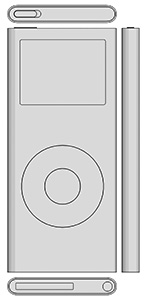
Click image to download
Arrange the planes as shown in your respective 3D app.
 Notice I have place the top view plane on the bottom & vice versa, the reason for this is for tracing convenient, depending on the way you model, it may or may not applies to you.In the steps to come, I will no longer show the schematic planes, it’s understandable that you will need it to guide the proportion accuracy of your model.

1: Using Spline/Curve, draw out the very outer edge of the iPod from the top or bottom view, it doesn’t matter.
2: Extrude from the spline the main body of the iPod.Naturally, you’ll use the schematic planes for guidance regarding the height of the iPod 🙂
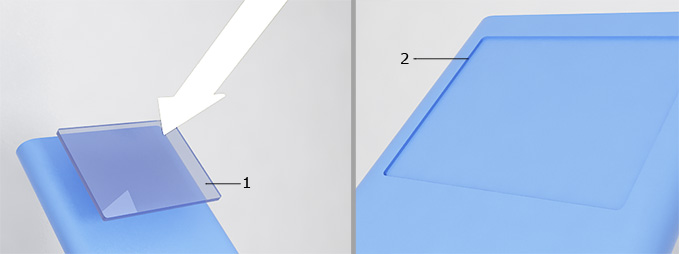
1: Create the screen’s spline by tracing outthe screen shape.Extrude and use that as a boolean subtraction shape.
You can either guess the depth of the screen using common sense [you can’t be too wrong] or look at an actual iPod nano but seriously, it’s a step too much.
If you are using NURBS [especially using Rhino], your job is done.The way NURBS handles boolean operations can only be describe as perfection.
If like me, you are using polygons and you encounter some problem,please kindly refer to this tutorial that I have created on fixing booleans 🙂
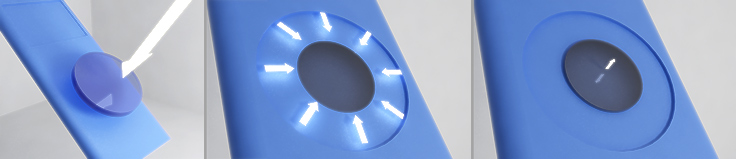
Do the same thing for the “hole” of the wheel.Spline->Extrude->Boolean with main body.
Fix the boolean operation [if you are using polygon modeling like what I’m doing for this particular model].
If you are using 3DS Max, you’ll select the inside polygons of the hole[wheel] and click “insert” to create another polygon[actually it’s more like slicing] to match the size of the inner wheel.If you’re using NURBS, ignore this step.
Polygon modeling: extrude from the hole to create the inner button.
NURBS Modeling: straight away model a cylinder and boolean union it in.The reason why NURBS can do this while polygon cannot[not really cannot, more like advise not to] is because you have gone all the way to fix the boolean operation that result from the subtraction from the wheel why not use the fixed result to extrude another button instead of fixing another boolean operation right ?That’s why the second step is created for polygon modelers like myself 🙂
Pages: 1 2


Latest Comments