“Creating game character – part 4 ” by Les Padrew
Texturing the Character
Most video games combine the textures of a character into a single texture map, sometimes called a blanket or pelt.For your pirate girl,you will create a single texture map that measures 512×512 pixels. Before you even start painting, however, you will need to set up the map in 3ds Max so you have a guide. The pelt for the character will be 512 ×512 pixels. For now, load a solid black texture map into the next available Sample Slot.
3Dtutorials.sk recommendation:
To maximise the realism of your 3D characters we recommend to use high quality human photo textures from the #1 texture website www.3D.sk
Preparing the Model for Mapping
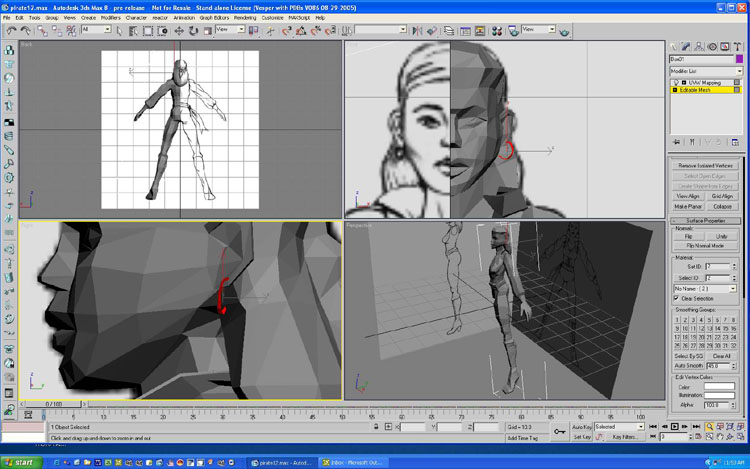
The first step in preparing the model for mapping is to separate and label the Material ID. A Material ID is a way for you to isolate mapping areas on your model. In Figure 94 the polygons of the head are selected. These polygons will later be mapped with a circular projection.

Scroll down the rollouts to Surface Properties and type 1 in the Set ID box,as shown in Figure 93. Every polygon on the model needs to be part of a Material ID, even down to the girl’s earring,which I have given a Material ID of 2 in Figure 95.
The way you isolate your model depends on the types of mapping projections you will use. Most of the time I like to use circular projections,but in some cases,such as the hands, I use planar projections. In mapping this character I used 10 different Material IDs,as follows.
Head
Earring
Hair
Collar
Torso
Arm
Hand
Hip and leg
Boots
Heel and sole of boot
Figure 96 shows how the torso was isolated.

It includes everything from the neck down to the bottom of the sash.The hip could also be included,but I find it much better split the IDs based on hard transitions from one color to another,such as in the pants and the sash,rather than splitting along an area within the pants.It helps to keep painted seams out of the texture.
Projecting Maps
To have multiple projections on a single map from a single object mesh,you need to use a special type of shader called a Multi/Sub-Object Material. Bring up the Material Editor,as shown in Figure 97,and select the black material you loaded earlier.

Now click on the box labeled Standard, just below the row of icons in the Editor. This will bring up the Material/Map Browser, as shown in Figure 98.

Select Multi/Sup-Object from the list,as shown. You are now ready to start projecting maps to the character.
1. Collapse the stack and set the Material ID selection to 1 so the head is selected.
2. Select UVW Map from the Modifier List to bring up the mapping options.
3. The modifier will come up with a Planar projection,which is the default projection mode.Change the projection to Cylindrical.
4. Change the alignment to X.
5. This next part will be a little tricky.You need to rotate the projector into the right position.Click on the plus sign next to the UVW Mapping line in the stack to access the mapping gizmo.With the gizmo on,you can rotate the projection instead of the model.
6. The projection needs to be lined up so the seam (marked in green on the projection cage) is directly behind the character’s head so it will mirror properly.You also need to rotate the projection so its projection cage line runs exactly vertical.
7. Click the Fit button on the Alignment rollout.
8. Now the projection needs to be centered on 0 in the X axis.
9. Scale the projection so it is larger than the mapping area,as shown in Figure 99.

10. When you are finished,collapse the stack.
That is pretty much it for projection mapping.You will need to go through each of your mapping sets and project a map on each one.With my model I used Circular maps for everything except the hand and the bottom of the boot, where I used Planar maps. Make sure on the torso, collar, and hair that you center to Circular projection on the X axis, as you did with the head. For the arm, leg, and boot, the Circular map should follow the angle of the limb.This might take a little while,but don’t worry.
Pages: 1 2


Latest Comments