Unwrapping the UVWs
You must be done projecting maps, if you are reading this. Now comes a really interesting part of the process.You will need to organize the UVWs of the model on your texture area.You will use the Unwrap UVW modifier to do this.
1. Select the model in Object selection mode and then select Unwrap UVW from the Modifier List.
2. Click on the Edit button in the Modifier rollout to bring up the Edit UVWs Editor.
3. You will see all of your projection maps directly over each other in the Editor. It will look a lot like a bowl of spaghetti.Drop back to the Edit Mesh modifier. Ignore the warning pop-up.
4. Now go to the Material ID and set it to 1.
5. The Editor will now only display the first projection of the girl’s head laid out flat,as shown in Figure 100.
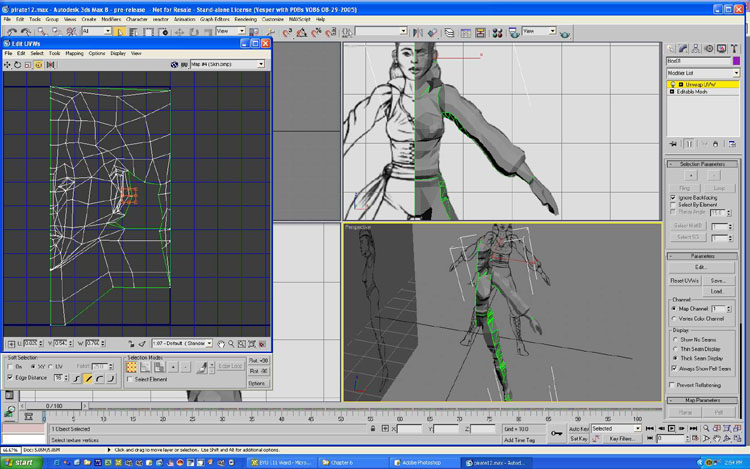
6. You need to do two things with the UVWs of the head.First,you need to scale them down so they take up about a quarter of the texture area.You can use the tools on the upper-left panel of the Editor,just below the menu, to move,rotate,and scale selected UVWs.
7. Next,you need to open up any overlapping UVWs in the ear area.Figure 101 shows how the UVWs should look after the overlapping ones are flattened out.

Continue working on each Material ID set until you have all of them laid out on the texture and not overlapping.Figure 102 shows how mine are laid out.

Painting the Texture Map
Now you can use the UVW map as a guide for painting the texture map.First,you will need to get the guide into a 2D painting program, such as Corel Painter. In Edit UVW,go to the Tools menu and then to Render UVW Template.Set the template size to 1024 ×1024 and then click on Render UV Template at the bottom of the pop-up window. The template will be rendered and can be saved in any file format you want. Alternatively, you can just do a screen grab of the Editor by pressing Print Screen on the keyboard and pasting it into a paint program and cropping it,as shown in Figure 103.

Continue to paint the texture map until you have all of the texture areas covered. Figure 104 shows my final texture map in Corel Painter.

Applying the Painted Texture Map
When the texture map is finished,you will need to load it into 3ds Max and apply it to the model.
1. Bring up the Material Editor and select the Multi/Sub-Object Material (see Figure 105).

2. Click on the first sub-material and go to the Maps rollout menu.
3. There will already be a map loaded in Diffuse Color because we loaded the black texture earlier.Click on it.
4. Under Bitmap Parameters,click on the button that has the path to the cur- rent bitmap.
5. Browse to the new texture map you just painted and load it.You will see it in the shader sphere.
6. Now you will need to click on two icons in the icon row to apply the texture to the model.First,click on the Apply Material icon,which is the third icon from the left.Next,click on the View Material icon,which is the fourth icon from the right.The face texture should now show up on the model (see Figure 106).Alternatively,you can drag the material directly from the Sample Slot to the object.

7. There is a Go to Parent black arrow icon second in from the right.Click it twice to go back to the Multi-Sub-Object Base Parameters rollout.
8. The next material has not had a map loaded into Diffuse Color,so when you click on the material button you will notice that nothing is loaded there.
9. A series of rollouts will appear.Click on the one labeled Maps.
10. Now click on Diffuse Color to bring up the Material/Map Browser,as shown in Figure 107.

11. Double-click on Bitmap at the top of the list and load the new texture into this slot as well.
12. Apply the texture to the model as you did the first material.
You will need to repeat the process of loading the texture map into each material on the list.Figure 108 shows the texture map loaded into all of the slots.

The model is now textured completely. If you did your painting correctly,the tex- tures should all line up with the UVWs. If you need to adjust any of the textures on the model, you can go back into the UVWs Editor and move the UVWs until they are correct.
Mirroring the Model
Now that the model is built and textured, it is time to complete the other half by mirroring the model. The Mirror function icon is located on the top of the main interface row of icons.It is on the left side and looks like two triangles pointing at each other with a line in between.
1. Collapse the stack so the mirror function works correctly and click on the icon to bring up the Mirror:World Coordinates dialog box,as shown in Figure 109.
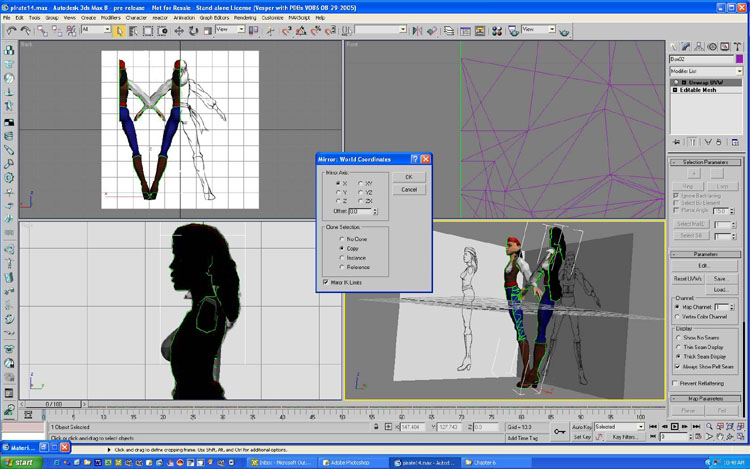
2. You will need to scroll in closely to the model in the Front view in wireframe mode to line the mirrored object up with the original.You need to make the object a copy,so select Copy in the dialog box.
3. The mirrored model is not in the right position,so move it using the dialog box.To do so,type in the coordinates,as shown in Figure 110.

4. The two halves need to be joined into a single object.Go to the Create tab in the Side Bar and select Compound Object from the pull-down menu.An Object Type rollout will appear.Click on Connect,as shown in Figure 111.

5. Click on the Pick Operand button and then click on the unselected object of the two mirrored objects,as shown in Figure 112.

6. Now that you have a single object,you need to weld all of the vertices along the seam of the two halves.Go back to the Modify tab,collapse the stack, and make the model an Editable Mesh once more by selecting Editable Mesh from the Modifier List.
7. From the Front view,select all of the vertices along the seam of the two halves and weld them together,as shown in Figure 113.
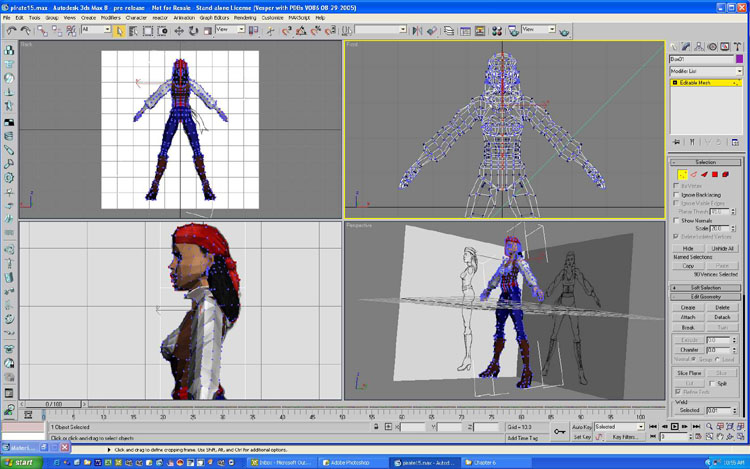
8. The model is almost finished.There is just one more thing to do,and that is to smooth the facets of the model.Change the selection mode to Edges and select all the edges of the model.From the Modifier List choose Smooth. Click on Auto Smooth and then change the Threshold to 60,as shown in Figure 114.

There you have it, a finished character model for a game, ready to move on to anmation.You should be proud of yourself for making it this far.In Figure 115 I have rendered the model to show how it will look in a game. Hopefully yours will look similar.Now that you know how to create a character,try designing a few of your own.

(c) Les Padrew, les@alpine-studios.com
Pages: 1 2


Latest Comments