“Frog King” by Chris Beatrice
Creating and Using a Guide Layer
Before painting the tower roofs I created a separate layer to use as a guide while painting. The guide layer contains a few ellipses traced over the form of the coned roof, and a small color palette applied to a duplicate of the roof to the right of where I’ll be doing the actual painting. The guide layer helps me stick to the proper elliptical shape as I paint the rows of shingles wrapping around the roof, and maintain the right overall map of colors and shapes to define the conical form as I paint individual shingles.
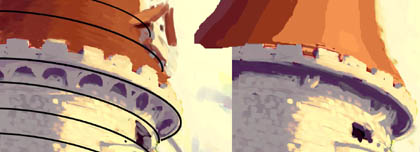
Guide for painting coned, shingled roof
Adjusting levels
One of the great things about working digitally is that as long as you have your basic shapes and value relationships right, you can fine tune and experiment with different adjustments to push the image further. In some cases you can actually change the apparent material with just a few simple adjustments. Here I’ve taken the initial painting of the golden ball, and by simply adjusting the levels in Photoshop made it really look much more like metal than it does in the original rendering.


Making that metal shine by adjusting levels in Photoshop
Character studies
I did a whole bunch of quick painted studies for the main character of the girl. In keeping with my approach to the rest of the painting, I essentially “practice” painting the item in question until I feel I’ve got it, then I lay in the actual final representation quickly and dynamically. At right are two of the head studies I did before painting the final image of the girl, showing the basic sequence of painting starting with simple shapes, then fine tuning. I take each one to the point at which I can tell how it will work in the final image, but no further.


Facial expressions
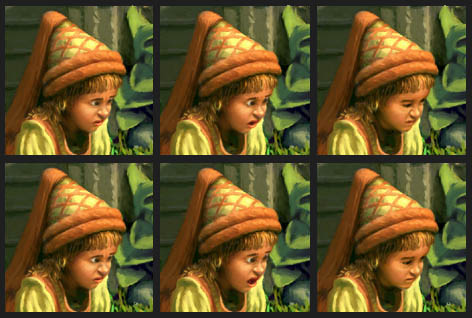
I came to feel early on that the expression on the girl’s face was going to be pivotal in telling the right story with this picture. In the end, to achieve the desired effect I had to take some liberties with the chronology of the story. In the story, by the time the frog has retrieved the ball, his proposal has already been made, the girl has gotten over her shock, and in fact simply takes off, breaking her promise. I chose to combine their initial interaction (where the frog proposes his “deal”), including the girl’s reaction of surprise and disgust, with the presence of the (retrieved) ball, since it is the central object of their exchange. I created around ten different versions of the expression on the girl’s face, before settling on the final one (on the lower left).
Wrap-up
The big challenge with this picture was to establish “mini paintings” within the painting, each with its own light and color palette. When you isolate these areas (some are shown at right) they almost look like thumbnails taken from different pictures. Each has its own red, yellow, blue, black and white, relative to the other colors in its area. The trick is connecting these areas into a cohesive, larger whole. This is something I’m likely to continue exploring in my next few pictures.
You can also download the brushes used in this picture and download other brush sets on the Brush Download Page


(c) Chris Beatrice, www.chrisbeatrice.com


Latest Comments