“Creating grass land using pflow” by Ranjit Menon
Hello friends .. I just love pflow and have used it in lot of my projects. Here i would like to share with you a very easy method to create a grass land in 3dsmax using pflow . It is some what similar to scatter but more flexible than scatter and u can create your own variations easily. I will be using some operators here

Shape instance operator
Shape Instance creates particles whose shape is based on a reference geometry object. The object’s animation can be synchronized with particle events.
Position Object
Position Object places particles on a set of reference objects.
Split Amount
Split Amount checks numerical particle property, and sends to the next event either a fraction of particles, or every Nth particle, or the first N particles, or all the particles after the N first.
1. First of all lets start with creating a cone of sides: 6 radius1: .6 radius2: 0 and height: 40. A bend modifier should be applied to the cones. You can even go lesser on the sides if it gives u the result u want. U can also create another cone bend in a different angle. Now we have a Cone01,Cone02 and a Plane01 U may name these to Grass1,Grass2,Terrain respectively since i strongly would advice u all to use naming conventions whenever possible, which can save u a lot of time. Using a cone gives u a 3dimension to the grass. rather than using a plane. Also create a plane with length: 200 Width: 300, Segments 12*12 and apply a noise modifier with the settings as shown below. Also apply a turbosmooth modifier to it.


2. Create a particle flow source. In the Main menubar – Create>Particle>particle flow source (Particle flow is an event driven particle system and it gives us more control over the particles than the ordinary particle systems in max which are non-event driven) Press 6 or select the pflow icon and go to the modify panel and click on the particle view button. You will get a window as shown below
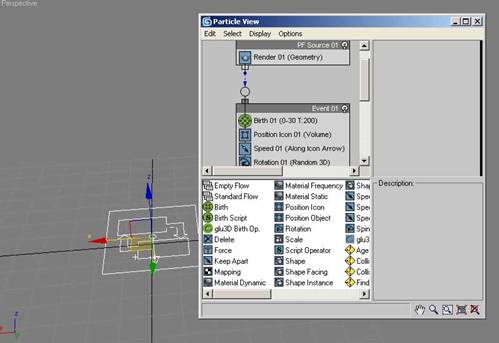

3. These are the default operators that u get in particle flow. We shall replace some of those with operators from the operators depot to get our desired result . I have marked in the image below where all operators have to be replaced with new ones. eg the Position Icon operator will be replaced with the Position Object operator by left clicking and dragging the Position Object operator from the operators depot on to the Position Icon operator in event 01.U will see that a red line appears on top of the Position Icon operator, release your left mouse button then. Similarly, change the Shape operator with Shape Instance operator.


4. First click on the Birth operator and change the emit stop to 0. Now all 200 particles will be emitted at once rather than one by one. Also give a particle amount of 1000 ( Depends on how much u need and how much area u need to cover).


Latest Comments