“Clothes tutorial” by Aziz Khan
22-like this one below.
23-first of all deactivate (Select Surface Objects) where in the image indicating, why I am doing this because its time to create seams for our cloth which we need to select the curves not the cloth surface if you don’t deactivate (Select Surface Objects) the surface of cloth wont let you select the curves since we will deal with curves in this case, once you deactivated (Select Surface Objects) then select the indicated curve and hit (Create Seam) in the picture below.
24-now you should see something like mine.
25-keep selecting the curves one by one and keep creating seams in the end yours should look like in the image below.
26-now select the both indicated curves from back and forth as showing in the picture below.
27-and then hit (Create Seam) and now your cloths should be attached together.
28-keep doing the same process and then your should look like mine below, front side.

29-and here is from back side.
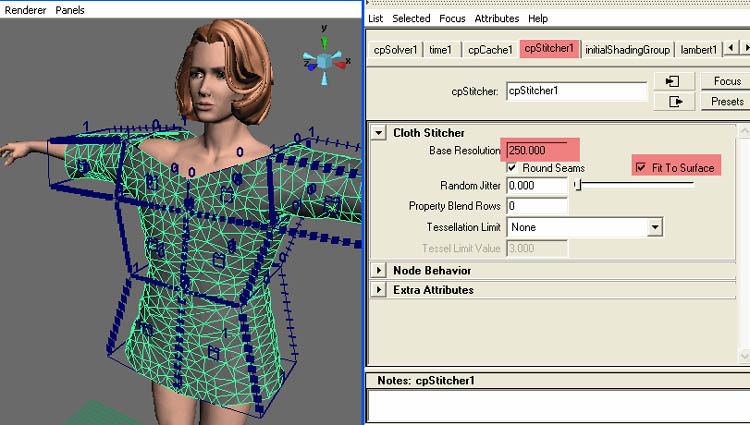
30-activate the (Select Surface Objects) and then select the cloth surface like the image indicating below.
31-by CTRL+A open up your attributes editor and then in the (cpStitcher1) tab do the same settings as below.
Clothes tutorial
One comment
Leave a Reply
You must be logged in to post a comment.
Popular Tutorials
-
 Free set of photo references for our members
Posted on Nov 15, 2010
Free set of photo references for our members
Posted on Nov 15, 2010
-
 Photo References
Posted on Oct 6, 2010
Photo References
Posted on Oct 6, 2010
-
 Modeling Competition
Posted on Dec 10, 2010
Modeling Competition
Posted on Dec 10, 2010
-
 Modeling a High Definition Building – part 1
Posted on Dec 9, 2010
Modeling a High Definition Building – part 1
Posted on Dec 9, 2010
-
 FREE photo reference sets for you – only for registered members
Posted on Oct 2, 2011
FREE photo reference sets for you – only for registered members
Posted on Oct 2, 2011
Try something new

It’s truly a nice and useful piece of info. I’m happy that you just shared this useful info with us. Please stay us informed like this. Thank you for sharing.