“Character Texturing ” by Julian Johnson-Mortimer
Hello there, Welcome to my Texturing tutorial. In This one I will be texturing the head of the character I made in my modeling tutorial.
Now I will be working in Photoshop, I should first say that for a good texture, you need a good UV map with a minimum amount of stretching.
In my tutorial I went through how I set up my uv’s. Now it’s not very in depth, so i’ll provide a few links to some other uv tutorials.
Here is a picture of the UV Map for my head. which I shall be using as a guide for painting.

I will be working in a texture size of 3000 by 3000.
If your just learning and practicing you do not really need to go this big, a texture size of 1000 by 1000 or 1500 by 1500 will be just fine there’s just no need putting in extra detail when its not needed.
I’m using texture size of 3000 because of one that’s probably the limit of the memory I have for my PC also I plan to do some large renders of the head and 3000 by 3000 should be fine.
Now I’m not really, going to go into great detail of what each map does, please read the above texturing links by Leigh she can explain them far better then i can.
The maps I will be making for my head will be:
Color Map
Bump Map
Spec Map
Reflectivity Map
Transparency Map
Translucence Map
Diffuse Map
Some of these maps I just use as part of my shader, please remember you don’t actually need to make all these maps, this is just what I use.
I will be starting with the bump map because its usually the base for the other maps, now if your have Graphics tablet your probably find adding nice bump details far easier, then using a mouse. I only have a mouse so it’s not so easy painting nice bump details and can take a lot of time, but we’ll make it;-).
Now lets load up photoshop and make a start.
This tutorial is aimed at beginners so the bump map won’t actually involve to much painting.
I’ve thought up a few ways to make it easier to make a bump map, it won’t be the best, but it should be quite easy to make and follow if you have Maya that is. Любите смотреть на то, как женщины ласкают друг дружку, трахают разными способами и доводят о оргазма? Тогда вы обратились точно по адресу. У нас самые красивые русские лесбиянки https://порнушка.org/lesbian устраивают дома самый жаркий трах. Сучки начинают обычно с того, что целуются в губы и раздеваются, а потом они отменно лижут и мастурбируют письки, пока не кончат.
Lets first load the UV map into photoshop.

I’ve made a gray 50% gray layer, below the uv map layer. Now i’ve screened the uv map over the gray layer and turned down the opacity.

I should just say you always need good reference for making textures, here is the picture i’m using for reference, i’m not going for a nice clean skin texture, quite the opposite.

3Dtutorials.sk recommendation:
To maximise the realism of your 3D characters we recommend to use high quality human photo textures from the #1 texture website www.3D.sk
Now usually I would start painting the bump details and it can be hard some times to make a start. But for this tutorial I’ll be using some of Maya’s Procedural textures as a base for our bump layer.
So let’s load up maya and experiment with some of maya’s Procedural textures, it’s always good to experiment and try different things.
Now using the IPR Interactive renderer, i’ve played about with different textures and settings looking for different parts of the skin.

I’ve pluged a fractal texture and started playing about with the settings.

I’ve tweaked the settings till I found something that I liked, once I’m happy I converted it to a file texture that I can use in photoshop.
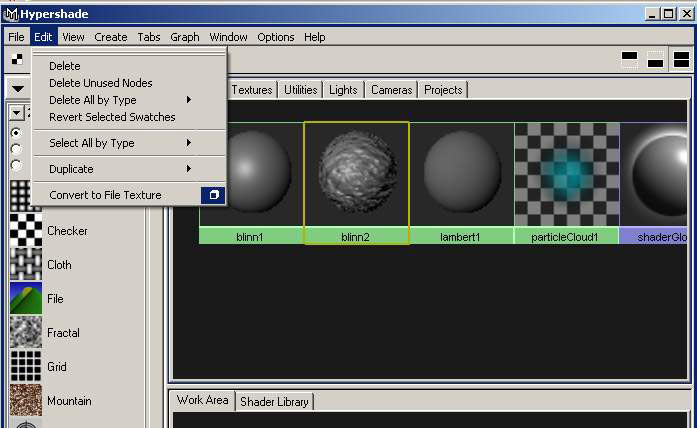
From the menu shown above I first selected the head mesh then shift selected the shader, then select convert to file texture from the menu.
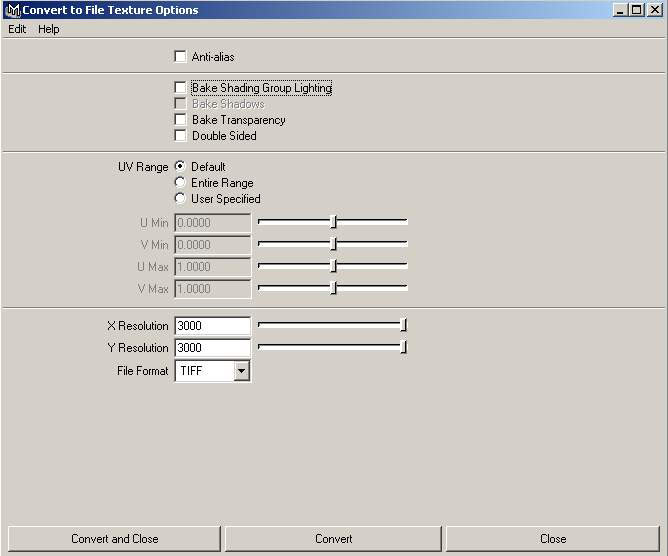
Here’s the options i’ve selected texture size 3000 by 3000 because that’s what i’m using of course and I selected TIFF format to keep all the details.
Once Maya has written the texture image i open it in photoshop and paste into my photoshop file .
Now let’s see what else we can use…

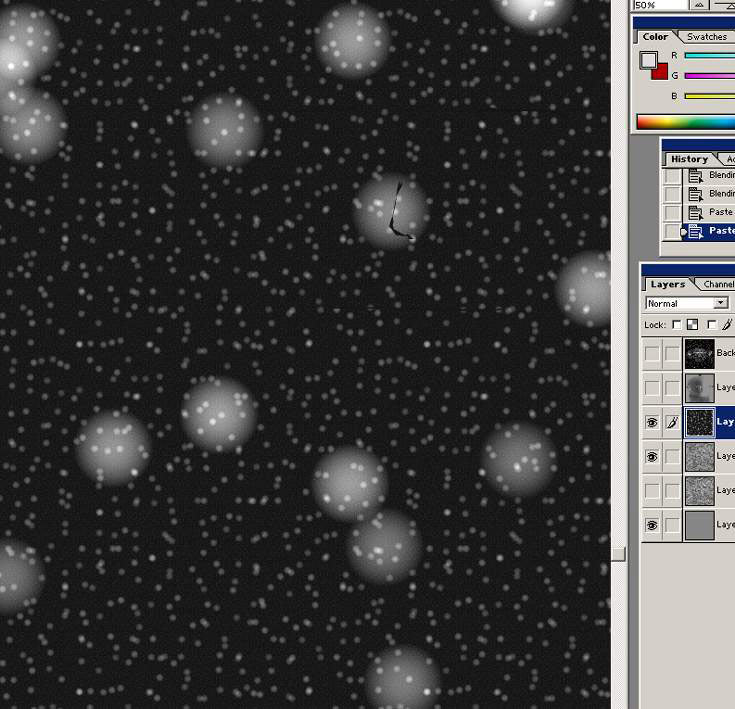
Using a noise texture this time I made loads of spots, once I was happy i’ve converted to file again and put with other layers in photoshop.

Here’s my crazy spot texture opened in photoshop and put with my other layers.
Next i’ve used a brownian texture to make the very fine wrinkles that you might see on the forehead or around the neck. Converted to file texture again.

Now for some pot marks.

The pot mark texture opened in photoshop; we are only actually going to use it in a few places like the nose and around his cheeks, we will erase the rest.

Now I have started to blend the textures together, starting with the first texture, and doing some test renders at the same time to see how its looking. erasing areas of the textures and blending it with my 50% gray layer right at the bottom using soft light, or multiply or overlay.

Now looking at the spot texture, we of course only want some random spots and bumps here and there so I will be erasing most of them.

Now we need to be making lots of test renders while we work on the bump map, there’s only really a few areas of this spot map that I want to keep. I like the big lump that’s above his left eye, i’ll probably try and keep that in.


Hello, I check your blog like every week. Your writing style is awesome, keep up the good work!
i’m fresher in animation world, and this is very helpful to me. thank you very.