“Angie – 3D Photorealism Portrait Tutorials & Digital Art Lessons – Part 1” by Ralph Manis
In this tutorials you will learn how to model a realistic head, add photo realistic textures to the face and paint perfect hair using Poser, Bryce and Photoshop.
3Dtutorials.sk recommendation:
To maximise the realism of your skin textures we recommend using high quality human skin photo references from the #1 texture website www.3D.sk
For this tutorial you will need a basic understanding of Poser, Bryce 3D and Adobe Photoshop, Paint Shop Pro or any other painting program. These techniques can be applied with other similar programs but, were written for these in particular. A note to intermediate and advanced users: I tried to make this tutorial as comprehensive and detailed as possible for new users. Please bare this in mind when the explanations seem a bit obvious and repetitive.
•Tip : Where ever you see: (Ctrl+S) or (Ctrl+Shift+N) or something similar, these are “Keyboard Shortcuts” or “Key Strokes” By holding down these keyboard combinations together, they will manifest different commands. It is a good practice to use them when ever you can. In time they will become second nature and speed up your work flow. You may download the entire model with texture maps here or other models from the Bryce free downloads page.
This tutorial is featured in “Femme Digitale” by Michael Burns.
Also published in “The Best of 3D Graphics” by Vic Cherubini.
A CD with the entire contents of this tutorial and all of it’s Poser, Bryce 3D and Photoshop files is available here.
Modeling in Poser, Creating a UV Map, Using photos and painting in Photoshop
Modeling the Head and Facial Features with Poser 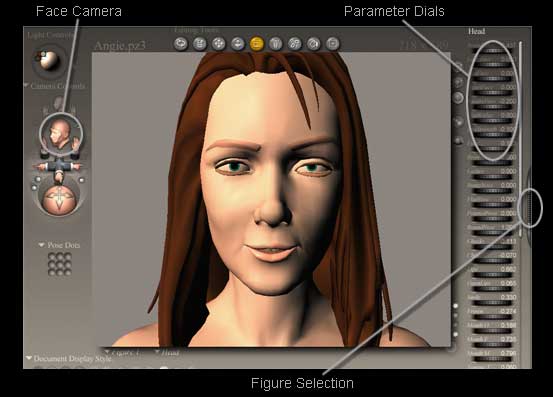
The Poser Interface Feel free to work from your own photographs and create your own poses.
1. Open Poser and select a female figure then select the “Face Camera” from the camera controls drop down menu or click on the small gray head. ![]() Adjust the facial features and head shape with the “Parameter Dials”
Adjust the facial features and head shape with the “Parameter Dials” ![]() until you have your desired characteristic’s. Save and name file Head.obj.
until you have your desired characteristic’s. Save and name file Head.obj.
2. Select File > Export As Wavefrount Object. In the Export Range pop up menu select: Single frame and OK. In the Hierarchy Selection pop up menu uncheck: Ground and Hair then OK. Name the file: Head.obj Save file and close Poser.
•Tip: When using the “Parameter Dials” make your adjustments in small increments. If you don’t like an adjustment hit: Ctrl+Z to undo the last input.
Create and Editing a UV Map (without hair)
Creating and Editing the UV Map Without the Hair
1. Open UV Mapper then: File > Load Model or (Ctrl+L) > find and select Head.obj.
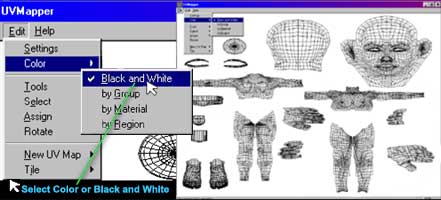
2. If you saved your “Head” model without hair then ![]() Select: Edit > Color > Black and White then: File > Save Texture Map (Ctrl+T) and OK. Name it: UVMap.bmp, save and close the UV Mapper.
Select: Edit > Color > Black and White then: File > Save Texture Map (Ctrl+T) and OK. Name it: UVMap.bmp, save and close the UV Mapper.
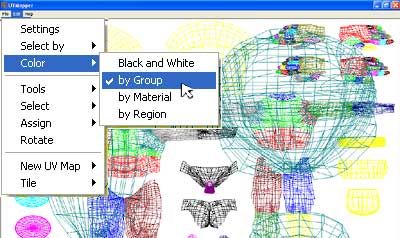
2a. Optionally you may want to separate your body parts into groups. This will make it easier to select the individual parts in Photoshop with “Select Color Range” To do this select: Edit > Color > by Group then: File > Save Texture Map (Ctrl+T) and OK. Name it: UVMap.bmp, save and close the UV Mapper.
•Tip: Pay no attention to the fact that the UV Map does not look like it has the facial expressions (morphs) that you applied to your model in Poser.
•Tip: You can Select: Edit > Color > By Group to separate the body parts by color making it easier to distinguish them apart from each other.
UV Mapping (with hair)
Pages: 1 2


Latest Comments