“Walk Cycle – part 1 ” by Joshua Murphy
In this tutorial, you will learn how to set up IK solvers on bones and create a simple walk cycle. For this tutorial you will need atleast an intermediate knowledge of 3DS Max, or your preferred 3d application. In this tutorial, I will be using 3DS Max 2008, so if you have an older version or if you are using a different 3d application, your button configuration maybe be slightly different.
3Dtutorials.sk recommendation:
To maximise the realism of your 3D models we recommend using high quality human photo references from the #1 texture website www.3D.sk
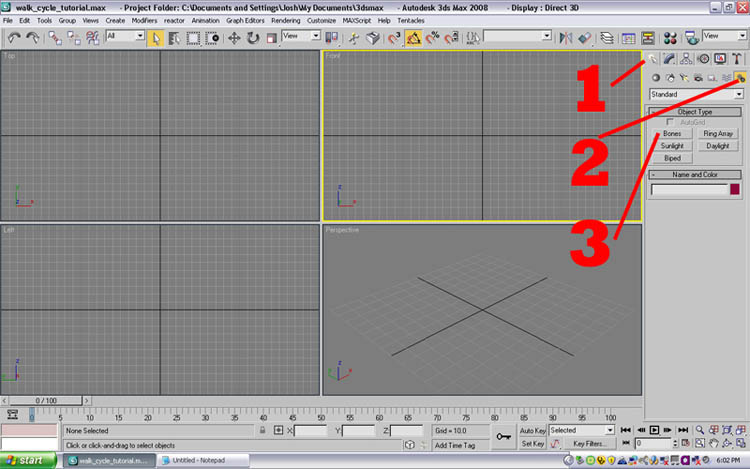
Firstly, open 3d max and follow the steps labeled below.
First, go to the Create tab, then go to the Systems tab ( the tab that has gears showing), next select the button that says Bones.

Go into your Left viewport and draw out the bone in the shape of a leg. If your creating bones for an animal, or anything other than a human, the principle is the same. Make sure that you create the leg with a little bend in it. Like the image below. This will allow us to apply the IK solver later.

Don’t worry about the little nub at the end of the last bone that you create. Now we have our leg bone. Next, you want to go to the Helpers menu and select Dummy. This will give us a dummy object we can use instead of grabbing the actual bone.

Now create the dummy object, resize it if you have to and position it like I have in the image below. Next, with your top (thigh) bone selected, in your Main toolbar, go to the Animation menu, select IK Solvers, then select HI solver.

Notice how that creates a link between the top and foot bone of the leg. Next, follow the same steps as above, but this time select the calf bone and the foot bone. Notice how now you can move the foot and leg independently of one another if you select the blue plus sign gizmo.

Once this is done, select the dummy box that we created earlier and go to the Select and Link button on your Main Toolbar. Link the dummy object to the foot bone. You will see two squares when you are on or hovering over your foot bone. Just let go of your mouse button and it will blink, letting you know that it’s been linked. Now, all you have to do is select all (CTRL+A), and in your Top viewport, shift+drag to the left or right to create the other leg.

You should end up with something similar to the image above.
I will show you how to animate a human walk cycle in Part II of this tutorial.
(c) Joshua Murphy, http://www.3dhuntsville.com


Joshua Murphy, you have said the truth and many had been set free through your tut. Great tutorial, thank you very much.