“Vertex painting ” by Radoslav Zilinsky
Hi, I’m Radoslav Zilinsky from Slovakia and i’m going to explain you the method of blending procedural materials with vertex paint modifier that is located in max from version 6, so even though I use 3dsmax 7, you wont have any problems with 6.
Procedural materials are very powerful and combination with vertex paint are even more. This tutorial will be just about procedurals, so im not gonna use a single bitmap in it. I don’t want to tell you that procedurals are better than bitmaps. Both have its own advantages and disadvantages, but i think what the combination of both is the best solution. But this tutorial is about something else.
So, what we are going to do? We are going to make some procedural materials and, what is important, tell them where they should be located on our object with vertex paint. In fact, we will paint on specific locations on object, where we want to have specific type of procedural.
One disadvantage, when you are using vertex paint for this, is that you should have quite dens mesh when you want to paint on object with vertex paint, because it shades faces and if you would have for example a plane with two faces and you would want to paint just in the corner of this plane, it wont be able, because the faces are too big and you will not have a color just in the corner, but a gradient from corner something to the middle of this plane. But this is not very dramatic, and in most cases you will have mesh that is dens enough. Just try it for yourself and you will see.
First, i want to show you my teapot that i made for this tutorial, and that im going to work with.

Now, we are going to make two base procedural materials that will blend together, exactly how we paint on object. We will paint on object just black and white, where black will represent first material and white will represent the second.
So here are the first two material
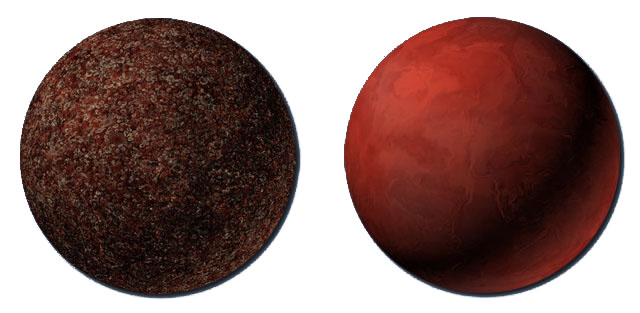
The material nr.1 is just a mix of super noise and watercell map (assign this two maps to a mix map and put this mix map to a diffuse slot of a material).Material nr.2 just have a two level super noise map(it means that it has another super noise map inside super noise map, assigned to one color) in diffuse slot. And this materials have also bump maps of course. Super noise map is more complex and better than normal noise map that comes with max.If you don’t have super noise a watercell map you should download it below supernoise map watercell map
Now we are gonna paint our object B/W so black will represent material nr.1 and white will represent material nr.2 as I mentioned earlier.So first apply a vertex paint modifier to object(marked as 5 on the next picture).Set VERTEX COLOR DISPLAY – UNSHADED(marked as 1 on next picture) to see how you paint, set CHANNEL to Map channel 3(marked as number 2 on next picture)

I’m not going to explain you how to paint with vertex paint. All the buttons are well explained in user reference. But there is one important thing that I should mention. When you assign a vertex paint modifier, there’s no vertex color on object by default. So it seams like it has white color, but it doesn’t. So first thing you should do, is to make the whole object white. Do this by setting a color(marked 5 on the picture) to 254, 254, 254(not to 255 255 255, because it will not work) and press the can button(marked 3 on picture). Now you have white object and you can start to paint with black color – just change opacity and size(marked 4 on picture) of brush during painting. On previous picture, you see like I painted my object.
Now, we want to blend our two materials, like the vertex colors are our object. To do this, make a blend material, assign material nr.1 to first slot, material nr.2 to second. Put the gradient ramp map to mask slot of blend material and change its map channel to 3, like we have in vertex paint modifier(we are putting gradient ramp because you can better control this map, like simple gradient). In fact this gradient ramp represent the transition between this two materials. Do a render and you should have nice blend of 2 materials on object like me on the next picture.

Look at the render and on my vertex painted object. Truly, where I painted with black color, there’s first material on render and vice versa.
What bother me on previous render, is that the transition between the two materials is linear which look a little unrealistic. I also solved this problem. So if the gradient ramp represent the transition between materials, it is clear that we are going to tweak this map. I don’t want this transition to be linear, but something like fractal noise. To make this, we are gonna put a mix map instead of simple gradient ramp to mask slot of blend material. You should be able to make this map from next picture, there is everything you will need for it.

3Dtutorials.sk recommendation:
To maximise the realism of your textures we recommend to use high quality photo images from the #1 texture website www.environment-textures.com
On the next picture, you see that the transition is now more realistic.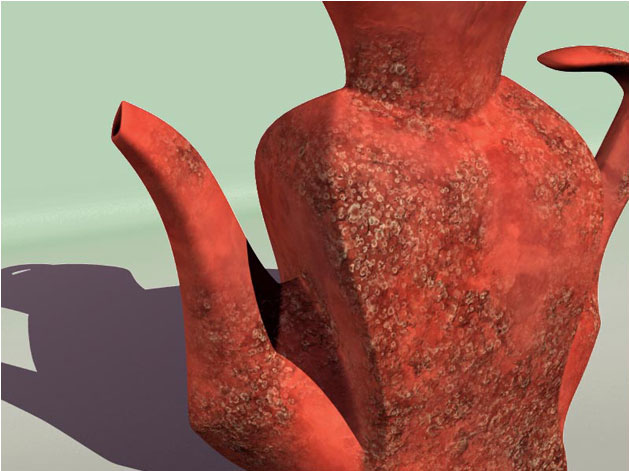
I will show the same pictures, but with the similar materials, to better see the difference.

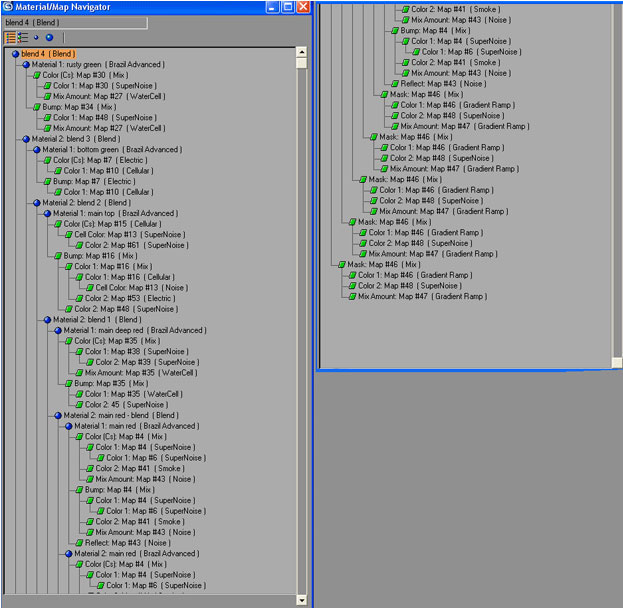
So this is the main procedure. I continued with assigning another 3 materials to this teapot. I do this by making new blend material, assigned new material to the first slot and to the second slot I assigned our old blend material. As mask, I make another mix map(similar to previous one), in which all the maps had higher map channel and than I put another vertex paint modifier and set its map channel to the same as in the maps of the mix map. I continued further more – new blend, new material, new mix map, higher map channel, new vertex paint.Everything is clearly visible on my final material tree
This is the additional three materials.

This picture is how all 5 materials will blend together.

Eventually this is the final image – so it is blend of 5 materials and every material is placed on the teapot with new vertex paint modifier – at the end, I had 4 vertex paint modifiers in the stack with different map channels assigned.

So i hope you enjoyed this tutorial and feel free to contact me if you have any questions.
(c) Radoslav Zilinsky , www.radoxist.com


Latest Comments