“Using Character Studio – The Basics” by Nathan Fearon
Introduction:
After spending weeks teaching myself Character Studio, I’ve decided to make a tutorial on it in the hope that others won’t need to suffer the same frustration. I’ll try to make each step as simple and straight forward as possible — basic knowledge of 3D Studio Max is recommended, however.
1. Creating and Positioning a Character Studio Biped
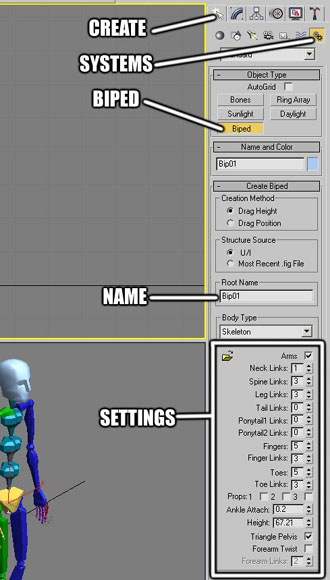
Go into CREATE, SYSTEM, and BIPED. Now click-and-drag inside a VIEWPORT, and a CS biped skeleton will be created.
It’s possible to set the name of the Biped, which will apply to every piece of it, although I usually leave it as the default as I’m lazy 🙂
Now edit the settings to create whichever kind of biped you want. I personally find it best to set the amount of Spine Links to 3 or 4, as any more than that can become a pain when rigging or animating.
It’s possible to change the settings later, though in some cases you can run into problems with this, so it’s generally always best to do it now.
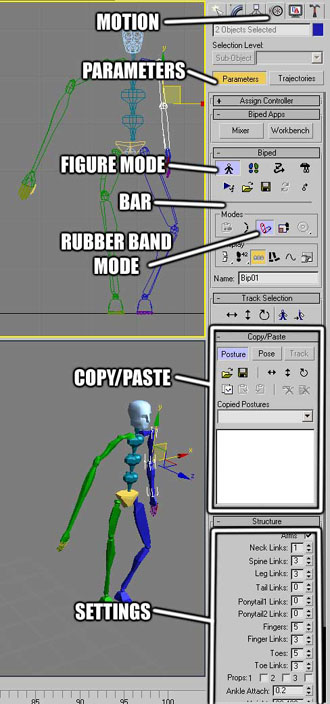
With a piece of the biped selected, go into MOTION, PARAMETERS, and FIGURE MODE – now you can set the default position of the CS biped (usually used for matching the CS biped to a mesh before rigging).
Click the thin BAR and it will bring out a new rollout of tools – if you select RUBBER BAND MODE, you can stretch or shrink parts of the biped.
With the COPY/PASTE parameters, you can save and load biped positions and animations – page 2 has more details on their use.
While in FIGURE MODE, you can change the settings of your biped – doing so can cause problems with existing animations or rigs, thus it’s best to arrange all your settings early on. Once you’ve finished setting up your biped, click FIGURE MODE again to exit it, then turn to page 2 for the next part of the tutorial.
3Dtutorials.sk recommendation:
To maximise the realism of your 3D character animation we recommend you to see motion videos from www.3D.sk
2. Character Studio Parameters Overview
We already went over the basics of FIGURE MODE on page 1, so now let’s have a look at some of the other Character Studio tools. I suggest that you try each tool out after reading the description for it.
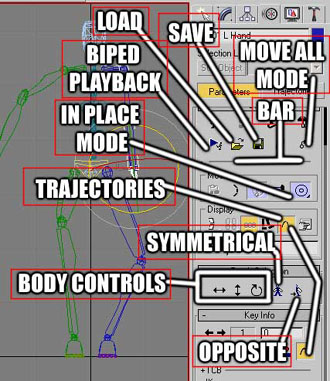
SAVE and LOAD – saves or loads a CS biped.
MOVE ALL MODE – use this if you want to relocate your biped, together with any existing animation.
BIPED PLAYBACK – good for viewing your CS animations in realtime.
BAR – click this to open a new rollout.
IN PLACE MODE – keeps the pivot of the biped in place (which can be handy when making stuff like walk or run animations). If you hold the mouse button down on it, you can also choose a single axis to keep in place.
TRAJECTORIES – this displays lines in the viewport which represent your biped’s movement, with small dots to represent each keyframe. A very useful tool when you’re refining your animation.
BODY CONTROLS – these let you swap between the movement and rotation tracks of your biped’s pivot. More about this below.
SYMMETRICAL – if you click this while a limb is selected, the opposite limb will be selected also.
OPPOSITE – if you click this while a limb is selected, the opposite limb will be selected instead.
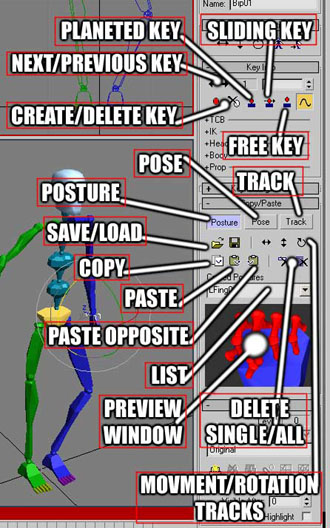
PLANTED KEY – when applied to a hand or foot, this tries to keep it in place.
SLIDING KEY – when applied to a hand or foot, this tries to keep it in place, but still allows you to animate it.
FREE KEY – turns off PLANTED or SLIDING KEY
CREATE KEY– sets a normal keyframe
DELETE KEY – deletes a keyframe if one is set at the time
Next is the COPY/PASTE ROLLOUT, which allows you to copy a biped position or animation, and paste them later on.
POSTURE – used for when you just want to copy a piece of the biped (e.g. just the fingers, so you can swap between an open or closed fist).
POSE – used for when you want to copy a pose for the entire biped.
TRACK – used for copying the biped’s animation.
SAVE/LOAD – saves or loads copied biped files.
COPY – copies the biped’s POSTURE/POSE/TRACK. First select whichever part of the biped you want to copy.
PASTE – pastes biped positions and animations you’ve copied.
PASTE OPPOSITE – pastes a mirrored version of biped positions you’ve copied (e.g. a pose copied from the right arm would be pasted to the left arm).
LIST – brings out a drop down menu of all the biped positions you’ve copied. Also lets you rename them.
PREVIEW WINDOW – shows you a preview of the pose.
DELETE SINGE/ALL – deletes one, or all, of the copied biped positions from the List.
MOVEMENT/ROTATION TRACKS – use these to select which pivot tracks (horizontal movement, vertical movement, rotation) you want to copy or paste.
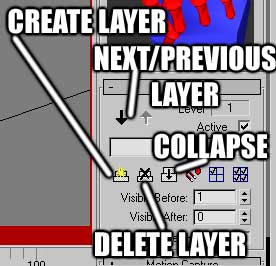
LAYERS ROLLOUT
CREATE LAYER – creates a new layer which you can animate on.
NEXT/PREVIOUS LAYER – swaps between layers.
DELETE LAYER – deletes the current layer
COLLAPSE – merges layers together
Animating Tips:
1. The CS biped cannot be moved without AUTO KEY/ANIMATE turned on (or while in FIGURE MODE).
2. By default, much of the biped shares keyframes (i.e. if you have a keyframe for the left hand, it will also create keyframes for the left fingers, arm and shoulder). In the picture on the right, I’ve colour coded which parts are shared.
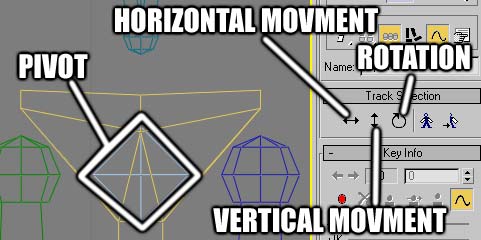
3. The entire biped is dependent on the pivot, which is inside the Pelvis (see image below).
By default, the pivot’s VERTICAL MOVEMENT, HORIZONTAL MOVEMENT, and ROTATION tracks are each separate (so moving it won’t make rotation keys, and rotating it won’t make movement keys).
Alternately, you can choose which track you want to animate it in under TRACK SELECTION in the Character Studio PARAMETERS (once again, see the image below).

Another thing to remember is that becoming comfortable with the technical side of Character Studio (or any other program for that matter) is a great thing, since it means you then don’t need to spend as much time thinking about the technical stuff while you’re trying to express yourself. What’s even more useful in the long run, however, is learning animation theory.
For anyone who’s at all serious about animation and hasn’t already, I fully recommend buying The Animator’s Survival Kit by Richard Williams (probably the best book ever written on animation), and The Illusion of Life by Ollie Johnston and Frank Thomas (also extremely good). Thanks for reading my tutorial and I hope it was useful to you!
(c) Nathan Fearon, kune777@gmail.com


Clear, compact, and useful. Thanks
Heya i’m for the primary time here. I found this board and I find It truly useful & it helped me out much. I’m hoping to give something again and aid others like you helped me.