“Superlópez” by Enrique Gato
about this tutorial
I didn’t want this tutorial to have direct relation with the tools I used to create the animation short. My idea is to show you all the steps followed to make the animation and make you understand that no matters the software you want to use (Max, Softimage, Maya…), because now adays most of the tools are good enough to get very good results, so just select the one you like more.
My only intention with this tutorial is to explain all the diferent parts involved in the creation of an animation short, and show you the decitions taken for the particular case of “Superlópez”. I think this is more useful than telling you all the particular techniques related to the programs I used for the short.
starting the short
The origin of this short was unexpected. When I started modelling the character I wasn’t thinking about making an animation short, I just wanted to make a small animation with Superlópez, just for fun, he’s always been my favourite comic character. But when I had that little 15 seconds animation, I thought that it wasn’t enough, I needed to do something bigger with him, and that was the moment when the big robot being born from a small and insignificant ball came to my mind. So, with the main objetive of including this two characters in a story, I started to work very hard.
the script
It was evidence that I didn’t want to think in a complex script, I didn’t want to involve the characters in a trascendental story, but make a tipical context of any of the comics. I wanted a story that any fan of Superlópez could asociate with him, so taking into acount that I wanted the robot in that story, I thought that the best thing I could do were to make them fighting. That was going to be the main idea for the short, so I ordered the ideas and structured the script in four different parts: introduction for Superlópez, introduction for the robot, fight and ending.
When I finished working on all this different parts was when I started to think about a good way to introduce and finish de short, and I achieved the idea of the comic in the room, so that I could show the inmersive story contained in the book.
stage modelling
I’ve never liked a lot modelling things only to make static pics, I’ve always worked in order to animate things. I’m quite impacient about that, I need to see things moving soon, so I spend just a little time for the initial modelling. When I have the character finished and ready to be animated, I create a very simple stage built with boxes and basic 3D shapes. the ones that represent the significant volumes of the scene (because they hide objects or because the character inteacts with them). After that, while I go ahead with the animation, I slowly change all those boxes with the fianl objects (buildings, trees, walls, etc.).
Here you can see the evolution of the stage, how did it started and how it was at the end.
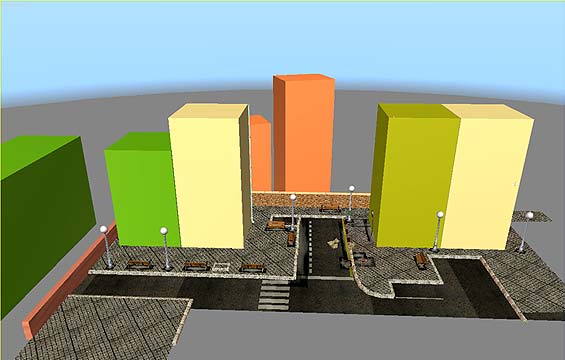
Starting stage

Final stage
seting up the main character
Superlópez modelling is made with standard poligons, there’re no patches or nurbs. He has an only texture, the “S” painted on his chest. The rest of the body has just solid colors, excepting the nose, which has a gradient ramp to tint the tip.
The character is animated with the next bones structure:

The number of bones is the minimal for the character structure that, although it has a cartoon look, it’s completely antropomorphic.
You can see that the nose has its own bone to be moved. This is because in lots of camera shots it hid all the face due to its enormous size, so I had to move it down in order to discover the eyes. Anyway I tryed to save the situation of front shots to the character face. This technique is also used in the original comic, where you can excepcionally see Superlópez drawn looking to camera.
For the spine I don’t usually use more than 3 bones, just because you can get a very soft curve with no need of adding more of them in human-like characters.
The hands are composed by five fingers with three bones for each one. This is probably the most difficult part of the body to be animated, there are lots of bones for a quite small part, and you can’t forget animate everyone of them if you don’t want to appreciate stiffness in the hands acting.
About the face, I created 16 gestures as morph targets, the ones that I used for all the short. It’s a basic number of them, but very efficient to get all the facial acting of the character. I prefer geting complex gestures from the basic ones instead of creating those complex gestures and adding them as a new morph target.
3Dtutorials.sk recommendation:
To maximise the realism of your character morphs we recommend to use high quality face expression photo references from the #1 reference website www.3D.sk
Here you can see all the targets created for Superlópez:

As you can see, the targets does not contain the eyes, the eyelids neither the upper teeth. All these pieces are single objects that go linked to the main bone of the head.
About the eyes, they’re animated with a “look at” controller, so they’re all the time aiming to an object, the one that is in fact animated. So the eyes have really no key generated in all the short.
textures
If I count all the bitmaps used for texturing all the elements of the short it would probably be under 20 maps, and most of them are used in the room secuence. There’re almost no bitmaps in the rest of the short, most of the textures are generated using procedural color maps (like noise or smoke maps, specially the first ones).
3Dtutorials.sk recommendation:
To maximise the realism of your textures we recommend to use high quality photo textures from the #1 texture website www.environment-textures.com
I use a technique where I just tint the objects with this procedural maps, composed by the color I want for the object and a little variation of it, so I create a non-uniform base color. Then, some times, if the object has corners, I add a second procedural map (this time a greyscale gradient ramp), that I multiply with the base color. I make this gradient map match the black areas with the corners of the object, so that they are emphasize and I can get a better approximation to the comic style.
I will explain this process with an object from the short, a building. In this case we have an aditional texture that I mix with the base color and the emphasize map. This new texture is a bitmap that I use as rugosity map.

animating the cape
Solving the animation of the cape was a very complex work. I tried animating it with physics, but it was almost impossible geting a good behaviour due to the constant changes of speed in the moves of the character, that caused the cape tangled up everywhere and it never got a good shape. So I decided to make handmade animation for it. I introduced three bone rows into the cape and I animated it as the rest of the pieces of Superlópez. This technique involve a very tedious work, but it allowed me to control the position and shape of the cape in every moment.
Once I decided to use this technique the first thing I did was finishing all the animation of the body and, when I thought it was absolutely definitive, I started animating the cape. Obviously, as the movement of the cape depends directly from the movement of the body, I couldn’t change the order of the process.

lightning
I don’t usually use those heavy global ilumination engines that spend years to get a frame, and taking into acount that this short has a cartoon look, I decided not to use an engine like this for Superlópez. So I worked with a standard scanline engine that made me to investigate a little with lightning. I tried lots of ilumination setups before reaching the definitive one. This was a very simple model, but it needed lots of lights to work. What I did was placing 11 infinite lights with a very low intensity, each one pointing in a different direction. Then I added an ambient ligh (also with a very low intensity), in order to fill the points where no light were received, and finally I added the main light with a big intensity, simulating the sun light.

The final result of this technique in the render is quite close to the result obtained with a global ilumination engine with only one light. It’s not so precise as this last one, but much more quick. The computer spent about 22 seconds average for each frame, while all the tests I did with global ilumination spent 6 minutes (16 times more) in the best cases.
creating the comic
This was one of the parts of the short that I really enjoyed. I wanted to get that the comic that appeared in the room was quite real, something that you really could think that it could really exist.
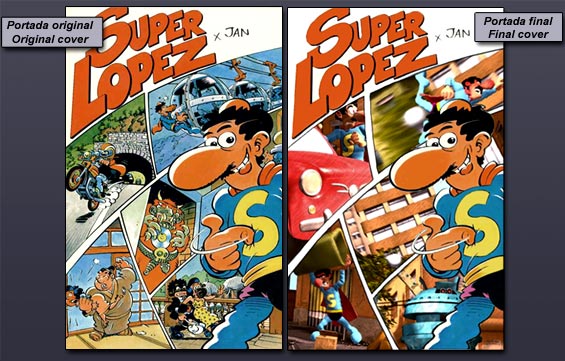
I started with the cover, where I decided to mix an original cover from the comics with some frames from the short. Here’s the result of this adaptation.
After that I made the title page and the two pages that really represent the comic. For this last ones I tried to keep the original style from the pictures of the author.
The last step was the back cover, where I just took one of the original from the comics. But I had one more page I wanted to make, this wone before the back cover. It was a blank page for quite a long time, but one day I though I could try to make a little drawing of Superlópez working with a computer, making graphic design… why not? So I did it. It wasn’t easy at all geting close to the author’s style, but I could get something that convinced me.
Here you can see all the pages I created for the comic of the short. Click on the images to enlarge them.

postproduction
This short has a very simple postproduction work. I didn’t made different layers for the characters, the foreground, the background… I just tried to get a good color balance in the render process, so that I could edit the color of the whole frame. So that’s what I did, and the only modifications made for all the secuences was only a color correction where I increased the contrast, the saturation, and I modified the color through warm colors. I also added all the smoke and dust effects, and I mixed the speaking ballons (the only thing that was rendered apart from the short). The final thing I did was adding glows to the parts of the frame with a luminance factor greater than 80%.
Here you can see some examples of the frames before and after of the postproduction process.

sound effects
This is a quite hard part for me, due to the fact that I don’t have any sound effects libraries, and I have to get most of the sounds from Internet. which involves the low quality of some of them.
Sound effects are a very important part in all the audiovisual projects, it really makes the video come to life. The result I got in this part is not something I can say it’s impresive, but I think I finally got a good result.
music
This is the other big part in audiovisuals. Music is the final touch for the video, it’s what really transmit all the sensations that you want asociated to each part of the short. I worked really hard on this part, trying to synchronize all the events of the video with the music, so that all the piece get a bigger emphasize.
I spent lots of hours to find the adecuate music for the short. I probably listened to more than 100 themes from different soundtracks in order to decide which one to select for Superlópez. Finally I chose the themes from “AntZ” as main soundtrack for the short. This soundtrack not only has an exceptional performance, but also it has the leading instruments that I wanted in the music. It also has every kind of themes, so that I could express all the different feelings I needed for the short almost with only this soundtrack. There’re only two themes from another soundtracks: the opening theme from “South Park” (used as opening theme in the short), and the main theme from “Superman”.
final analise
I hope that, after reading this tutorial, you can have all the parts of a 3D animation short creation clear in your mind, and also a possible way to work on them. The methods described here are not the only one, neither the best ones. There’re hundreds of ways to afford each part, I’ve just published here the ones I used for Superlópez, that’s all. Now it’s in your hands deciding how to make your own shorts, but at least I hope this can help you to take some decitions.
(c) Enrique Gato, www.insidemotion.com www.tadeojones.com


thanks for this tutorial