“Spacemonkey” by Glen Southern
The aim of this tutorial is to allow the reader to model and color a `Space Monkey` head using Pixologic`s ZBrush. At the time of writing the software has reached version 1.1 and Pixolologic have a downloadable demo copy available on their site. The Space Monkey can be made and saved or exported using the demo version (It`s main limitation is a document size of 640×480.STAGE 1. SETTING THE SCENE
Start with a blank document with a black background (this should be the default document anyway). Got to the TOOL menu, usually found to the right of the screen and select the SHERE3D tool. Click in the document window and drag out a sphere then release the mouse. Select TRANSFORM/ROTATE (keyboard R). The colored gyro should appear (Sceenshot 1). Click on the blue ring and rotate the Sphere as shown.
 Screenshot 1
In the TRANSFORM panel select EDIT OBJECT (keyboard T) and a red dot should appear when you pass the mouse over the Sphere. To enable us to model the Space Monkey we need to apply symmetry on the `X` axis. Select TOOL/SYMMETRY and click `X`, now when you pass the mouse over the Sphere you will see two red dots that move in a symmetrical manner. (Sceenshot 2)
 Screenshot 2
STAGE 2. THE BASIC SHAPENow we can begin to shape the head into the Ape shape. Figure 1. shows the steps.These next steps require frequent adjustments to the `draw size (DRAW/DRAW SIZE) and to keep the adjustments subtle lower the DRAW/Z_INTENSITY to around 10. And the undo keyboard shortcut is CTRL+Z
 Fig 1.

In the TRANSFORM panel click DRAW POINTER. Rotate the head slightly to the left (click outside the sphere and scroll to rotate the model). `Draw` the ear bumps (A.). As you draw on the right side of the head the SYMMETRY adds an identical ear on the other side of the head. To make the ear indent hold down the ALT key and draw (B.). This can also be achieved by using DRAW/ZCUT.
Now click TRANSFORM/MOVE OBJECT and begin to `pull` the head into the Ape shape, out at the lower front, up on the crown of the head etc. experiment a bit and don`t forget that you have the CTRL+Z undo. When you have the shape looking like (C.) move on to the lips.
STAGE 3. THE HEAD DETAIL
Click TRANSFORM/DRAW POINTER and change the DRAW/DRAW SIZE down to about 15. Start with the top lip at one side of the head and draw across to the middle (the symmetry will do the other side). Then move on to the bottom lip and repeat the process. It should look like D.
Move on to the nose and nostrils. Continue using TRANSFORM/DRAW POINTER to model a nostrel `bump`. To make the depression for the nostrils make DRAW/DRAW SIZE a little smaller and draw with the ALT key depressed.
To bring this section to completion make to more raised bumps for the eyes and once again make depressions using using the ALT. You should have amodel that looks a little like (F.) in Figure 2.
STAGE 4. ADD SOME COLOUR
 Fig 2.
With the Model still in TRANSFORM/EDIT mode you can now add some colour. Click TOOL/MODIFIERS/TEXTURE/COLORIZE. This will allow you add colour as if using the simple brush. When you activate the COLORIZE button it reverts the model to a base grey colour. As you started this tutorial with a grey Sphereyou won`t see a difference.
3Dtutorials.sk recommendation:
To maximise the realism of your 3D creatures we recommend to use high quality animal photo textures from the #1 texture website www.3D.sk
Use the floating colour palette to choose an overall colour for the head (or activate the COLOUR drop down to left hand side of the screen) pick a colour. Paint the whole head by clicking away from the head and rotating it as you colour it. When this is done pick the darker colour (G. and H. in Figure 2.) and `paint` the brow and sideburns.Before moving on save your Space Monkey head as a ZBrush object.Go to TOOL/INVENTORY/SAVE AS. Save the head in a directory of your choice (ZBrush gives you the ZTools Directory as default. Now you can reload the head as a tool whenever required.
STAGE 5. THE EYES AND HAIR
First the Eyes. To carry on from here you will need to stamp the head into the document.(Known as SNAPSHOT) This will mean that the head can no longer be rotated or modified in EDIT mode.Still in EDIT mode rotate the head so that it matches the orientation of the head in Figure 3. CTRL+S SNAPSHOTS the image onto the page.
The eyes will be made from SHERE3D tools again. Click in the MATERIAL drop down to select TOYPLASTIC for the eyeball. Click in the COLOR dropdown and choose a nearly white colour.Now click in the left hand eye socket in the main document window, drag out a Sphere until it fills the socket. To elongate the sphere use TOOLS/MODIFIERS/DEFORMATIONS and slide the SIZE X slider until you see an egg shape in the small window. Now use TRANSFORM/ROTATE or the `R` key and rotate the `eye` eyeball into the upright position (With the gyro in use you must click inside the rings to rotate unlike EDIT mode). If you need to reposition the eyeball use key `W` or TRANSFORM/MOVE and drag the end of the gyro to move along that axis maybe in/out of the socket a little.
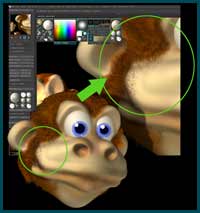 Fig 3.
When positioned use CTRL+S to SNAPSHOT the eyeball into the document. With the gyro still active use Keyboard `W` to move the `live` eyeball across to the second socket and CTRL+S this one into the socket.To color the pupil and iris select a blue color from the COLOR palette. Turn off depth in the draw palette by making sure that nothing is selected in the ZADD/ZSUB/ZCUT section. If ZADD is selected turn it off with a click. Now draw a blue shere on top of your first eyeball. With `Z` turned off this process gives you a perfect blue circle painted onto the eyeball. Now go over again with black. Repeat this for eyeball number two. Because we used TOYPLASTIC you should see a very specular eyes, ie. wetlook.
Now the hair. Pick a gingerish color from the palette. CLick TOOL/FIRBER BRUSH. In the TOOL/FIRBER BRUSH/MODIFIERS dropdown adjust GROOMING to 80%, DENSITY to 50% and the GRAVITY setting to 60%. With the DRAW/DRAW SIZE set to about 20 start to draw on some fur around the eyes and cheeks. Now change the colour to a lighter ginger and increase the DRAW SIZE to 25 or 30 (longer hair) and draw a few strokes to add depth. See Figure 3.
STAGE 6. THE HELMET AND OBJECTS
Last stretch now. The neckring is a simple torus TOOL/RING3D. The material chosen was the default REFLECTION GEL SHADER material. Draw the ring into the image and position it under the Space Monkey d using the move and rotate keys. (W+R)The glass helmet was created with a Sphere and a BASIC material set to 30% Z-INTENSITY (Semi-transparent). As with the neck ring, click into the canvas and drag out the sphere-helmet and then position it with W+R
 Figure 4
 Screenshot 4
The helmet spike was created with SWEEPROFILE3D. Use the TOOL/MODIFIERS/INITIALIZE to adjust the profile to match the wide base and thick neck of the object (see Figure 4.). Once placed in the document add a Sphere onto the tip.To complete the image render the image using RENDER/BEST RENDER and to get some of the glow effects or highlights add more lights to the scene…..but that`s another tutorial..
(c) Glen Southern, glen@southerngfx.co.uk


Latest Comments