“Python scripting ” by Dave Jarvis
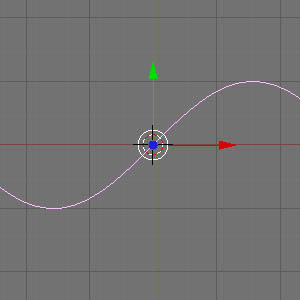
This tutorial shows how to write a Python script. Upon executing the script, a new mesh object is added to the current scene. The mesh follows a sine wave curve.
Setup
Download the Sine Wave Script.
Press CTRL-x to get a fresh start.
Press DEL to delete the 3D box.
Text Editor
Press SHIFT-F11 to display the Text Editor Window.
Click RMB to open the Text Editor menu.
Click Open…
Load sine-wave.py.
Script Execution
Click RMB.
Click Execute Script.
Press SHIFT-F5 to return to the 3D view.
3Dtutorials.sk recommendation:
To maximise the realism of your 3D rendering we recommend to use high quality photo textures from the #1 texture website www.environment-textures.com
Script Details
As shown in the 3D view, the Python script creates a mesh in the shape of a sine wave. The script:
import math
import Blender
from Blender import NMesh
x = -1 * math.pi
mesh = NMesh.GetRaw()
vNew = NMesh.Vert( x, math.sin( x ), 0 )
mesh.verts.append( vNew )
while x < math.pi:
x += 0.1
vOld = vNew
vNew = NMesh.Vert( x, math.sin( x ), 0 )
mesh.verts.append( vNew )
mesh.addEdge( vOld, vNew )
NMesh.PutRaw( mesh, “SineWave”, 1 ) Play the best online juegos friv games are presented on this mega portal.
Blender.Redraw()
Here is what the lines mean:
import mathimport blenderfrom Blender import NMesh
Indicates that the math and blender packages will be used. These packages provide the functionality of Python’s Math library and Blender’s Python library. The last line permits using the terse NMesh instead of the verbose Blender.NMesh. x = -1 * math.pi
Although Blender uses three dimensions, a sine wave typically has a two dimensional representation. This line sets the lower limit for the sine wave’s starting value. In this case, the sine wave will be modelled from negative pi to positive pi. mesh = NMesh.GetRaw()
Create a new mesh object. This object begins with no vertices; the remainder of the code calculates the position for those vertices and then assigns them to the mesh. vNew = NMesh.Vert( x, math.sin( x ), 0 )
Before entering the loop, the first vertex is created. Since the vertices must be connected to form an edge, the script tracks two vertices: (1) the vertex that was just added; and (2) the vertex that will be added next. mesh.verts.append( vNew )
Takes the first vertex and makes it part of the mesh. while x < math.pi:
The loop to insert vertices into the mesh object begins here. The loop will continue until the value for x exceeds pi. x += 0.1
The next vertex should be 0.1 units away from the current vertex. Ultimately, this controls the number of vertices that become part of the mesh. A smaller number means more vertices will be added because it would take longer for x to count beyond the value of pi. vOld = vNew
Tracks the vertex that was previously included in the mesh. Eventually the old vertex and the new vertex will be used to create an edge. vNew = NMesh.Vert( x, math.sin( x ), 0 )
Create a new vertex based on the value of x. The value of y is the mathematical result of sin( x ). A sine wave generally does not fly off in the Z axis direction, so the Z component remains zero. mesh.verts.append( vNew )
Slam the newly created vertex onto the end of the mesh. mesh.addEdge( vOld, vNew )
Create an edge between the old vertex and the new vertex. The next time the loop occurs, the new vertex will become the old vertex. NMesh.PutRaw( mesh, “SineWave”, 1 )
This is the magic line to insert the newly created mesh object into the current scene. Blender.Redraw()
Politely ask Blender to redraw the current scene. Without this line the mesh might not appear. Your milage may vary.
(c) Dave Jarvis, www.davidjarvis.ca


Latest Comments