“Modeling A Female Head ” by Peter Ratner
Over the years I?ve written many human modeling tutorials for my books 3-D Human Modeling and Animation, 1 st and 2 nd Editions, Mastering 3D Animation, 1 st and 2 nd Editions and various magazine articles as well as online tutorials. As a full-time Professor I?ve taught human modeling at James Madison University for over 13 years. The tools for modeling have improved tremendously.
Since I use and teach Maya, this tutorial will refer to the tools it utilizes. One only needs several tools to model humans and most other software applications have these in one form or another.
Before using Maya, I used and taught Lightwave and that application had very strong subdivision modeling tools. Although I liked subdivision modeling, my students and I found that these models often ended up with distorted topology when seen as low polygon models. Working in subdivision mode everything looked fine but not when they were viewed in low polygon mode. This made it difficult to edit the models when they were in low polygon form. Subdivision modeling used to create a lot of non-planar faces that when viewed in low polygon mode showed holes in the model. Their degree of distortion also made it difficult to identify various parts of the anatomy. Maya has both subdivision modeling and low poly modeling. Since Maya?s subdivision modeling tools are not very powerful, I found that Maya?s smooth proxy method worked best for me. The added advantage to this was that my students and I were able to create cleaner topology that was easier to modify than when we used Lightwave?s subdivision modeling tools. I?m sure some people reading this will disagree and that?s fine because we each have to find our own way of working. This tutorial will work with subdivision modeling because basically the low polygon topology will be very similar.
This tutorial has instructions for deleting and adding edges. If this is not an option for you, then you can use the spin quad or spin faces option in your software rather than deleting and adding new edges.
Figure 1 shows some completed female models created from the following steps. The reference photos came from Peter Levius? human anatomy site whose link was already given at the start of this tutorial.

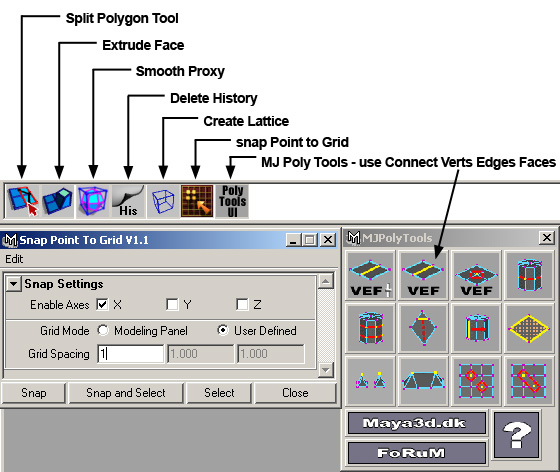
Figure 2 shows the tools used in Maya. Before you attempt the most challenging modeling step ? human modeling, you should be familiar with your software?s tools and have already modeled some simple characters. Besides Maya?s tools, which you should be able to find equivalent ones in your software, I also like to use the following Mel scripts:
MJ Poly Tools: http://www.maya3d.dk/Scripts/MJPolyTools/
Snap Point To Grid: http://www.lightstorm3d.com/download/html_en/snapPointToGrid.htm
Since my art students prefer to look at pictures rather than read text, I try to keep my tutorials? copy to a minimum. However, it takes a lot of images to convey information about every step when the writing is nominal. Besides this tutorial you should also have an anatomy book and mirror nearby.
The Head
Steps 1-11
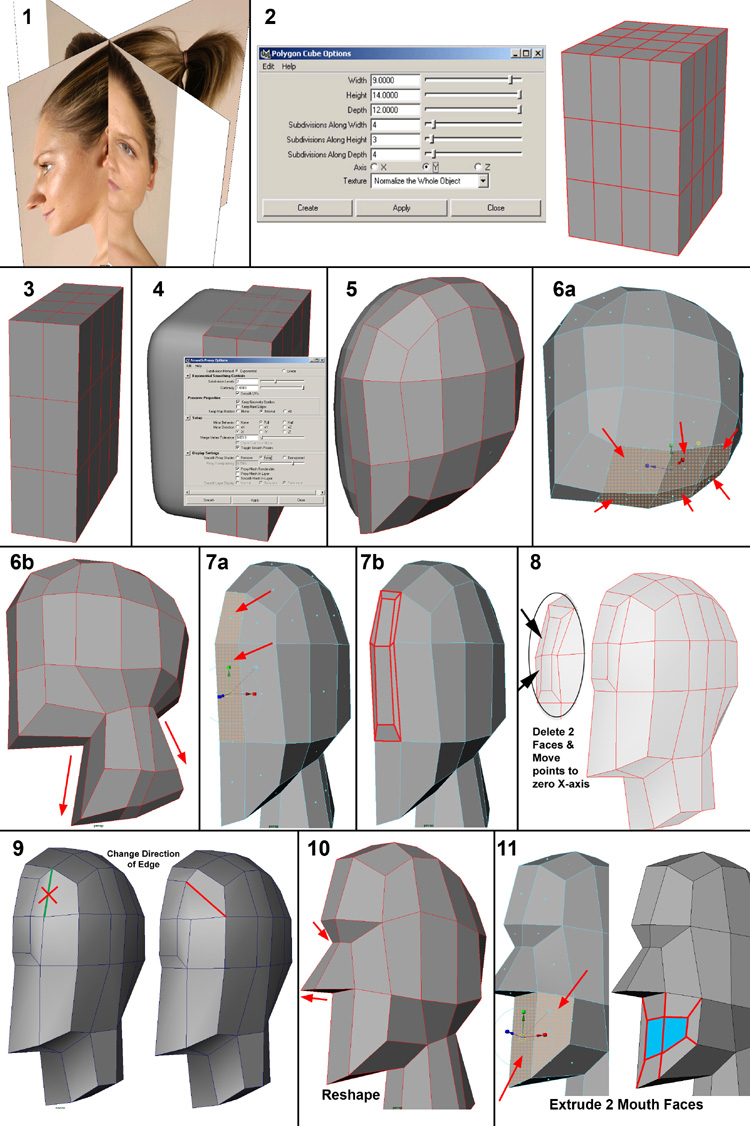
You need quality images for modeling a female. I get mine from www.3d.sk Scale and center the images and Photoshop or some other image edition program and import them into your software. Step 1 shows the imported front and side views of the head. In Maya select each view pane with the front or side image, scale, and position it with the Attribute Editor. Use the settings in Step 2 to make a polygon cube. Cut off the ?x half faces (Step 3). The middle points should be on 0 x axis. If these vertices are ever moved, then use the Snap Point To Grid mel script or your software?s command. To move them back to 0.
Create a Smooth Proxy of the half cube or change it to subdivision mode (Step 4). If you are using Maya, then create a keyboard shortcut to switch back and forth between low poly and smooth mode. Here?s how to do this. Create two layers. One is called ?Hi? and contains the smooth version of the model. The other is called ?Lo? and has the low poly version. The low poly half that is on the ?x axis can be hidden with Control h. Display only the layer with the low poly version (?Lo?). Open the Script Editor. Go to the Edit menu and select Clear History. Under the Script menu select Echo All Commands. Hide the object in the layer named ?Lo? and show the one in the layer named ?Hi?. Copy the script that is generated in the script editor. It should say something like this:
layerEditorLayerButtonVisibilityChange Hi;
layerEditorLayerButtonVisibilityChange Lo;
Go to Window>Settings/Preferences>Hotkeys? Under the User category, create a new command called ChangeLayers. In the Command area paste in the script that you copied. Assign a keyboard shortcut such as Shift@
Move points and/or edges to shape it into a rough approximation of the head (Step 5). Steps 6a and 6b show how you select the bottom 6 faces and extrude them down to make the neck. Always delete the inside faces that are produced when extruding faces whose edges are on the 0 x axis. Steps 7a to 8 have you create more faces in the nose and forehead area by extruding once. Step 9 is the first time that an edge is deleted and a new one is made facing a different angle. If you don?t have this capability then use your spin quad or spin faces command. Continue through Steps 10 and 11 to make a rough nose and begin the mouth.
Steps 12-30 Steps 12 and 13 have you delete the extra face created from extruding, moving points to the 0 x axis and changing the direction of an edge. At Step 14 the faces under the nose to the bottom of the neck are extruded. Steps 15 through 30 have you creating more faces, deleting extra faces near the 0 x axis, moving points to the 0 x axis, and adding as well as deleting edges. Be sure to continue refining the shape of the head while doing these steps.
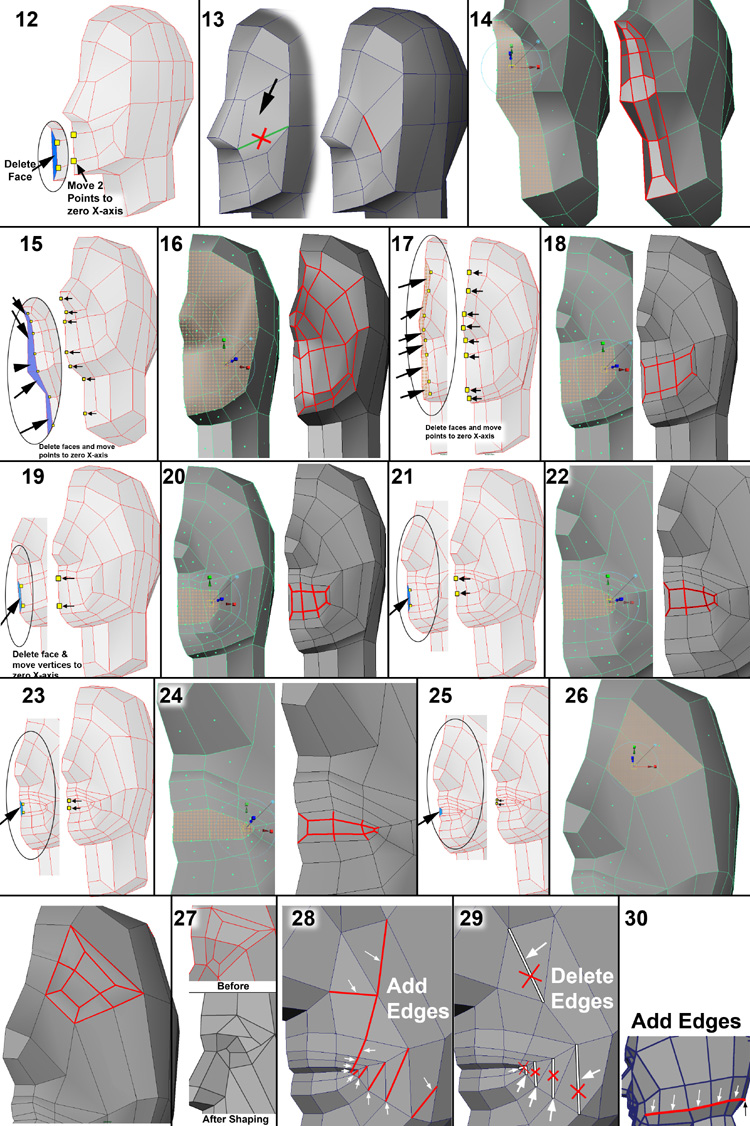
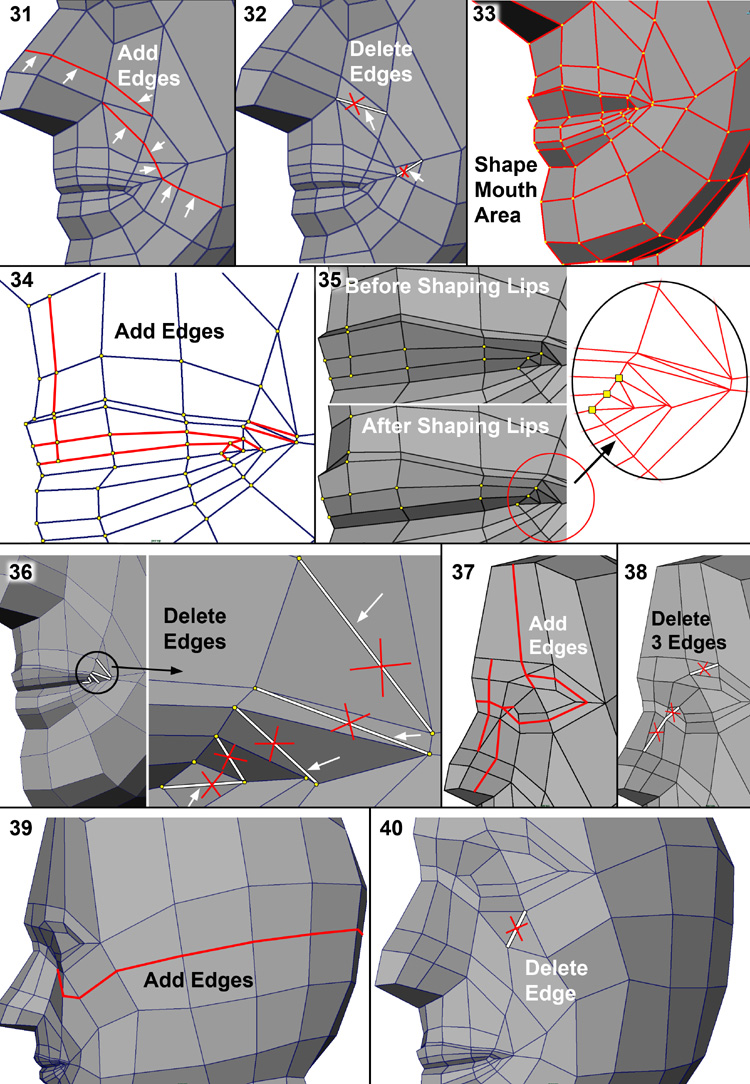
Steps 31-40 These steps have you adding and deleting more edges so that the topology is more accurate and follows the contours of the muscles.
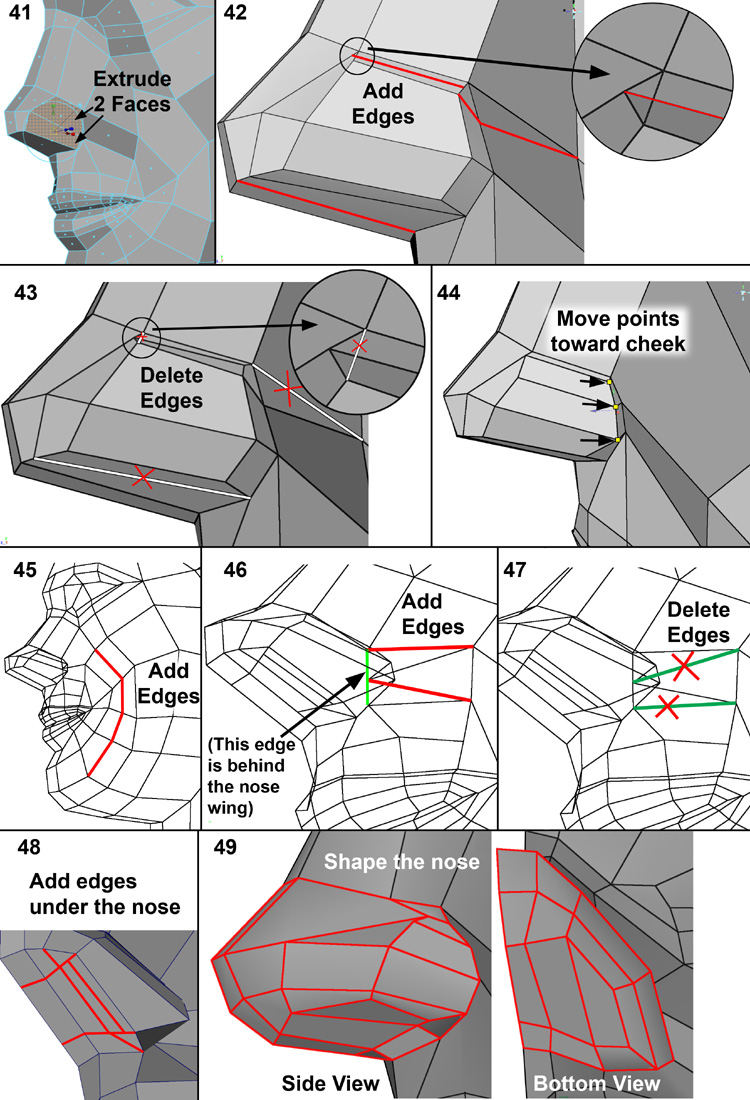
Steps 41-49 This set of instructions show you how to complete the nose except for the nostrils.
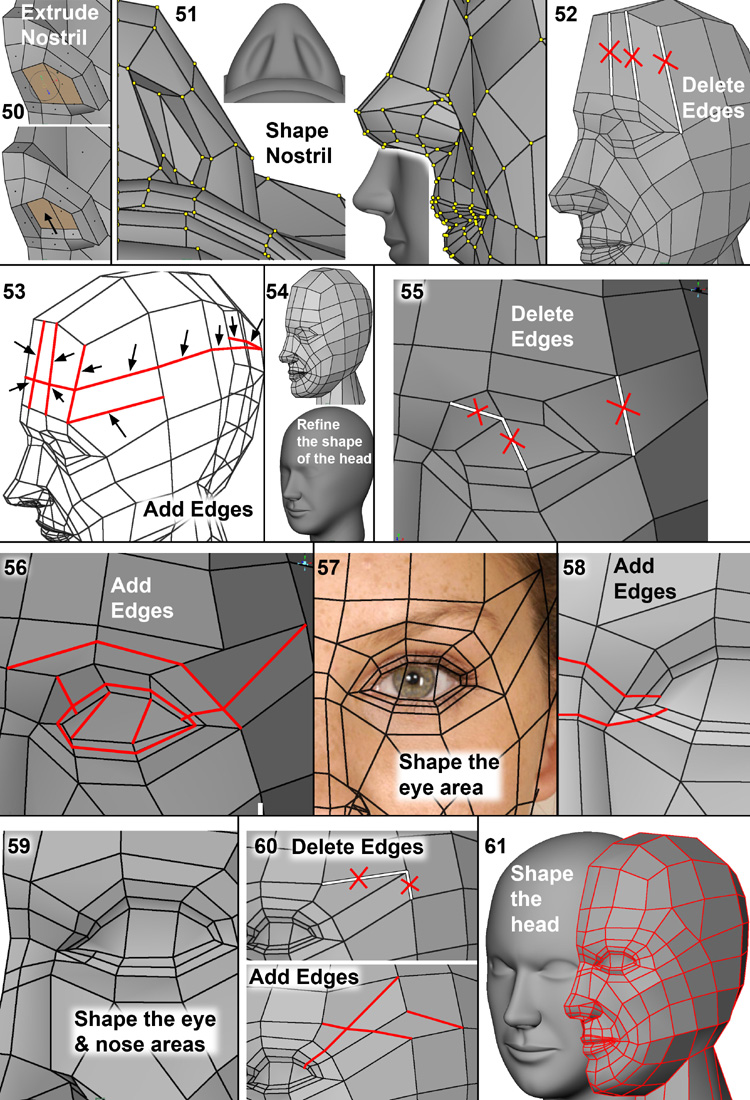
Steps 50-61 Creating the nostrils, forehead, and eye area are covered here.
Steps 62-77 Completing the eye area and mouth are the focus of these steps. Placing a sphere inside the eyesocket will help you shape the upper and lower eyelids. The ear which is the most difficult part starts at Step 70.

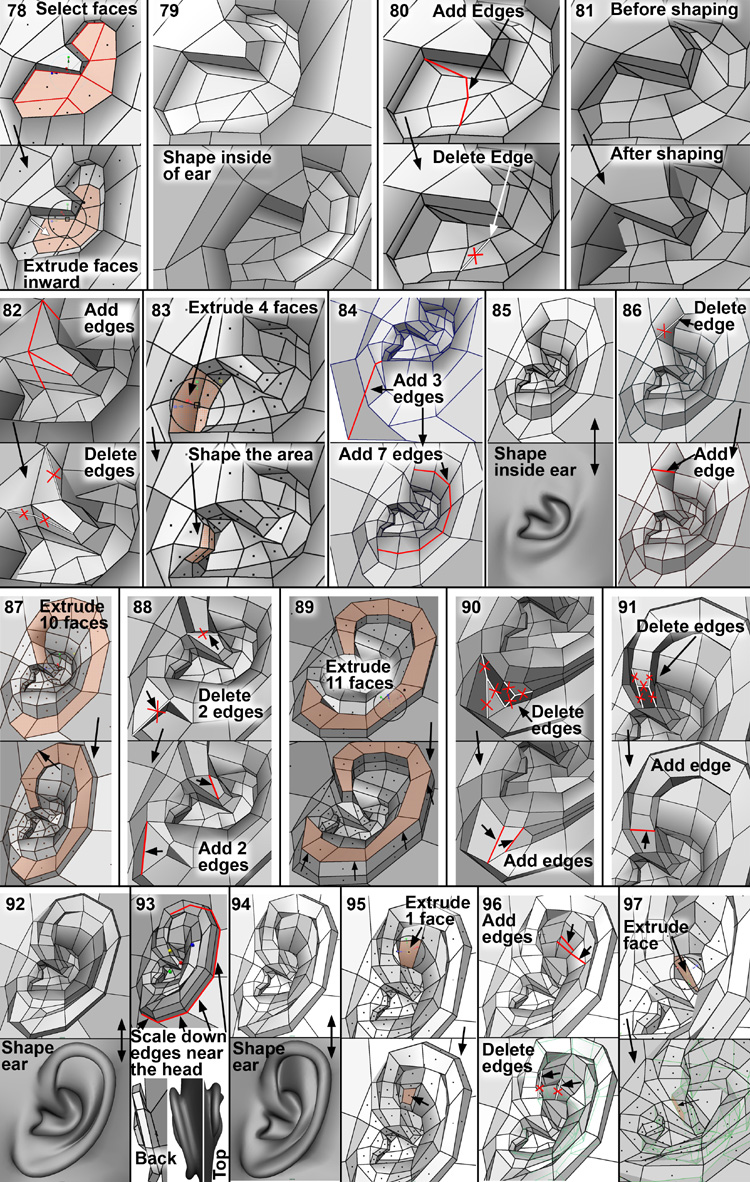
Steps 78-97 These show the main parts to modeling the inside bowl of the ear as well as the outer rim.
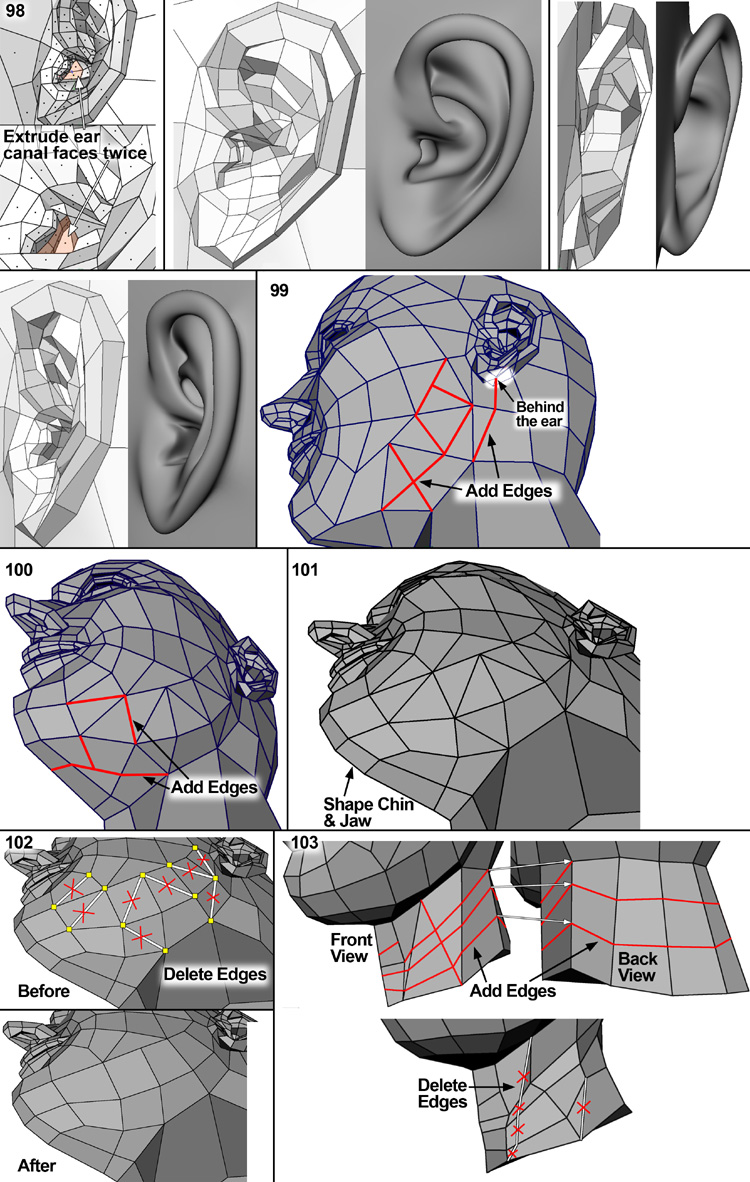
Steps 98-103 Completing the ear, jaw, and neck are the focus of these steps.
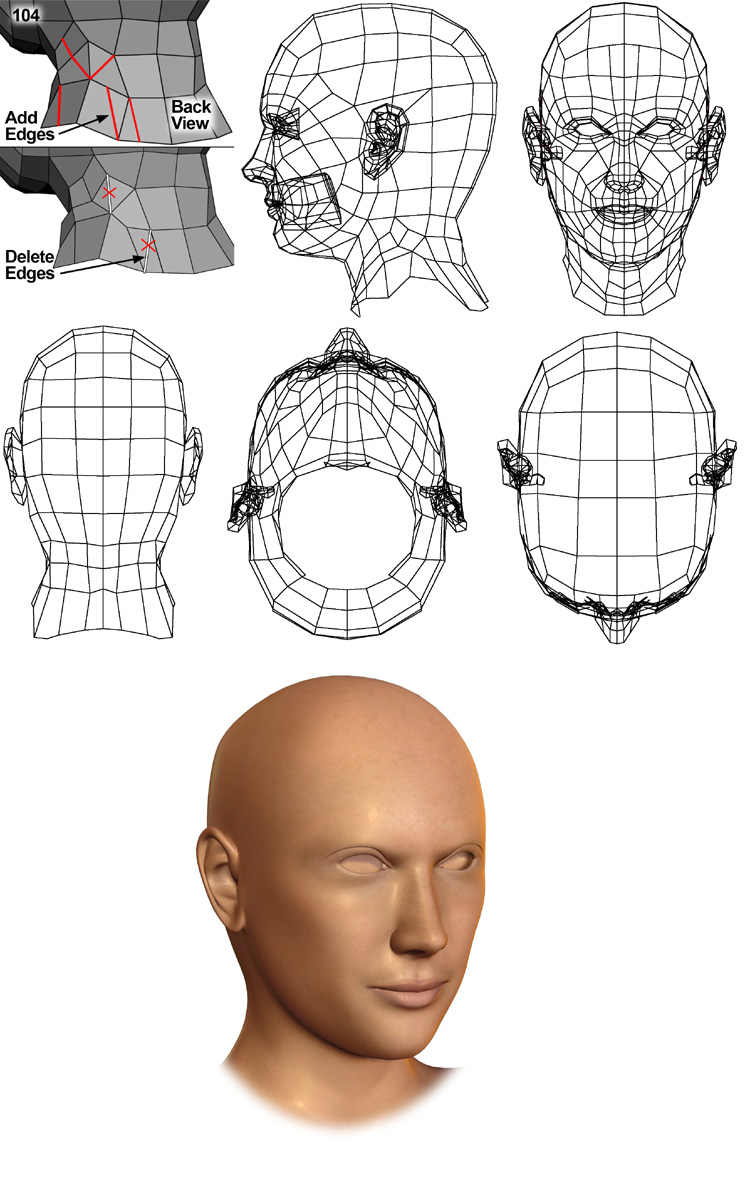
Step 104 This shows the final part of completing the neck. You can use the low poly wire topology as a guide for your own creation. The next tutorial will have you model the torso and shoulders.
(c) Peter Ratner, http://www.jmu.edu/


FINALLY! A step-by-step guide to box modeling. We were kind of forced into this in a class, and I’m used to starting with one polygon and just extruding around. This is all new to me, so it’s nice to see something step-by-step without skipping over parts ass-uming that everyone reading knows what you’re talking about.
Thanks for this.
Is there a website or a place in this site where I can find how to model the rest of the body. I m really new to maya and I d like to find a full tutorial on how to model a full woman body.
I got lost at 96. I dont understand where the extruded face went.
i had some doubts in ear,nose modeling, but in this tutorial gives lot of tricks for me. thank you very much
hi its very usefull for me nd me like maya students i hop u will help me to learn rigging