“Modeling a Barcelona chair ” by Montree T.

3Dtutorials.sk recommendation:
To maximise the realism of your 3D furniture we recommend to use high quality photo references from the #1 texture website www.environment-textures.com
1. Create a Plane or Quad Patch.
2. Assign an edit patch modifier or convert to an editable patch and adjust the bezier handles (green dots) as shown. Also change the View Step parameter to be 1 or 2 to reduce the meshing within the patch unit.
3. While still in edit patch mode, go to the patch sub-object and clone the patch, using snapping.
4. Differentiate the number of smoothing groups in each patch unit as to avoid the same smoothing group in whole object after we’ve welded the vertices in the next step.
5. Turn to poly or convert this patch to editable poly.
6. Select all vertices and weld. This is to making all of the elements become one element.
7. Make the cushion’s thickness. In polygon sub-object mode, select all polygons and extrude.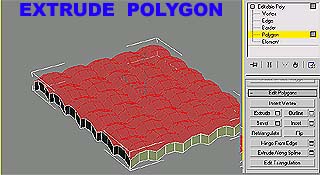
8. Clone the polygons on the top and move down and snap (using 3d snap) with the bottom part’s edges. This is to make the bottom part of the chair capped. Flip the normals and select the vertices along the edges and weld.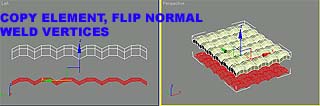
9. Select the bottom part’s polygons then go to a top view and align the selected polygons to the top view (or we can use “make planar” as well)
10. In the Edge sub-object mode, select the edges as shown in the picture and chamfer.

11. Select the chamfered polygons along the chair’s edges and extrude or bevel.
12. The seat of the chair is complete as an element in the editable poly. Clone and rotate the seat to become a back rest.
13. Use an FFD box to add a curve to the chair.

(c) Montree T. , Smoke3dStudio


Latest Comments