“Making of the fur ” by Dan LuVisi
Step 1:

Let’s begin; it’s really easy to create fur although it just takes patience. I will list what you need, a color for the fur, a small brush and to know how to use the burn tool. But I’ll walk you down the path. We’ll do a Lion’s fur in this tutorial, so first off look at the colors on the first image.
Step 2:

So in box 1, are your three base colorsand your three highlight colors. Your base color is basically your fur coat, the under layer, where the highlights will spring off of. But, you must mix those base colors to achieve that dark look we get in the next image. I have a source image of fur to look off of as well to help me as I paint.
In box 2, I’ll lay down my first base and the other base colors to show you how to get that thick feel. We’ll need to smudge after, or you can blend with the pressure set brush. Try not to get too rough if you smudge, set the strength of the smudge tool to 75-80%. You don’t want to get too aggressive and lose all your colors, because there would be no true point in putting them all together now.

Step 3:

This is where you paint in your highlight colors. It’s a pretty easy step, I set the brush to Flow, which you can follow in the picture and it will give you a more fade-like feel.

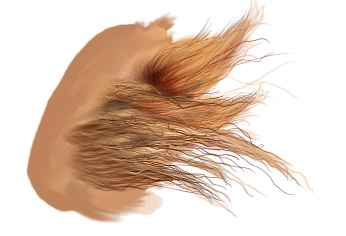
After you have lightly smudged the fur together, we’re going to detail it up. By making threads this is where the patience starts to kick in. Slowly, one by one (if you want to), draw the hairs. Ill do chunks to show you how to map it out. Let’s start with the knotty thread first over on 1. Now we’re going to do the soft parts, the fuzzy light ones on 2. Then finally, big patch of fur, in 3. Now with the number 3.spot, to create the brown tone at the bottom, I set the brush to Overlay, with 20% Opacity and slowly blotched it in. After that, I used the smudge tool and dragged it along to create threaded hair.

Ok now this is where you might get confused. Now after you did those three blotches of hair, use the noise tool to sharpen them up. Just a little bit though, don’t use it too much and make the hair hard. After that, use the clone tool, with the opacity set to 65% and also set to a soft brush and blotch your own little shapes here and there to create larger blotches of fur. Now I’m not saying you do this the entire picture, because it will all look identical but rather repeat the whole process, draw a different part, replicate, paint over it and etc. Once that is finished, use the Burn tool and set it to Highlights and start to mark little dark splotches for missing hair, or just shadows that are created by different patches of hair. Once that is finished, sharpen a LITTLE bit more, and you should have some good hair.
3Dtutorials.sk recommendation:
To maximise the realism of your CG illustration we recommend to use high quality fur photos from the #1 reference website www.3D.sk
(c) Dan LuVisi, dmxdmlz@aol.com


Latest Comments