“Making of Medkova” by Fábio M. Silva Creating realistic human model 3D tutorial.
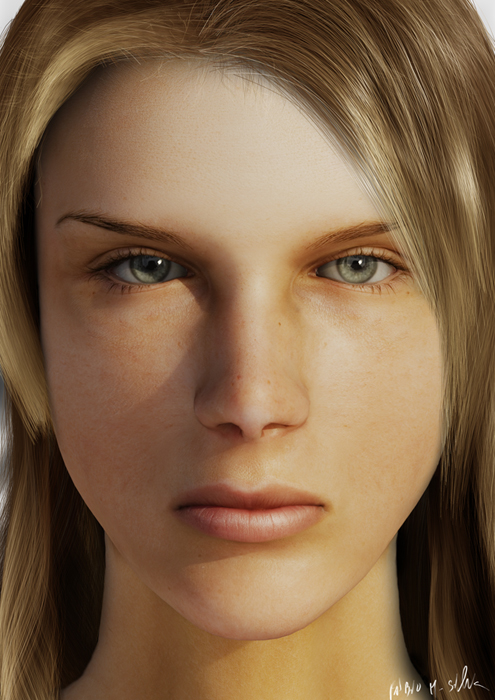
Some time ago several friends of mine who are enthusiasts of CGI kept asking me why I didn’t try modelling a realistic cg human being. Although I really like stylised yet complex characters, such as characters from Final Fantasy games or Blizzard Entertainment and Blur Studios cinematic characters, which was the kind of style I’ve been aiming o achieve in the majority of my cgworks(with of course, a personal touch to them) realism isn’t quite something that hadn’t occurred to me as well. I’m really happy with the results I got, and very proud of the reception this image has been receiving, even to be included on Ballistic’s Publishing Exotique 4. It makes me want to produce more realistic characters.
3Dtutorials.sk recommendation: To maximise the realism of your CG character we recommend using high quality photo references from the #1 reference website www.female-anatomy-for-artist.com
Still, there’s a lot of more fantasy like images that I also need to create. But I’ll return to realism again eventually. Some people argue that realism is more difficult to achieve than a stylised look. In my opinion, be it either realistic or stylised or even anime or more towards the Pixar look, all these styles are difficult to achieve when you’re aiming to achieve them with a degree of high quality. It’s one of the good things about Cg I believe, there is quite a lot of different styles one might try, or even who knows, create a new one unseen. It’s very exciting from an artist viewpoint. .When this idea of a realistic character came up, I decided that I should include this realistic model in demoreel, thus it is why I’m spending more time on her than other artists would do if they were doing the model just for a still image. I need to make sure all edge loops are good, all mesh objects are made of quad polygons, and that they would deform well when rigged for animation. For the face, loops that would enable facial animation, and for the body, the joints. For the cloth, either modelled wrinkles or a mesh that is prepared for cloth simulation. Finally the hair, which has to be prepared for hair dynamics as well. In resume, it means this model, will not only look like this on the still image, but also in all kinds of situations(with a big hopefully in the middle lines ^_^), camera angles and lighting rigs. With all this in mind, I had to find a person to model after. Klara Medkova, the Czech supermodel came naturally as there were so many good pictures of her available. I bought the Dvd from Ballistic/3d.sk Ultimate Klara medkova dvd to get those good references, and I was ready to start.  Some of my medkova’s reference Note: keeping a Stash of high-res photos to use for reference or for texturing purposes is absolutely mandatory. And make sure you keep a backup of it! Reference plays a huge role in my work, specially if it is a photorealistic one. Anatomy books are great to learn from, but sometimes, reality kind of doesn’t match what it is in the books, so I try to always check both for reference. Better having more than few right? So I’ve began modeling her, starting with the head. The head is the most important part of the human model, so if it doesn’t look good, even if the rest is good, it will always make the rest look weird or inaccurate. Although the opposite is also true, a great looking head will not save a poorly built body. But the head is where you should spent most time on, because in the daily life, the head is the area of the human being with whom every person spends the most time with. It’s how you recognize persons from one another(unless they are twins). Also it is from the faces that you can tell if a person is sad or happy , unless they are faking emotions(not to mention body language, but that’s kinda off topic right now). Now which area of the head is the most important? Well, all parts are, but the eyes are particularly important. In Japan, anime characters are made of very simplified facial shapes, but the eyes have a lot more detail than the rest, since the eyes contain a lot of emotion. Like someone said, the eyes are the window of the soul. Davy Jones from Pirates of the Caribbean is an awesome model, with all those ragged clothes, tentacle beard and the sss on his wet skin, but his eyes, they’re his soul. Every realistic character needs realistic expressive eyes, or, the model will be dead. Thence it’s only natural that one spends sometime on the eyes of his/her character. This is not only applicable to humans, but to monsters and robots likewise(for example, Michael Bay on Transformers wanted Optimus Prime to have eyes that could depict emotion).. However, the way I built my eyes isn’t complex at all. The process is quite simple actually. It’s not necessarily the best way to do things, but I find that it works pretty well for me. Here’s how I do it: A create a sphere, set the polygon count to a lower number(it’s going to have turbo smooth afterwards anyway). Name the sphere “Eye”. Now duplicate it on the same position and scale it up for about 5% Name this “Cornea”. Ok, so now we got two objects, a cornea mesh, and an eye mesh. Select the eye mesh, convert it to Editable poly, select soft selection with a bit of radius, and now pick the center vert of the eye, where the center of the pupil would be. Now push it back. It will create a concave area, the like a real eye has. Chamfer the center vert to make a more flat look on that area.
  From Sphere to eye Now select the cornea mesh, and do the exact same thing, except than at the last stage , instead of pushing backward, pull forward. Now you have the eye completely modeled. Pretty simple heh? I find that some times, the simplest things are the ones who look better. In the past I’ve made eyes with several parts, but I found that I never got great results with it, not to mention that it was quite troublesome.
  From sphere to Cornea. What you could do afterwards is attach the 2 meshes, and apply different material id’s to each other. That would help simplify the rigging process later on. You might be thinking that with only this shapes, you wont be able to make the pupil contraction or dilatation animation, but it isn’t quite so. If you want to keep pushing it further, you just need to make some morpher modifiers for that kind of shapes, or even use scale modifier on just that area, and write some scripts to get control of it, or even use reaction manager.”Making of Medkova” by Fábio M. Silva So now we have the eyes, but what about the head? For the time being, we’ll call it a day as far as the eyes go, we’ll save them for later. When we have our base structure of the head we will merge them in and position them into place. This way you can also use this eyes for later characters too. Now for the head, I usually load up my references into regular planes with 1×1 segments(why 1×1? Because I use F4 to display edges a lot, and this way the planes won’t show they’re edges which are distracting.) . Also make sure you set the planes to be 100% self illuminated on the material editor.
  You will have a lot of stuff going on the scene, we don’t need any more edges to confuse us even more. With this in mind, create a small plane on anywhere on the model’s frontal part of the face and extrude your way out. Edit poly modeling is the way I prefer to do it. Don’t just model using one viewport, keep an eye on both at all times. If you like modelling on a single view like I do, you will find yourself switching from one view to another very regularly.
 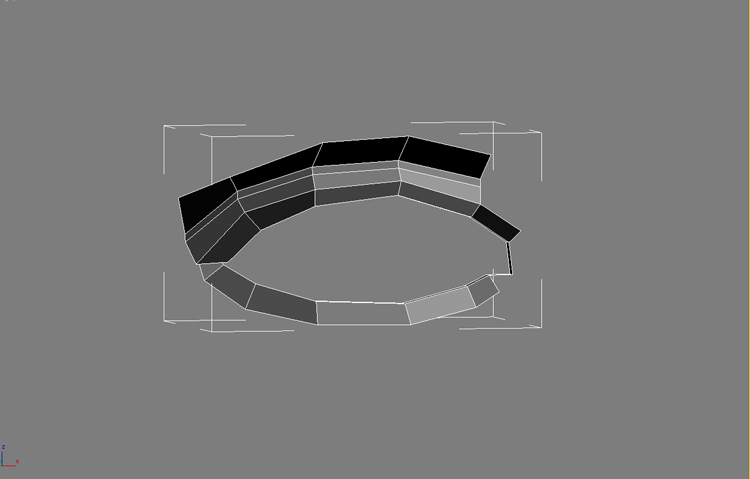 The way I do this, is to set the Orbit mode to Orbit SubObject. This way when I have the head mesh selected, I’ll rotate only around it.
  This is the way I like it! Also to take note, I try to make the mesh be all quads, and keep those quads shape and size even. There are no big tricks on modeling the head. Just keep going, until you have the frontal part done.
  Remember the eyes? It’s now time to bring them over into those sockets. They will help us define volume. Keep going around the head, and leave a hole where the ears will be. We will build them on a different mesh and then attach them together. The process I use to model the ears is exactly the same. starting with a single polygon and extruding my way out. Count the number of edges you got on the outer border. Does it match with the ones on the head’s hole? You have to make them match the best possible, since we’re attaching it to the head. If it doesn’t match, we are going to have some triangles, which is not good, but if it’s not avoidable, at least try to make them be on non deformable places of the head, which luckily will be where we will attach them to the head. Personally, this is the step I find most difficult. Trying to keep everything on this stage is really hard, since we have a very high density mesh such as the ears, with very complex details, and then we’ll have to attach it to the head which is a lot more simpler.
  “Making of Medkova” by Fábio M. Silva With a few more steps and refinement we get the head completed. If it’s not perfect in terms of shape, we can always go back and change its proportions. But if you have to add more geometry, to it so now, because after uv mapping it, it will become a lot harder to correct such issues.
 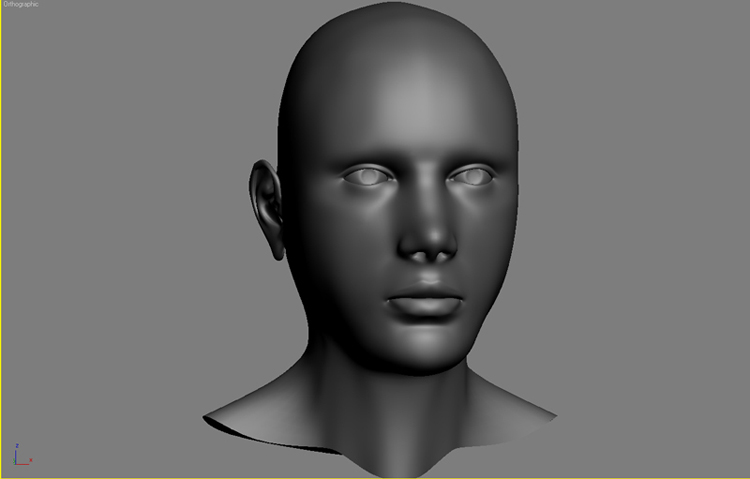 For Uv mapping, heads are generally quite easy, unless you have pointy ears like elf’s. Those cases are more complicated to Uv. But for this head, normally a cylindrical mapping will do the trick. Relax the zones you need, or like I sometimes do, move uv’s by hand until everything has its own uv space with no overlapping. The ears uv it’s normally the most difficult since there’s so much geometry in there(in elfs/goblins even more overlapping). Sometimes it is not a bad idea to UV the ears separately. For the eyes, frontal planar mapping usually will do the trick.
  Cylindrical Mapping for the head, is usually a good way to start, then work your way out of it, improving those uv’s. The ears are usually the hardest part, sometimes it is a good idea to detach them away from the head uvs. Some years ago I thought texturing was less important than modeling, but it isn’t so. Both are really important. One thing that makes a model work is the quality of it’s textures, therefore, you need good uv’s to be able to make good textures. I painted some big maps for her since I wanted to make a big render. Her facial map is 4096×4096. There’s also specular map and bump map etc. Her eyes are 2048×2048. As I textured her, I tried to pay close attention to my references, to get spots age marks and scars on the same places she has on real life. Now the materials. I’ve used Fast-SSS for the head, and the eyes. The cornea took a raytrace material(fully transparent). I’ve had to tweak the settings until I got the look I wanted. A common problem I see with some people cg models is that they like to make things exaggerated, until they can see some features very clearly. For example I see models using a lot of specular, others exaggerate on the sss, other even use a lot of ambient occlusion on their models. I believe the key is subtlety. You wont have much specularity on a face unless it’s wet or greasy, and since most my cg renders don’t portray characters with oil notion on their faces as if they are on the beach . I tend to keep this value fairly low. SSS won’t be much seen unless you have a strong rim light penetrating the skin, so if its a day shot, you won’t see much of it either.
  For the lighting, I used mental ray’s daylight system. I never had used it before and I was quite impressed.
  Testing the lights on gray shaded model, to see the light direction and how shadows behave.”Making of Medkova” by Fábio M. Silva After that came the hair. I’ve used built in Hair&Fur. I started making some tests on a simple ball(on a different scene) tweaking the hair until I got the look I wanted on the hair strands. I wanted her hair to be spiky on the tips, just like her hair is in real life.
  Then on the actual Medkova scene file, I used the same settings on the hair that I built for her. Her hair was modeled with several layers; each layer was carefully brushed and styled to look like her real hair (the long version), and I created a different hairstyle from her own, yet still one that would look good on her if she had such a haircut.
  The hair settings So after the hair is done, the last thing I needed to do was to composite everything together. I’ve rendered both elements (hair and head) on different renders and brought them together for the final image. I’ve rendered the hair and the hair’s shadows in scanline, using a different lighting setup to what I had used for the model of the head, but which still resembled the daylight system I had on Mental Ray.
  I like to render hair separately from the head, because I like the hair i render on Scanline better than the one in mentalray(for the time being at least) The hair colour wasn’t very good so I had to give it some colour correction in Photoshop. For the final image, I wanted to portray a cold stare expression from her. It’s subtle so it’s not very direct in my opinion. Like I’ve mentioned previously, I believe subtlety is key to realism. The final Image Thank you for your time and I hope you have enjoyed it. If you have any questions about this tutorial or any other type of inquiries, please contact me to fabiomsilva (at) fabiomsilva.com Klara Medkova Fábio M. Silva website: www.fabiomsilva.com Cgs portfolio: http://fabiomsilva.cgsociety.org/gallery/ email: fabiomsilva (at) fabiomsilva.com (c) Fábio M. Silva, www.johnstrieder.com


very good worth the effort! I am a noob and I did it 🙂
keep up the good work. P.S. I found it easy to follow.
Very good work man 🙂
It’s a beautifully designed model. In fact I’m trying to make one myself and it’s not easy. As for the tutorial, it simply isn’t. It’s no more than a resume’ of the steps taken to make the model. This teaches (tutor) nothing that isn’t common knowledge.
Hey if i could model like that i would be so happy. Whats with all the negativity if you think you can do better then go do a tutorial and show us you can do better instead of just bad mouthing this guy for actually putting a tutorial up.
Nice work mate i learnt quite a bit from you stuff.
Take care aye.
I agree Lasse. He even states that this isn’t for beginners and he wont be going into detail!
Anyway I am a noob and found this very help full, it’s always good to see a work flow. Thank you!
at T-Bone and WTF:
T-Bone: There’s nothing wrong with his mesh at all. He’s stating he isn’t going for ultrarealism, and he’s not taking the time to go over-the-edge with his modelling. He’s not unwrapping 100% because, as he states, he doesn’t give a shit about the top head, back, round the ears. He doesn’t use those words, but it’s secondrated when it comes to this texture.
His face map is, granted, slacky but MORE tha sufficient for a projection map in zbrush. It’s actually more than needed and he could unwrap and rel. it easily I’m sure but it would take him three times as long for that over-the-edge look than to get to this which is 85%.
At WTF: I’ll explain “the making of”. You obvious think “the making of” means “how to use editable poly”, which it doesn’t.
It does, however, mean he’s telling you which tools to use and how he used them.
And, what do you know, he did tell us that! He told us which hair he used, which render, why he used that render, that he used hair and fur. He told us which skin he used, he told us the main materials for the eye. He told us HOW he made it all. The MAKING of this model is those combined.
If you’re incapable of creating the rest of the face, incapable of tweaking hair and fur to get it downwards, unable to draw the eye by hand and attaching the air to the base mesh, then this model is -way WAY- WAY out of your reach.
Go do Joan d’Arc tutorial or something, then come back with the techniques you’ve learned and you’ll find this tutorial amazing.
Why? Because it’s made in the same way, he made this by regular standards, regular render and regular tools with nothing but his skill with them, and this is a fantastic result given he’s leaving out some key helping tools, which is why this “the making of” is very interesting.
So at you both, this is high reality made with little effort, lots of shortcuts and breaking it down to the basics. If you can’t do the basics, I doubt you would be able to get half his results by the same tools.
But I do agree with T-Bone on the uvmap, I’d get it straight since the effort needed isn’t that great but with the laziness on it, saying the result is “half okay” is just ridicolous.
Yours,
Lasse.
Whats up with the comments like “This tutorial is totaly wrong, bleeding from millions of scars…” and “WTF r u calling this shit…”? Come on guys, fair dinkum. I’ll defend any artist who has a go!
– Well done on your model and render mate!
r u calling this “making of” ?
u showed only the simple steps that every one knows , there is no modeling steps and techniques included no wire frames no good explanation , WTF r u calling this shit ?
i don’t call this a “making of” , but i call it like :”hey look at me i modeled a head with some texture and hairs” that’s what actually this shit is
just tell me what the part of “making of” you don’t understand and i’ll help to understand it .
nobody knows 🙂
johnny t…who are u?
This tutorial is totaly wrong, bleeding from millions of scars…only the texture make it almost good but the mesh model is terrible wrong. wrong the eye slot, eyelids, wrong the mouth, wrong the nose..I could list them but I won't do that…