“Making of AUDI R8 ” by Joshua Murphy
In this Making of, you will learn how to model an Audi R-8 ; or any vehicle for that matter. The principal is the same. For this Making of, you will need atleast an intermediate knowledge of 3DS Max, or your preferred 3d application. I will be using 3DS Max 9, so if you have an older version or if you are using a different 3d application, your button configuration maybe be slightly different.
3Dtutorials.sk recommendation:
To maximise the realism of your 3D models we recommend using high quality photo references from the #1 texture website www.environment-textures.com
I typically use vehicle blueprints, when available, for the modeling process. Although , you can use any reference photographs as well. When you are modeling vehicles, you want to have plenty of reference photographs to view. I have over sixty reference photographs that I will be using throughout the entire time that I am modeling this vehicle. As you are gathering your reference photographs, you want to select many different angles, close-ups of certain parts; such as, headlights, tailights, wheels, and any distinct or unique grooves or parts of the vehicle. You can find all of the reference photographs by doing an image search in google or yahoo.
The image below shows how I normally setup my blueprints or reference images. You can set them up however you like, but this is my personal preference. Make sure the plane that you apply the images you plan on using to, exactly matches the dimensions of the photograph or blueprints that you use.
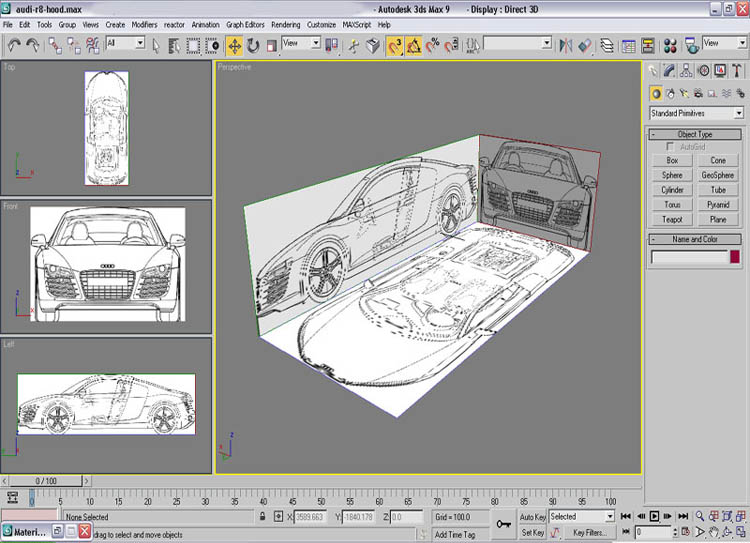
Here is a link to another one of my tutorials to help with the blueprint setup. Blueprintsetup tutorial.
Something you have to realize, is that vehicle modeling is not easy or simple. There is no certain way to model a vehicle. Some people use box modeling, others use polygonal modeling or poly modeling, some use NURBS modeling or spline modeling. What I will be using and my personal preference is poly modeling. That is where you extrude the edge of a polygon to form the shape that you want. There is not a certain place to start your modeling when modeling a vehicle. Some start at the hood, some at the front drivers side fenderwell, some at the rear, and some at the roof of the vehicle. I usually start at the front drivers side fender, however, that is just your personal preference.
To start polygonal modeling, I like to maximize the viewport that I will start off in. In this case, the Left viewport. You can maximize the viewport by right clicking anywhere in the viewport and hit the keyboard shortcut or “hotkey” ALT + W.
Now, the first thing I do is create a Line. I find the exact center of the wheel and create a line from the center and while holding shift so that the line contrains to the X axis, drag to the left. Next, you want to go to the Hierarcy tap in the main menu, and select Affect Pivot Point. You want to snap it to the start of the line that you created. Next you want to hold the Shift key and rotate the line in increments of 10 or 15 degrees for a full 180 degrees until you have something like the image below.

From here, using the lines that we created earlier as guides, create a poly where the ends meet the first two lines on either side like I have below.


GOING FROM PAGE1 TO 2 IS REALLY HARD TO UNDERSTAND MORE DETAILS PLEASE
Appreciate your efforts, but very difficult to follow