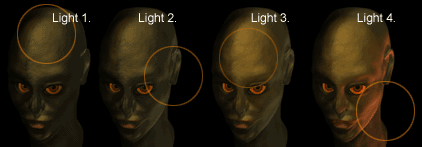
“Light on a female face ” by Glen Southern
SETTING THE SCENE

Firstly load the head model into your document and choose/make a material that has little specularity and a little colour bump. Colour it all over with a dark skin or bone colour. (fig.1)
3Dtutorials.sk recommendation:
To maximise the realism of your 3D rendering we recommend to use high quality human photo textures from the #1 texture website www.3D.sk
To help with the lighting effect you can darken the left hand side of the image by using a slightly darker shade of the same colour (COLOUR/MODIFIERS and click a darker shade). Make sure that you darken the side of the nose and the eye sockets. Try to imagine where you the light source will be coming from in the final image and only darken areas where light will not fall. (see fig. 2.). Put a little rouge on the lips with the same material and a red colour.
 Female head tool in ZTool format 500K
Tip: to shade the head use the SIMPLE BRUSH and a RGB INTENSITY of around 5-10 in the DRAW panel. This will allow you to build up the darker areas slowly. Make sure that `Z` is turned of or you will add depth as well as colour.Create a new layer (LAYER/INVENTORY/CREATE) for the eye balls. Either make a new eye ball (see tutorial) or download the example one from this page. On the new layer draw an eye into the document and postition it (Keyboard `R` to rotate, `W` to position ). Duplicate the eye for the second one and position that. (see Fig. 3)
ADDING THE LIGHTS
Now that the scene is set it`s time to start adding light. A default document gives you two light switched on at the start. We will call these 1.and 2. (figure 5) Click on the two light switches (named 3. and 4. in fig 5.). When the lights are TEAL (dark green/blue) they are switched on and will affect the image.
To start, click light 1. so that it is TEAL and has a white line around it (this makes it the active light and its parameters can be modified in the panel drop-downs below the switch). Click in the COLOR panel (on the other side of the screen and pick a cream colour. Then click in the light colour box (shown red in fig 5.) This makes the light a cream colour in your image (It will only show correctly when in BEST RENDER mode).-Set the LIGHT INTENSITY slider to .59
 figure 5.-Set the GLOBAL AMBIENT to between 5 and 8-Set the MODIFIERS/TYPE to SUN-Go to light sphere (top left of figure 5.) and drag the light cursor to the top centre of the image-Set the MODIFIERS/SHADOWS to a SHADOW INTENSITY of 60 and a SHADOW LENGTH of 200Now do the same for lights 2, 3 and 4 using the settings in the table below. NOTE: these settings are only a guide and you can drastically alter the image with a very small change in any of these settings. You could even try changing the TYPE of one or two of the lights to see what different effects can be achieved.LIGHT SETTINGS TABLE
Light color
Light intensity
Type
Lightposition
Shadow intensity
Shadow length
Light 1
Cream
.59
Sun
Top centre
60
200
Light 2
White
.30
Sun
Bottom right
75
50
Light 3
Orange
.50
Glow
Centre (on forehead)
30
300
Light 4
Red
.69
Sun or spot
Bottom left
80
50
The Global ambient should be set somewhere between 5-8
 figure 6.
-To conclude the image select RENDER/MODIFIERS and click RENDER SHADOWS-Click RENDER/BEST RENDER to see the result.
(c) Glen Southern, glen@southerngfx.co.uk


Latest Comments