“Importing models into ZBrush” by Glen Southern
GETTING STARTED
To begin this tutorial you will need a Poser model (or body part) that has been exported to a format that ZBrush recognizes, currently .OBJ or .DXF. ZBrush has it`s own native format (The ZTOOL or .ZTL) and once a mesh has been imported into ZBrush it can be saved in that format
3Dtutorials.sk recommendation:
To maximise the realism of your CG characters we recommend to use high quality photo references from the #1 reference website www.human-anatomy-for-artist.com
Begin in Poser and model your figure into the required stance or pose. I used poser 4 for the example here. Save the document as a native poser file with `save as` if you want to edit anything later. Now you can export the mesh to the required format. For this tutorial I chose Wavefront .OBJ

EXPORTING THE MESH 
In this tutorial I will be exporting only the upper torso, arms and head.
-Go to FILE>EXPORT and select Wavefront OBJ-Select SINGLE FRAME from the `Export range` dialog box that pops up.-A `HIERARCHY SELECTION` dialog box now gives you the option to select which body parts will be exported. Remove the check mark (little cross) next to everything you `do not` want included. For this tutorial I switched off everything below the hips and his eyeballs.
You will now be presented will the save dialog. Name the mesh and save it in a local directory on your machine. (I used tutman.obj)
If you wish to export the full mesh leave all items `checked` in the HIERARCHY SELECTION` dialog box.
NOTE: I turned off the eyes in this example as it is possible to create eyeball Ztools in ZBrush and place them on a separate layer.
IMPORTING INTO ZBRUSH
Importing meshes into ZBrush is easy and is achieved with the help of a `POLYMESH TOOL`.
-Launch the application and look for the TOOL panel (usually on the right-hand side of the screen). -The `POLYMESH TOOL` is the little star shape shown in the image opposite. If you can` t see it at first `click` into the biggest of the tool windows and a `popup` window with give you a selection of TOOLS to choose from. `Polymesh` will be there.
-Once selected this tool give you an range of options that the other tools don`t provide.

-Go to `INVENTORY`(1) then `IMPORT` (2).
-Use the import dialog to locate `tutman.obj` and select it.
-The mesh will be imported and you should see a small image in the tool window where the `star` was.
You now have a .OBJ mesh with unmodified geometry in ZBrush. What you do with it next depends on whether you want to reuse the mesh or just use it in ZBrush and not worry about geometry. The next step describes what to do to use the mesh in ZBrush.

ADDING GEOMETRY
-To model and shape the mesh in ZBrush you can now subdivide the mesh and add some `smoothing.
-In the TOOL>MODIFIERS panel select SMOOTH and drag the slider over to `1`. This sets the objects surface smoothness without changing polygons. Higher values smooth out larger portions of the mesh.
-To subdivide the mesh use TOOL>MODIFIERS>DEFORMATIONS>DIVIDE

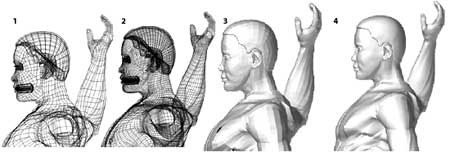
1. Imported unchanged mesh2. TOOL>MODIFIERS>DEFORMATIONS>DIVIDE mesh 3. Imported untouched model with basic material4. TOOL>MODIFIERS>DEFORMATIONS>DIVIDE shown with basic material.
-In the TOOL>MODIFIERS>DEFORMATION panel there is a second smooth button. This will average out the points to neighboring points and unlike the `first` smooth button, mentioned earlier, this one smooth the polygons
ZBRUSH IMPORT SUMMARY
This tutorial gives you the basic steps to get you started importing into ZBrush. There are a lot of different settings and modifiers that I have not touched on this time. Later tutorials will describe how to `stamp` or `snapshot` the model into a document, how to add ZBRUSH eyes and then on to texturing the models. A very different approach that that used in Poser or Bryce.

(c) Glen Southern, glen@southerngfx.co.uk


Latest Comments